Utilizing the For Loop in Kotlin:
To learn the usage of the Kotlin “for” loop in Ubuntu 20.04, you can take a look at the following five examples:
Example # 1: Printing the Days of a Week utilizing the For Loop in Kotlin:
In this example, we will teach you the method of printing the elements of an array by using the “for” loop in Kotlin. The example Kotlin script is shown in the image below:
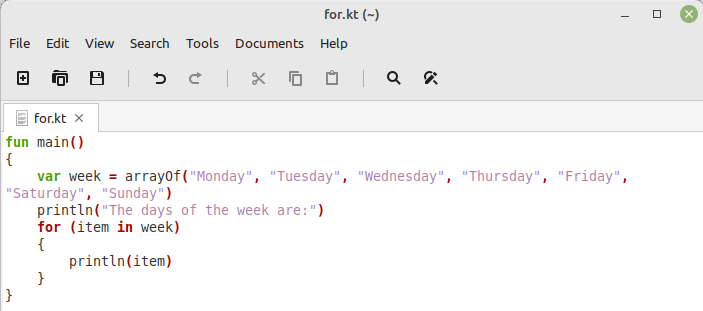
We have first created an empty document with the title “for.kt”. All the Kotlin scripts must have the “.kt” extension with their name. Then, within this document, we have defined the “main()” function with the “fun main()” statement. After that, we have defined an array of the days of the week with the title “week” by using the “arrayOf” keyword. We have assigned the names of all the days to this array as its elements. Then, we have displayed a message on the terminal. After that, we have used the “for” loop that iterates through all the items of this array, and within this loop, we have simply printed these items on the terminal.
Before we head on to the compilation of this Kotlin script, we first need to make sure that the Kotlin compiler exists on our Ubuntu 20.04 system. For doing that, we need to run the affixed command in the terminal:
![]()
The output shown in the image below will indicate the presence of the Kotlin compiler on Ubuntu 20.04:

Now, we can compile our Kotlin script with the following command:
![]()
This command will create a class file for your Kotlin script with the name “ForKt” i.e.; it will capitalize the first alphabet of the name of your Kotlin script file and also the “k” of the “.kt” extension. Moreover, the dot “.” will also be removed from the name. This will happen every time you will create a class file of your Kotlin script. To comprehend it in a better way, consider a Kotlin script file named “test.kt”. When you compile this Kotlin script file, the respective class file will be created with “TestKt.”
Now, to run the said class file, we will use the instruction presented below:
![]()
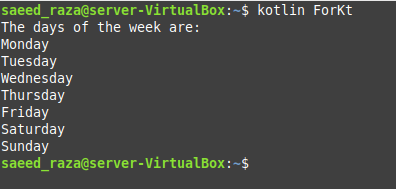
The output of our first Kotlin script is shown in the following image:
Example # 2: Printing the Elements of a Range in the Ascending Order utilizing the For Loop in Kotlin:
Now, we will create a Kotlin script for printing the elements of a given range in ascending order. We have used the script shown below for this purpose:
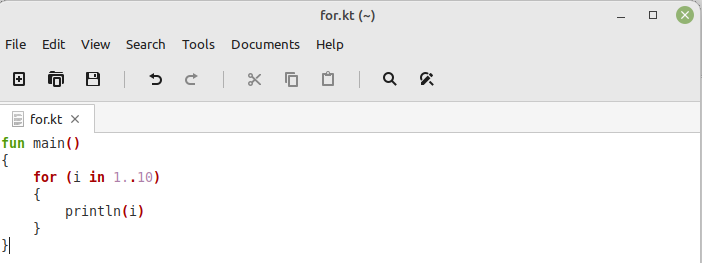
In this basic script, we have simply defined a “main()” function within which we have a “for” loop. We have assigned a range, i.e., 1 to 10, to this “for” loop to iterate over. Then, we just wanted to print the elements of this range on the terminal.
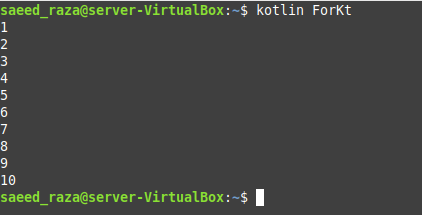
Upon execution, all the elements of the given range were displayed on the terminal as shown in the following image:
Example # 3: Printing the Elements of a Range in the Descending Order utilizing the For Loop in Kotlin:
In this example, we want to share with you a Kotlin script with which you can print the elements of a given range on the terminal in descending order. For that, we have used the Kotlin script shown in the image below:
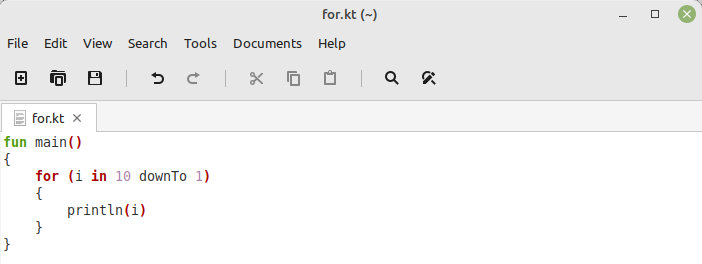
In this program, we have the same “for” loop that we have used in the example above. However, this time, instead of using the “i in 1..10” notation, we have used the “i in 10 downTo 1” notation for printing the elements of the given range in descending order.
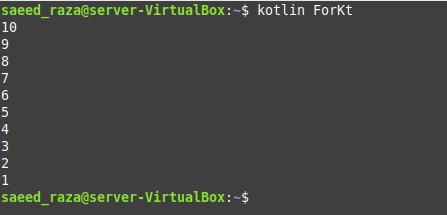
The elements of our given range in descending order are shown in the following image:
Example # 4: Printing the Elements of a Range in the Ascending Order utilizing the For Loop in Kotlin with Double Increment:
This example is somewhat similar to our second example, i.e., we want to print the elements of the range in ascending order. However, this time we want to print them with double increment. To do this, we have used the Kotlin script shown in the image below:
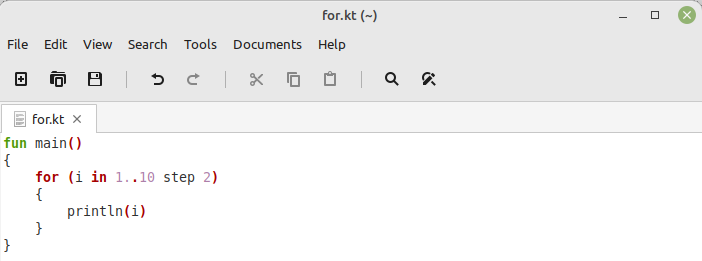
In this script, just like our second example, we have used the same “for” loop; however, we have only introduced the “step 2” notation in it for double increment. The remaining script is just the same.
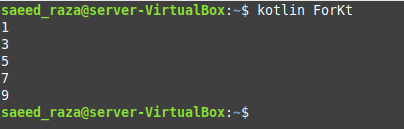
The output of this Kotlin script is shown in the following image:
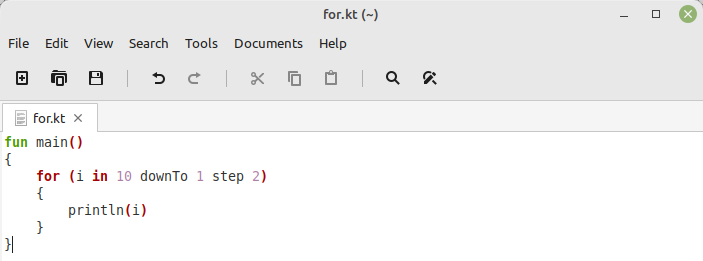
Example # 5: Printing the Elements of a Range in the Descending Order utilizing the For Loop in Kotlin with Double Decrement:
Again, this example is also similar to our third example; however, we will print the elements of our range in descending order with double decrement this time. The Kotlin script is shown in the image below:
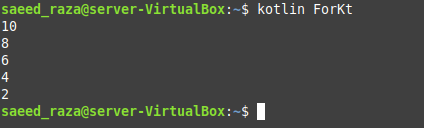
The output of our last Kotlin script is shown in the following image:
Conclusion:
This article was meant to build an understanding of the Kotlin “for” loop in Ubuntu 20.04. We first presented you to the basic purpose of this loop in this programming language, after which we shared with you five different examples that implemented its usage. Moreover, we also shared with you the methods of compiling and executing a Kotlin script in Ubuntu 20.04. After understanding these examples well, you will be able to use the “for” loops in Kotlin very effectively.