A practical method to automate the build and project management processes is to create and manage the Java projects with Makefile. Makefiles are frequently connected to C/C++ projects, while they are also a useful tool for Java projects. It helps to build a large Java project on your laptop computer. This guide provides a step-by-step tutorial to setup and manage the Java projects with a Makefile.
Prerequisites:
- Verify that your machine has Java Development Kit (JDK) installed.
- Set up a code-editing text editor or Integrated Development Environment (IDE).
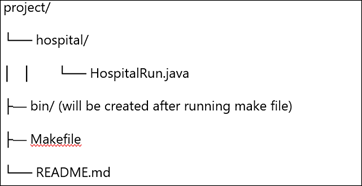
Project Structure
We organized our Java project into a directory structure that looks like this:
- Hospital(src)/: This is used to store your Java source code files.
- bin/: The compiled “.class” files are placed here.
- Makefile: This is the file where you define the build and project management tasks.
- md: This is an optional documentation.
Java Code
The straightforward Java application in the following provided code implements a hospital management system. Some fundamental Java principles are utilized. The import statements at the beginning of the program import the “java.util.ArrayList”, “java.util.List”, and “java.util.Scanner” classes. The functionality of the program can only be implemented using these classes.
Using the “HospitalRun” public class declaration, a new Java class with that name is created. The main logic for the program will be in this class. The PatientIdCounter, an integer type variable, and patientList, a static ListPatient>, are both specified as variables. All hospital patients are listed in the “patientList” variable which is also used to create a new patient’s ID. The program’s main method is defined. The core logic of the program is carried out in this section.
The statement for the Scanner object creates a new Scanner object. This object is used to accept the prompt user input. The while (true) loop ensures that the software’s main menu is shown continually until the user chooses the “Exit” option. The user’s selection from the main menu is handled with the switch (choice) statement. The related menu items are implemented by calling the registerPatient(scanner) and viewAllPatients() functions. The other cases also display the messages according to situations.
import java.util.List;
import java.util.Scanner;
public class HospitalRun {
private static List<Patient> patientList = new ArrayList<>();
private static int patientIdCounter = 1;
public static void main(String[] args) {
Scanner scanner = new Scanner(System.in);
while (true) {
System.out.println("\nHospitalRun - Main Menu");
System.out.println("1. Register a New Patient");
System.out.println("2. View All Patients");
System.out.println("3. Exit");
System.out.print("Enter your choice: ");
int choice = scanner.nextInt();
scanner.nextLine(); // Consume the newline character
switch (choice) {
case 1:
registerPatient(scanner);
break;
case 2:
viewAllPatients();
break;
case 3:
System.out.println("Exiting HospitalRun. Goodbye!");
return;
default:
System.out.println("Invalid choice. Please try again.");
}
}
}
A new patient is registered at the hospital using the registerPatient() function. The user is prompted to provide the patient’s information, after which a special ID is generated for the new patient, and they are added to the patient list. A list of all patients that is registered with the hospital is displayed via the viewAllPatients() function.
The patient list is iterated over, and the console is printed with each patient’s information. A patient is a basic class that is represented by the “Patient” class. The “P id” and “P name” are its two fields. It also offers two getter methods for these fields. The HospitalRun class’s basic() function shows the user with a menu and asks them to select anything.
A new patient may be registered, all patients may be seen, or the program may be closed. The chosen method is called, following the user’s selection. The user is requested to input the patient’s name if they decide to register a new patient. The user is informed that the registration is successful after the patient has been registered. A list of all registered patients is shown if the user opts to view all patients. By choosing “Exit”, the user can leave the software at any moment.
System.out.print("Enter patient name: ");
String p_name = scanner.nextLine();
Patient patient = new Patient(patientIdCounter++, p_name);
patientList.add(patient);
System.out.println("Patient registered successfully!");
}
private static void viewAllPatients() {
System.out.println("\nList of Patients:");
for (Patient patient : patientList) {
System.out.println("Patient ID: " + patient.getPId() + ", Name: " + patient.getPName());
}
}
}
class Patient {
private int p_id;
private String p_name;
public Patient(int p_id, String p_name) {
this.p_id = p_id;
this.p_name = p_name;
}
public int getPId() {
return p_id;
}
public String getPName() {
return p_name;
}
}
Create a Makefile
In the current directory of the project, open a text editor and build a Makefile. An array of all the Java files located in the SRC_DIR directory is defined in the first line as the JAVA FILES variable. To locate all files with the “.java” extension, the wildcard function is utilized. The “all” target which is the default target, is defined in the next line. This indicates that the “all” target is performed if the “make” command is issued without a target specification.
All of the Java files in the SRC_DIR directory must be present for the “all” target to function. So, until all of the Java files are built, the entire target won’t be deemed finished. The BIN_DIR folder is created in the first line when it does not yet exist. All of the Java files in the SRC_DIR folder are compiled in the second line, which then stores the finished code in the BIN_DIR folder. The symbol denotes the list of all the target’s dependencies which are Java files in the SRC_DIR directory. The BIN_DIR directory contains all of the built code which is removed using the “clan” target.
To execute the HospitalRun class, use the “run” target. The classpath, or directory, is where the Java compiler can locate the compiled code, and the -cp choice sets the classpath. “Make” is instructed not to look for a file with the “all”, “clean”, or “executed” names by the “Phony” target. The three objectives that are defined by this code are all, clean, and run. The BIN_DIR directory receives the compiled code from all targets which compiles every Java file in the SRC_DIR directory. The “clean” target completely removes the BIN_DIR directory’s compiled code. The “run” target executes the HospitalRun class.
SRC_DIR = hospital
BIN_DIR = bin
JAVA_FILES = $(wildcard $(SRC_DIR)/*.java)
all: $(JAVA_FILES)
@mkdir -p $(BIN_DIR)
$(JAVAC) -d $(BIN_DIR) $^
clean:
del /q bin\*.*
run:
java -cp $(BIN_DIR) HospitalRun
.PHONY: all clean run
Execute the Makefile
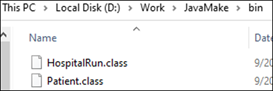
Open your command prompt and navigate to the project directory. Execute the “make” instruction to compile your Java code. This creates the “.class” files in the “bin/” directory.

You can look for these files in the “bin” folder.
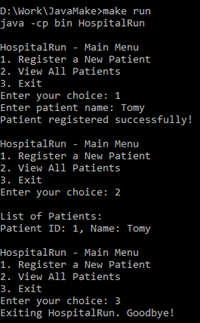
Use the “make” instruction to execute with a “run” target to execute your Java program. The menu is opened to select one option. We selected different choices every time according to our needs, and the Java program displays the output accordingly.
Clean Build
To start over and delete all created executable files, use “MAKE” clean. You may add additional targets to the Makefile as your project expands to do activities like producing documentation, testing, or JAR files.
![]()
Conclusion
Within this guide, we demonstrated how a Java project can be built using makefiles. We used the hospital management system as our Java code and makefile to build its executables to demonstrate that. The output for the Java project displays a menu of options to be selected from and the outputs accordingly.