This tutorial’s objective is to demonstrate a few of the straightforward networking-related tasks that can be completed rapidly and effortlessly by using the IP utility along with the monitor keyword.
Let’s get started with the implementation of this topic in the Ubuntu 20.04 Linux operating system. For this, you need to log in from your Linux system and launch the terminal shell on it. Most of our commands would be executed on the Linux shell. To open the shell terminal, you can try the shortcut “Ctrl+Alt+T” on your Linux screen after the successful login.
After the successful launch of the terminal shell, we need to update our system to make it bug-free and for the smooth execution of the rest of the instructions on the shell. So, we will utilize the apt package of Linux to update our system within the “update” instruction starting with the keyword “sudo” to make use of “sudo” rights. Tap on the “Enter” key after writing this command on the shell terminal of Ubuntu 20.04 to execute it. Your system will be updated in a while according to your system requirement.
After the successful update of our Linux system, we will take a look at the use of the simple “ip” instruction in the Ubuntu 20.04 Linux operating system. For this, write “ip” in the instruction area of your shell and tap on the “Enter” key. It shows the simple format of using this instruction, i.e. IP keyword followed by the options and its object. Also, it shows the options to use for this command, i.e. “–force” option to force some execution of a command. The “–batch” option is used with some Bash file usage in this command. Also, it shows some of the objects that are used to get the particular information regarding the IP. Check out the command along with the output in the following cited image:
You may learn a great deal about each of your network connection devices by using the command IP addr show. Our wireless Ethernet card (enp0s3) in this instance has the IPv4 address (10.0.2.15/24 in the inet column). The /24 indicates that each IP throughout this subdomain will retain the same 24 bits of the total 32 bits which make up its IP address. The subnet’s IP addresses fall between 10.0.2.0 and 10.0.2.254. The subnet’s broadcast IP, 10.0.2.255 (the brd column following the IP address), is set aside for broad communication to all the servers on the network. Check out the command along with the output in the following cited image:
Along with that, you can also see the single record for the particular device data within the IP instruction via the use of the following instruction in the image:
The local host uses the topology table to assist the internet traffic in determining its destination. It includes a series of directional markers that direct the traffic to a particular interface and the next halt on the route. On a particular host, there seems to be two commands. But if you operate any virtual machine instances or containers, they will have their very own IP addresses as well as subnet masks, which may render these routing tables rather intricate. Deliver the local traffic via the local Ethernet, and the network switches would determine where it should be routed by utilizing the ARP protocol to identify which host holds the target IP address.
Transmit the internet traffic towards the nearby gateway node, which would have a deeper understanding of how to reach the target. The very first row in the following scenario stands in there for the host’s exterior gateway for the outside traffic. The second phrase is for the regular traffic. Check out the command along with the output in the following cited image:
It’s time to utilize the IP monitor command on the shell to get the statistics of our IP address. We use it on the shell command area and pressed “Enter”. It shows us the IP address of our device named “enp0s3” along with its three states. The STALE shows that the previous neighbor cannot be reached now. The Probe state shows that the neighbor cannot be reached. To confirm the reachability, Unicast Neighbor Solicitation queries are indeed issued. The state REACHABLE shows that the neighbor is reachable. Check out the command along with the output in the following cited image:
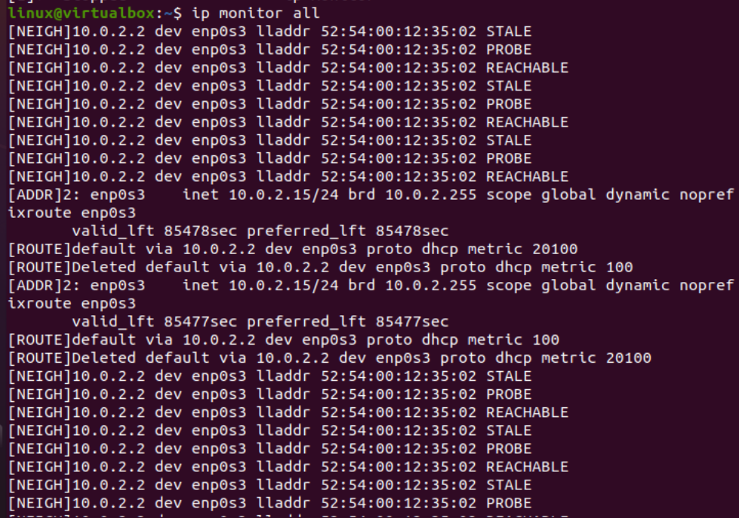
When combined with all, the IP monitor would notify you of any changes, preceded with [LINK] for the network adapter modifications, [ROUTE] for the adjustments to a forwarding table, [ADDR] for the IP address modifications, or [NEIGH] for the changes relating to neighboring ARP addresses. Additionally, you may keep track of alterations to certain items. The following output of the IP monitor command with the “all” keyword is displayed below. It shows the statistics of device states along with some extra information that are provided below the lines. Check out the command along with the output in the following cited image:
Conclusion
This article is all about the use of the different IP instructions of Linux to get the statistics and information regarding the network devices in Ubuntu 20.04 operating system. We utilized the IP address with “addr show”, “route list”, “monitor”, and “monitor all” keywords. The use of this IP command in different ways shows the device states along with the other statistics.


