Linux has many commands to work with multiple terminals from a single window which is called a terminal multiplexer. Multiple tasks can be performed from a single screen by dividing the screen into multiple panes by a terminal multiplexer. Tmux is one of the terminal multiplexers of Linux to speed up the terminal tasks. This tool is installed by default in the latest version of the Linux operating system (ex-Ubuntu 20+). The uses of this tool are shown in this tutorial.
Open the Tmux Window
Run the following command to open the default tmux window:
The following window appears with the default command prompt after executing the tmux command. You don’t need to have the root privilege to use the tmux command like the screen command. The default session name is 0 which is shown in the bottom-left corner of the window. The default window name is Bash and the active window is indicated using the “*” symbol:
Open a Tmux Window with the Session and Window Names
A new session can be created using the tmux new-session command with the -s option. Run the following command to open the tmux window with the session named myssesion:
The following window appears after executing the previous command that contains the session named mysession0 and the default window named Bash:
You can change the default window name of the tmux window. Run the following command to open the tmux window with the session named myssesion and the default window named mywindow:
The following window appears after executing the previous command that contains the session named mysession0 and the default window named mywindow:
Print the List of Tmux Windows
The “tmux ls” or “tmux list-sessions” command can be used to print the list of tmux windows. Run the following command to print the list:
The following output appears after executing the previous command. The output shows that two tmux windows are attached:
Rename a Tmux Session
Run the following command to check the existing list of the tmux sessions:
Run the following command to rename the default tmux session with the name, mysession:
Run the following command to check whether the tmux session name is changed properly or not:
The following output shows that there is only one tmux session named 0 that is renamed with the name, myssesion:
Split the Tmux Area Vertically
A single terminal window is opened for the default tmux session. Open the on-screen keyboard and press the following keys to divide the tmux window vertically:
Ctrl + b + %
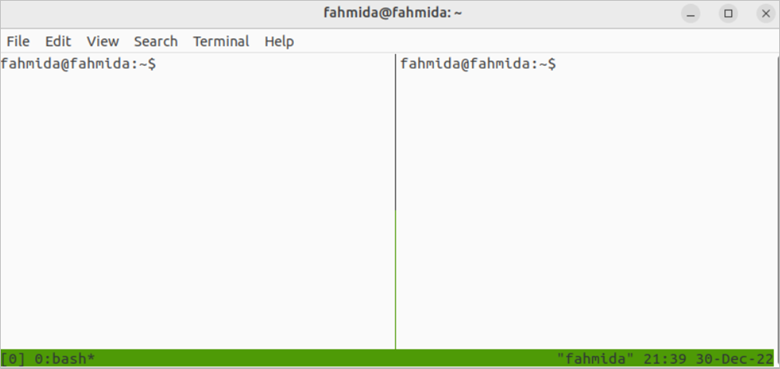
The tmux window looks like the following image where the tmux area is evenly divided into two parts vertically. The screen contains two parts:
Split the Tmux Area Horizontally
Open the on-screen keyboard and press the following shortcut keys to divide the left tmux window horizontally which was created in the previous command:
Ctrl + b + “
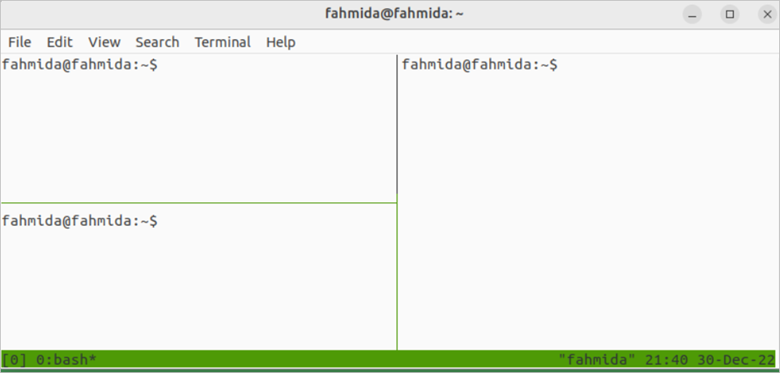
The tmux window looks like the following image where the left-side tmux area is evenly divided into two parts horizontally. The screen contains three parts:
Switch Between the Tmux Area
If the tmux window is divided into multiple parts, it requires switching between the tmux areas. Open the on-screen keyboard and press any of the following shortcut keys to switch between different tmux areas:
Ctrl + b + left arrow ( ← ) key [ It is used to switch from the left area ]
Or
Ctrl + b + right arrow ( → ) key [ It is used to switch from the right area ]
Or
Ctrl + b + up arrow ( ↑ ) key [ It is used to switch to the previous area ]
Or
Ctrl + b + down arrow ( ↓ ) key [ It is used to switch to the next area ]
Detach the Tmux Area or Window
To close a tmux window or the tmux area, you have to select the window or the particular area. Next, open the on-screen keyboard and press the following shortcut keys to close the window or the particular tmux area:
Ctrl + b + d
Attach to a Tmux Session
Any tmux session can be attached using the “tmux attach-session” command with the -t option. Run the following command from the terminal to attach the tmux session named mysession:
Terminate the Particular Tmux Session
Any tmux session can be terminated using the “tmux kill-session” command with the -t option. Run the following command to terminate the tmux session named mysession:
Run the following command to check the existing list of the tmux sessions after terminating any tmux session:
The following output appears if all tmux session are terminated:
TMUX Video Tutorial
Conclusion
The basic uses of the tmux command are described in this tutorial by creating multiple tmux sessions. There is another command in Linux to do the same task as the tmux command which is the screen command. But there are some differences between these two commands. The tmux window contains the status bar that contains the session name and the window name but the screen window does not contain this type of information. The screen command requires root privileges to work but tmux command does not require the root privileges. Each area of the tmux window contains the command prompt after dividing the window horizontally or vertically but the screen window does not. So, it can be said that the tmux command is more convenient than the screen command.


