Zeek, previously known as Bro, is a Network Security Monitor (NSM) for Linux. In fact, Zeek passively monitors network traffic. The best part about Zeek is that it is open-source and thus completely free. Further information about Zeek can be found at https://docs.zeek.org/en/lts/about.html#what-is-zeek. In this tutorial, we’ll review Zeek for Ubuntu.
Required Dependencies
Before you can install Zeek, you need to ensure that the following are installed:
- Libpcap (http://www.tcpdump.org)
- OpenSSL libraries (https://www.openssl.org)
- BIND8 library
- Libz
- Bash (for ZeekControl)
- Python 3.5 or greater (https://www.python.org/)
To install the required dependencies, type the following:
Next, as per the instruction on their website, there are many ways to obtain the Zeek package: https://docs.zeek.org/en/lts/install.html#id2. Further, depending on the OS you’re on, you can follow the instructions. However, on Ubuntu 20.04, I did the following:
1. Go to https://old.zeek.org/download/packages.html. Find “packages for the latest LTS release build here” at the bottom of the page, and click on it.
2. It should take you to https://software.opensuse.org//download.html?project=security%3Azeek&package=zeek-lts. There is a choice of OS for which Zeek is available. Here, I clicked on Ubuntu. It should give you two choices – (i) add the repository and install manually, or (ii) grab binary packages directly. It is very, very important that you stick to your OS version! If you have Ubuntu 20.04 and use the code provided for Ubuntu 20.10, it won’t work! Since I have Ubuntu 20.04, I will write out the code I used:
curl -fsSL https://download.opensuse.org/repositories/security:zeek/xUbuntu_20.04/Release.key | gpg --dearmor | sudo tee /etc/apt/trusted.gpg.d/security_zeek.gpg > /dev/null
sudo apt update
sudo apt install zeek-lts
Mind you, the installation itself will take some space and lots of time!
Here, there’s a simpler way of installing it from github as well:
./configure
make
make install
In this case, make sure that all the pre-requisites are up-to-date! If a single pre-requisite is not installed in its latest version, then you’ll have a horrible time with this. And do one or the other, not both.
3. The latter should install Zeek onto your system!
4. Now cd into the zeek folder located at /opt/zeek/bin.
5. Here you can type the following for help:
With the help command, you should be able to see all sorts of info about how to use zeek! The manual itself is quite long!
6. Next, navigate to /opt/zeek/etc, and modify the node.cfg file. In the node.cfg file, modify the interface. Use ifconfig to find out what your interface is, and then just replace that after the equal sign in the node.cfg file. In my case, the interface was enp0s3, so I set the interface=enp0s3.
It would be wise to also configure the networks.cfg file (/opt/zeek/etc). In the networks.cfg file, choose the ip addresses that you wish to monitor. Put a hashtag next to the ones that you would like to omit.
7. We have to set the path using:
source ~/.bashrc
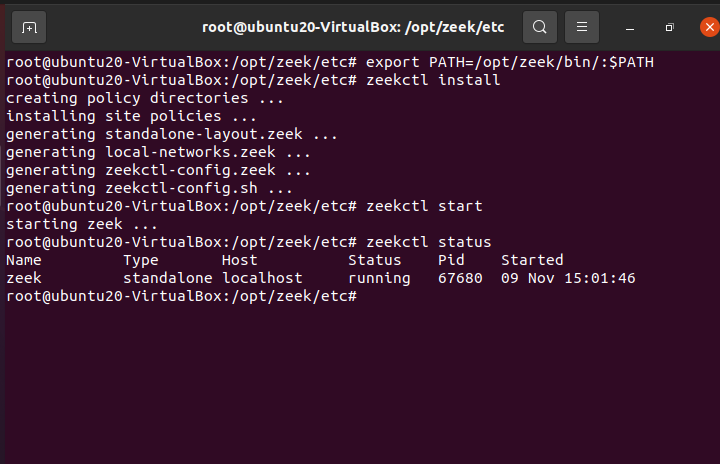
8. Next, type ZeekControl and install it:
9. You can start zeek using the following command:
You can check the status using:
And you can stop zeek using:
You can exit by typing:
10. Once zeek has been stopped, log files are created in /opt/zeek/logs/current.
In the notice.log, zeek will put those things that it considers odd, potentially dangerous, or altogether bad. This file is definitely worth noting because this is the file where inspection-worthy material is placed!.
In the weird.log, zeek will put any malformed connections, malfunctioning/misconfigured hardware/service, or even a hacker trying to confuse the system. Either way, it’s, at the protocol level, weird.
So even if you ignore the weird.log, it is suggested that you do not do so with the notice.log. The notice.log is similar to an intrusion detection system alert. Further information about the various logs created can be found at https://docs.zeek.org/en/master/logs/index.html.
By default, Zeek Control takes the logs it creates, compresses them, and archives them by date. This is done every hour. You can change the rate at which it’s done via LogRotationInterval, which is located in /opt/zeek/etc/zeekctl.cfg.
11. By default, all logs are created in a TSV format. Now we’re going to turn the logs into JSON format. For that, stop zeek.
In /opt/zeek/share/zeek/site/local.zeek, add the following:
@load policy/tuning/json-logs
12. Further, you can write scripts to detect malicious activity yourself. Scripts are used to extend the functionality of zeek. This allows the administrator to analyze network events. In-depth information and methodology can be found at https://docs.zeek.org/en/master/scripting/basics.html#understanding-scripts.
13. At this point, you can use a SIEM (security information and event management) to analyze the data collected. In particular, most SIEMs that I’ve come across use the JSON file format and not TSV (which is the default log files). In fact, the produced logs are great, but visualizing them and analyzing them is a pain! This is where SIEMs come into the picture. SIEMs can analyze data in real-time. Further, there are many SIEMs available on the market, some are pricey, and some are open source. Which one you pick is completely up to you, but one such open source SIEM that you might want to consider is Elastic Stack. But that’s a lesson for another day.
Here are some sample SIEMs:
- OSSIM
- OSSEC
- SAGAN
- SPLUNK FREE
- SNORT
- ELASTICSEARCH
- MOZDEF
- ELK STACK
- WAZUH
- APACHE METRON
And many, many more!
Zeek, also known as bro, is not an intrusion detection system but rather a passive network traffic monitor. In fact, it’s classified not as an intrusion detection system but rather a Network Security Monitor (NSM). Either way, it detects suspicious and malicious activity on networks. In this tutorial, we learned about how to install, configure, and get Zeek up and running. As great as Zeek is at collecting and presenting data, it is nonetheless a large amount of data to sift through. This is where SIEMs come in handy; SIEMs are used to visualize and analyze data in real-time. However, we’ll save the pleasure of learning about SIEMs for another day!
Happy Coding!

