The ‘tree’ command is used for listing the files of a directory in a tree-like structure. Most people use the basic ‘ls’ command and are unaware of the ‘tree’ command. The advantage of using ‘tree’ command is that it gives a very structured listing of a directory in a very graspable and simple way.
‘Tree’ is available for major operating systems like Windows, Linux or Unix and MacOS.
What will we cover?
In this guide, we will show you how to use the ‘tree’ command on Linux. We will also see how it can be installed on different Linux distros. Let’s start to explore the ‘tree’ command.
Prerequisites
1. Basic knowledge of using Linux terminal.
2. ‘sudo’ privileges and internet connectivity.
Installing Tree command on Linux
‘Tree’ is available for most Linux distros and can be installed using the package manager of these distros.
Installation of ‘Tree’ on Ubuntu
The ‘tree’ package provides the ‘tree’ command on Ubuntu and can be installed using the regular ‘apt install’ command. You can check the various details of this package like dependencies, version, description using the command ‘apt show tree’. To install ‘tree’ on Ubuntu, use the command:
Installation of ‘Tree’ on Fedora (RedHat based)
‘Tree’ can also be installed on Fedora. For this run the command:
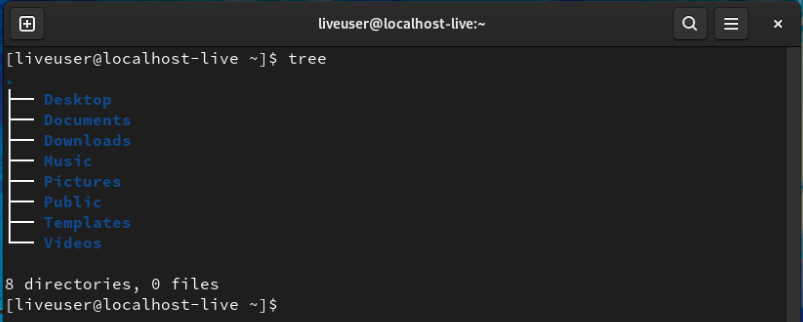
We have tested it on Fedora 35 and below is the screenshot of ‘tree’ command in action:
Installing The Tree Command for Linux using Snapcraft
The Snap software repository also provides a snap package for the ‘tree’ command. With Snap, applications come pre-packaged with all their dependencies. These run on all the major Linux distros. These applications are hosted on Snap Store. Snap comes pre-installed on many Linux distros (Ubuntu, Solus, Manjaro etc.), if it is not installed by default (Arch, Debian, Fedora), use the distribution specific command to install it.
Let us suppose that you have already installed Snap on your distribution, let us continue with installation of ‘tree’ using Snap. Once the Snap is installed on your system, you can simply use the below command to install ‘tree’:
Note: If on planet your distribution does not have the ‘tree’ command, you can still list your directories and files in a tree-like structure. This can be achieved by using the below command/script:
You can see how scary the above command is which is built by using the ‘ls’ command.
Using the ‘tree’ Command
When there is no argument passed to ‘tree’, it will print the contents of the current directory. When proper arguments are passed to ‘tree’ it lists the contents of the target directory. After listing the directories, it prints the total number of directories and files in that directory. The syntax structure of ‘tree’ is as follows:
Below, we have listed down some of the options (arguments) that the ‘tree’ command uses. We have performed this guide on Ubuntu 20.04:
1. Printing the help message and usage of tree command
–help: Prints the usage of various options (including the ones we have listed here).
2. Displaying the version
–version: Prints the version of the tree installed on your system.
3. Listing all the files
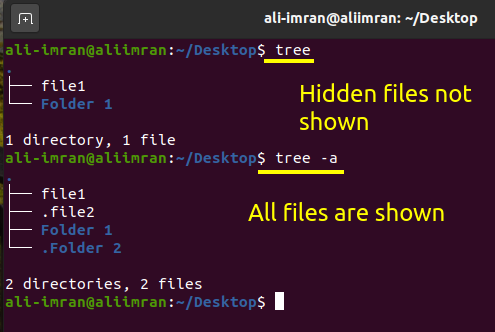
-a: Shows all the files in the output including the hidden one.
4. Listing the directories
-d: Prints only the directories.
5. Path Prefix
-f: Outputs the complete path prefix for every file.
6. Printing the permissions
-p: Show the permission of files and folders (similar to ls -l):
7. Matching Pattern
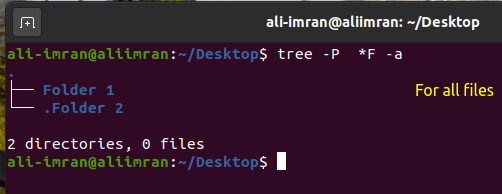
-P: Displaying those files which match a particular wildcard pattern.
8. Deciding the depth of directories in the output list
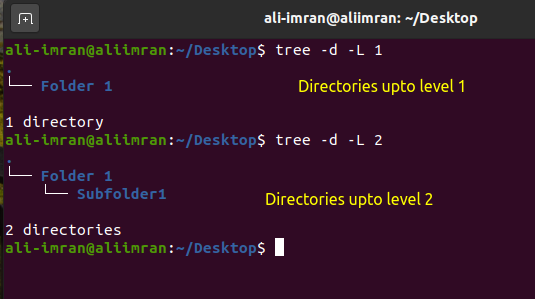
We can also control the depth or level of directories to be displayed in the output:
9. Displaying the size
a) We can display the size of each file alongside its name as shown here:
b) The above printed sizes are not much easy to interpret. Let’s make it more human friendly by using the ‘-h’ switch:
10. Printing the modification date
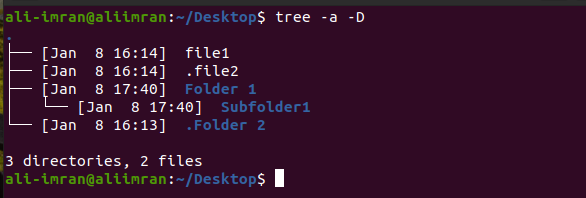
We can also print the date when the file was last modified with the ‘-D’ option:
11. Sorting the output
a) To arrange the listing of files in reverse alphabetical order, use the ‘-r’ switch:
b) To sort the output based on last modification time, use the ‘-t’ argument:
More to learn…
There are still many options available to play with the ‘tree’ command, but we are finishing it here. This guide is just scratching the surface of where we can go with the ‘tree’ command. To get a more insight into the usage of the ‘tree’ command, use the man pages.


