
In this article, we will explore how to get started with the Rust programming language by installing the Rust compiler on Ubuntu.
Step 1: Update System
Keep in mind that we tested the installation instructions on Ubuntu 20.04 and Debian 11. However, the installation instructions should work on any Debian-based distribution.
Before installing the Rust language, we need to ensure our system packages and repositories are updated.
We can do this with a simple, apt command as follows:

Press Y to accept the installation and updating of the packages to your system.
Step 2: Install Rust
Once we have our system updated and ready, we can install the Rust compiler. It is good to note several ways to install Rust on your system. The best is to use the Rustup installer script.
Open the terminal and enter the command provided below:
The previous command will download the installer script and execute it. The rustup utility allows you to manage multiple installations of the Rust compiler, including beta and nightly releases. Once you execute the previous command, get an output as shown below:
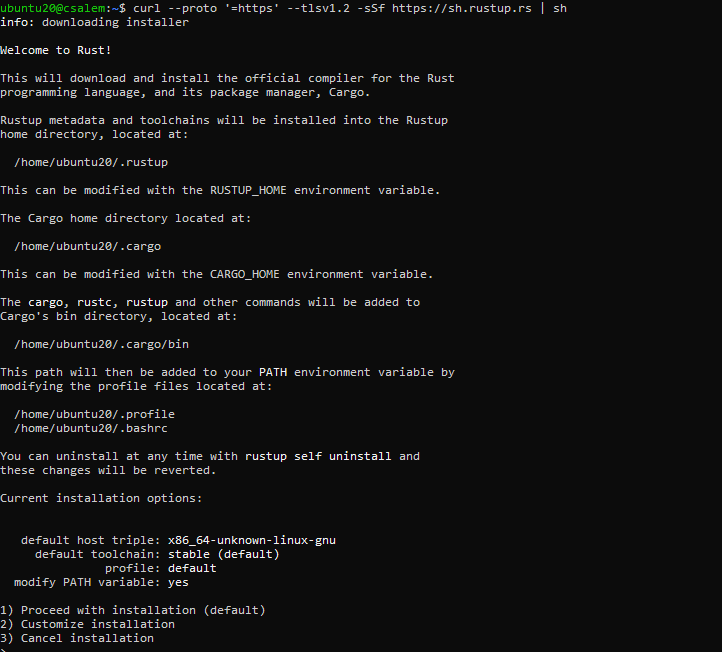
Press 1 to begin the installation process. The installer will prompt you for various options.
Unless you need to customize and configure the Rust compiler, the default options should work for most users.
Once the installation is complete, add the Rust development environment to your system path using the source command as:
The ~/.cargo/bin directory holds the tools for Rust development, including the rustc command, rustup, cargo, etc.
Run the following command to verify that Rust is successfully installed:
The command should return the installed version of the Rust compiler. If you get an error, try re-installing the compiler and export the path to the .cargo directory. You may need to restart your terminal session to apply the changes.
Step 3: Hello World
To test if you have successfully installed Rust on your system, create a test project. For this, we can use the cargo command as follows:
The previous command will create a new cargo package inside the current working directory. Navigate into the hello_world/src directory and run the command:
The previous command will execute the code stored in the main.rs file inside the source directory.
Step 4: Uninstall Rust
If you want to remove the Rust compiler from your system, you can use the installer using the following command:
Conclusion
In this guide, we explored how we can set up the Rust compiler in Ubuntu or any Debian-based distro. Rust is an open-source language that provides high-performance with low-level control. We hope you found this article helpful. Check the other Linux Hint articles for more tips and information.