PyTorch is the essential framework for Machine Learning models and its many subsidiaries allow users tailored features for all kinds of applications. The “PyTorch Geometric” is an additional library that brings new functionality to PyTorch. Geometric is used with the handling of visualizing data by graphs and models based on graphical data.
In this blog, the spotlight will be on how to Install PyTorch Geometric.
What is PyTorch Geometric and What are its Important Features?
The “Torch” library can handle graphs by itself but only on a small scale as compared to the “Geometric” library. The enhanced features include the ability to visualize complex models as well as handle large volumes of data. Geometric comes packed with previously trained models that are ready for use straight out of the box.
Some of the key features of PyTorch Geometric are listed below:
- Geometric can efficiently handle graphs for large volumes of complex data.
- It has a lot of features for “preprocessing data for graphs”.
- There are also “sample datasets” present for users to test out graphs and how to handle them properly.
- Geometric is also used for making deep learning models based on the “graph neural network architecture”. It provides trained models for developers to ascertain the different aspects of graphs.
- Geometric is based on PyTorch and this provides “seamless integration” into the framework.
How to Install PyTorch Geometric in Colab?
PyTorch Geometric needs to be installed into the project before its remarkable features can be put to use in machine learning models. The Google “Colaboratory” IDE is an excellent choice because it provides GPU access for programmers.
Follow the steps given below to learn how to install PyTorch Geometric in Google Colab:
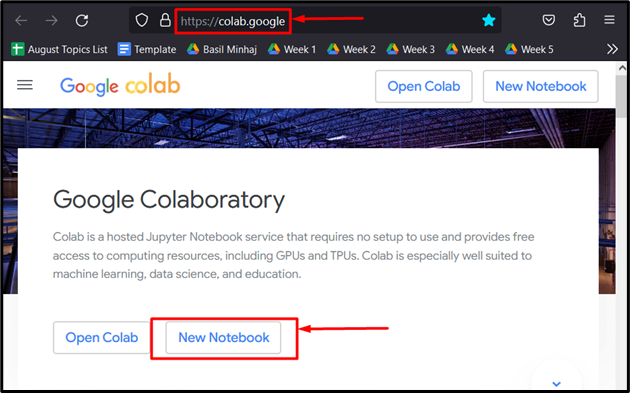
Step 1: Open a New Colab Notebook
The first thing to do is to go to the Colaboratory website and click on the option to open a “New Notebook” as shown:
Step 2: Install the Torch and Geometric Libraries
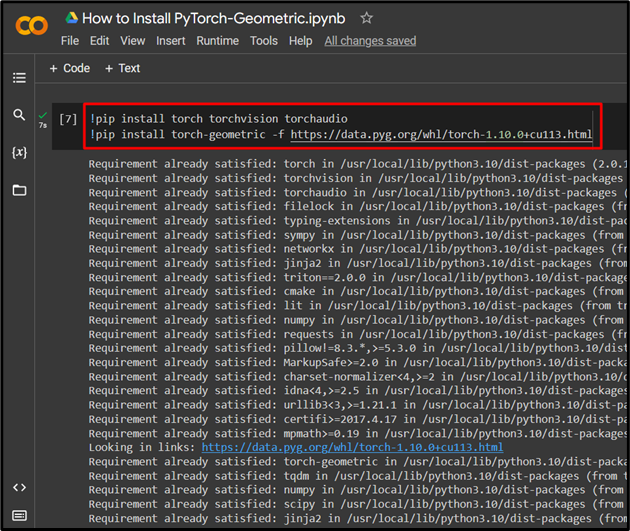
The required libraries must be installed at the start of any PyTorch project. In this example, the “Torch” and “Geometric” libraries are installed as shown:
!pip install torch-geometric -f https://data.pyg.org/whl/torch-1.10.0+cu113.html
The code given above works as follows:
- The exclamation mark “!” is used to run shell commands to install packages and libraries.
- “pip” is a package installer in Python.
- Torch and torchvision are both libraries for PyTorch.
- The PyTorch-Geometric is called by the “torch-geometric” library.
- The “-f” option in Colab is used to specify a web link to download dependencies for proper installation:
Note: You can access our Google Colab Notebook at this link.
Pro-Tip
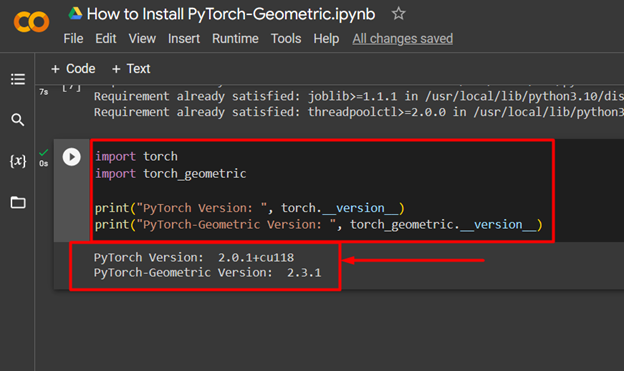
One extra step in the installation of PyTorch-Geometric is to “verify” the procedure. Do this by checking the version of both PyTorch and PyTorch-Geometric in Colab. For this purpose, use below code:
import torch_geometric
print("PyTorch Version: ", torch.__version__)
print("PyTorch-Geometric Version: ", torch_geometric.__versio
The above code works as follows:
- Use the “import” command to import both libraries into the project.
- Use the “print()” method to showcase the version of both libraries in the output.
- Then, use the “torch.__version__” method to check the version of PyTorch.
- Lastly, use the “torch_geometric.__version__” method to check the version of PyTorch-Geometric.
The output shows that we have PyTorch-Geometric version “2.3.1”:
Success! We have just shown how to install PyTorch-Geometric and verify its installation.
Conclusion
Install PyTorch-Geometric in a Google Colab project by using the pip installation package and a website link to install the required dependencies. This library can provide the added functionality to run models based on the graph neural network architecture. In this article, we showcased how to install the PyTorch-Geometric library from an online URL.


