
Lshw is a Linux command-line tool to find an information on the installed hardware of your computer/server. Lshw can report the motherboard/mainboard, CPU, memory, disk, PCIE, USB, and other hardware information.
Lshw is available on every Linux distribution out there. So, you can use the same tool to find the required hardware information on every Linux distribution.
In this article, we will show you how to install lshw on popular Linux distributions and use it to find the hardware information.
Topic of Contents:
- Installing Lshw on Ubuntu/Debian/Linux Mint/Kali Linux
- Installing Lshw on Fedora/RHEL/AlmaLinux/Rocky Linux/CentOS Stream
- Listing the Available Hardware with Lshw
- Filtering the Lshw Output with Hardware Class
- Finding the Detailed Hardware Information with Lshw
- Hiding Sensitive Information from the Lshw Output
- Displaying the Numeric IDs for PCIe and USB Devices
- Removing the Volatile Timestamps from the Lshw Output
- Exporting the Hardware Information Using Lshw
- Example 1: Finding the Installed GPUs of Your Computer/Server with Lshw
- Example 2: Finding the Chipset of the Network Devices/Interfaces with Lshw
- Conclusion
- References
Installing Lshw on Ubuntu/Debian/Linux Mint/Kali Linux
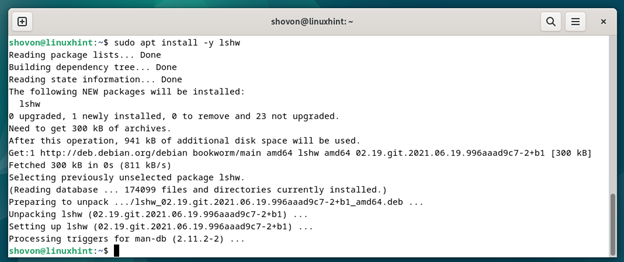
Lshw is available in the official package repository of Ubuntu/Debian/Linux Mint/Kali Linux. So, you can install it easily on your computer/server.
First, update the APT package repository cache with the following command:

To install lshw, run the following command:
Lshw should be installed on your Ubuntu/Debian/Linux Mint/Kali Linux system.
Installing Lshw on Fedora/RHEL/AlmaLinux/Rocky Linux/CentOS Stream
Lshw is available in the official package repository of Fedora/RHEL/AlmaLinux/Rocky Linux/CentOS Stream. So, you can install it easily on your computer/server.
First, update the DNF package repository cache with the following command:
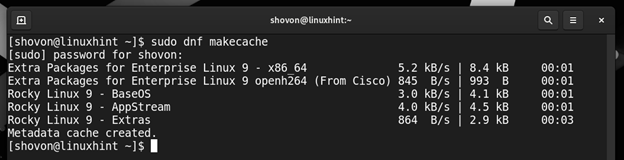
To install lshw, run the following command:
To confirm the installation, press “Y” and then press <Enter>.

Lshw should be installed on your Fedora/RHEL/AlmaLinux/Rocky Linux/CentOS Stream system.

Listing the Available Hardware with Lshw
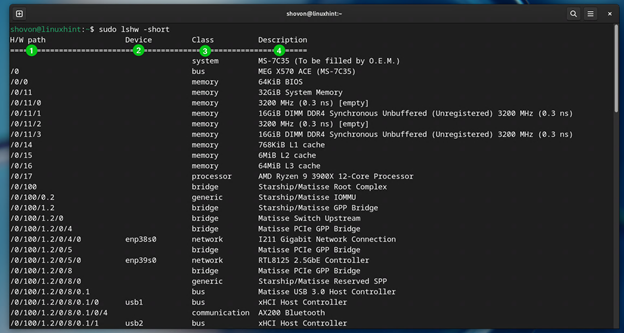
You can list all the available hardware of your computer/server with lshw as follows:
All the available hardware of your computer/server should be listed in a nice format.
You will find the following information here:
- H/W path: This is the physical path of the hardware that is installed on your computer/server. Here, /0 is the motherboard, /0/100 is the processor (connected to the motherboard), /0/100/<anything> is the hardware that is connected to the processor lanes, and so on.
- Device: This is the kernel-assigned name/identifier of the hardware. The most common example is the device name/identifier of the network devices such as enp38s0, enp39s0, etc.
- Class: All the hardware of your computer/server belongs to a certain group/class. For example, the network devices are grouped in the network class, the storage devices are grouped in the storage class, and so on. The hardware class can be used to filter the output of lshw.
- Description: It’s a short description of the respective hardware.
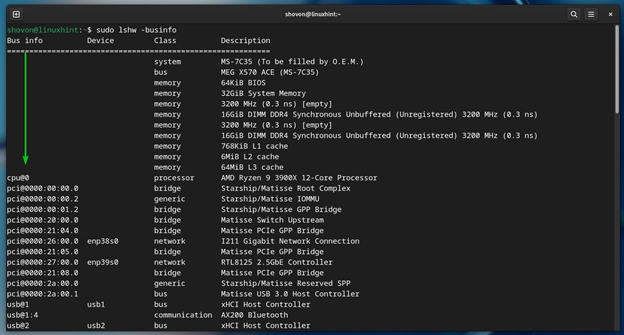
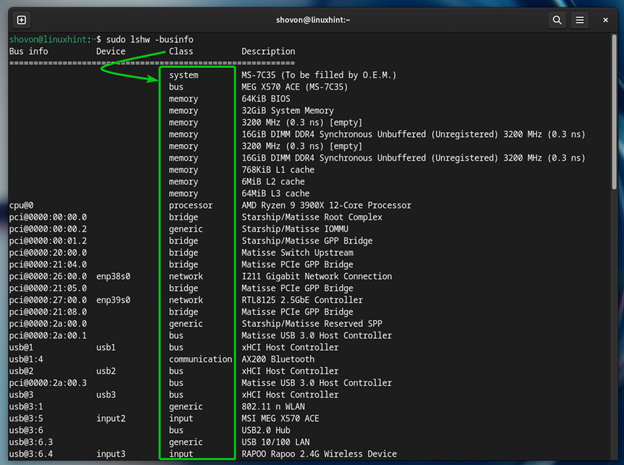
If you want to see the bus information of the hardware instead of the hardware path (H/W path), run the lshw command as follows:
As you can see, the first column now shows the bus information of the hardware instead of the hardware path.
The bus information of different hardware will show the information in different formats:
- CPU: The bus ID of the CPUs will be in the cpu@<id>,<logicalcpu> For example, the CPU cpu@0 (AMD Ryzen 9 3900X processor in my case) has the ID 0. On most desktop computers and laptops, you will have only one processor and one CPU entry which is “cpu@0”.
- PCIE devices: The bus ID of the PCIE devices will be in the pci@<domain>:<bus>:<slot>.<function> The <slot> number is also called <device> number. For example, the PCIE device pci@0000:26:00.0 (I211 gigabit network device in our case) has the domain 0000, bus 26, slot/device 00, and function 0. The ID numbers are hexadecimal and padded with zeroes.
- SCSI devices: The bus ID of SCSI storage devices will be in the scsi@<controller>:<target>.<id>.<lun>,<partition> For example, scsi@1:0.0.0 is a SCSI/SATA storage device that has controller 1, target 0, id 0, lun 0, and no partitions. If the SCSI/SATA storage device has partitions, the bus ID will be scsi@1:0.0.0,1 for the first partition, scsi@1:0.0.0,2 for the second partition, scsi@1:0.0.0,3 for the third partition, and so on.
- USB devices: The bus ID of USB storage devices will be in the usb@<controller>:<slot>.<id> For example, usb@3:6.3 is a USB device that has controller 3, slot 6, and id 3. The usb@3:1 is a USB device that has controller 3 and slot 1.
Filtering the Lshw Output with Hardware Class
Lshw assigns a class to every hardware device. You can filter the output of the “lshw” command to include only the certain types of hardware using these class names.
The available lshw hardware classes are:
- system: The motherboard and PnP devices of the system.
- bridge: The internal bus devices like PCIE, host bridge, etc.
- memory: The memory devices like BIOS, RAM, ROM, CPU caches, firmware, etc.
- processor: The processors of your computer and SCSI RAID controllers.
- address: The memory addresses for extension ROM and video.
- storage: The SCSI and IDE controller.
- disk: The random access storage devices like HDD, SSD, NVME SSD, CD-ROM, DVD, etc.
- volume: The partitions of your disk/storage devices.
- tape: The sequential access storage devices like DAT, DDS, etc.
- bus: The device connecting bus like USB, SCSI, FireWire, etc.
- network: The network interfaces like Ethernet, WiFi, etc.
- display: The display devices like your GPU.
- input: The input devices like your keyboards, mice, HDMI/DP ports, HD audio ports, power button, PC speaker, etc.
- printer: The printing devices, i.e. printer.
- multimedia: The audio and video devices like video card (GPU), sound card, TV output card, etc.
- communication: The communication devices like Bluetooth.
- power: The energy sources like power supply (PSU), internal battery, etc.
- generic: The devices that can’t be classified.
Not all computers/servers will have every class of hardware installed. So, to find the classes of hardware that your computer/server has, we recommend you to run the “lshw” command with the “-short” or “-businfo” option.
$ sudo lshw -businfo
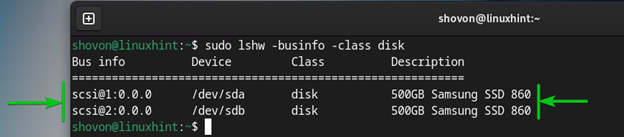
To filter the output of the “lshw” command to display only the specific types of hardware (i.e. storage devices), use the “-class” option as follows:
or
As you can see, lshw listed only the storage devices (2x 500GB Samsung 860 EVO SATA SSDs) that are installed on our computer.
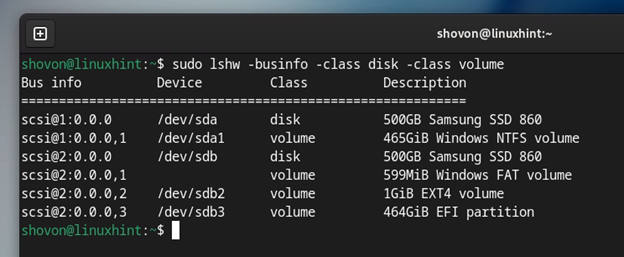
You can use the “-class” option multiple times to display multiple types of hardware at once with the “lshw” command.
For example, to display the storage devices as well as the disk partitions using the “lshw” command, use the “-class” option twice as follows:
or
As you can see, lshw listed the storage devices as well as the partitions of those storage devices.
Finding the Detailed Hardware Information with Lshw
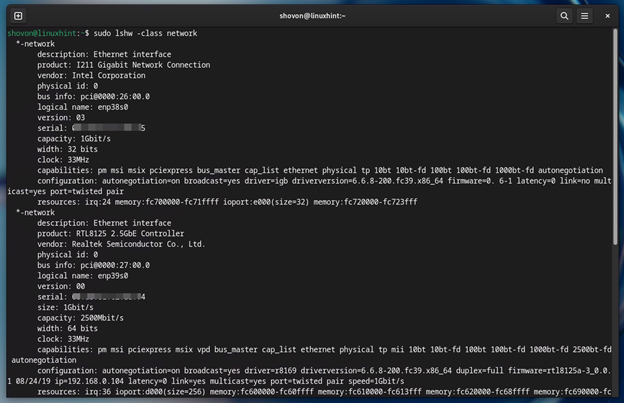
To find the detailed information on specific types of hardware (i.e. network), run lshw with the “-class” option as follows:
As you can see, a very detailed information on all the network devices that are installed on our computer is printed.
Hiding Sensitive Information from the Lshw Output
By default, the “lshw” command prints a sensitive information (i.e. MAC address of network devices) while displaying the detailed hardware information. If you need to share the hardware information with other people on the internet to get help with installing a driver for example, you might want to hide those sensitive information from the lshw output.
To hide the sensitive information from the detailed hardware information, you can use the “-sanitize” option of the “lshw” command as follows:
As you can see, the MAC addresses and IP addresses are removed from the network devices.

Displaying the Numeric IDs for PCIe and USB Devices
By default, numeric IDs are not displayed for the PCIe and USB devices in the output of the “lshw” command.
To display the numeric IDs of the PCIe and USB devices in the output of the “lshw” command, use the “-numeric” option as follows:
or
As you can see, the numeric IDs are displayed for the USB devices in the output of the “lshw” command.
Removing the Volatile Timestamps from the Lshw Output
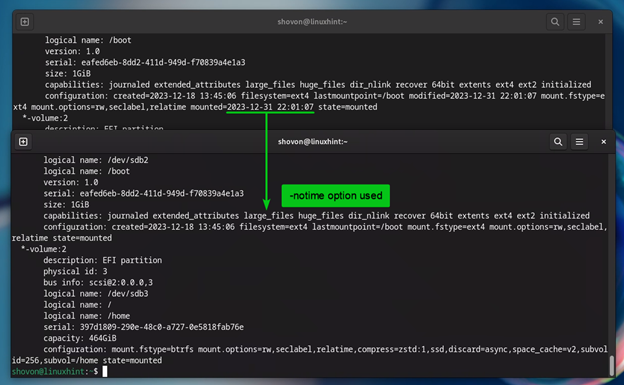
By default, lshw prints the volatile timestamps (changing time data) for disk volumes and other devices. If you don’t want to see those timestamps, run the “lshw” command with the “-notime” option as follows:
As you can see, the mounted timestamp data is removed from the lshw output where the “-notime” option is used.
Exporting the Hardware Information Using Lshw
You can export the lshw hardware information in different formats. At the time of this writing, lshw can export the hardware information in the following formats:
- SQLite database
- HTML
- XML
- JSON
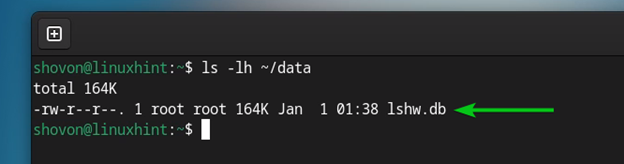
To export the lshw hardware information to an SQLite database file, run the following command:
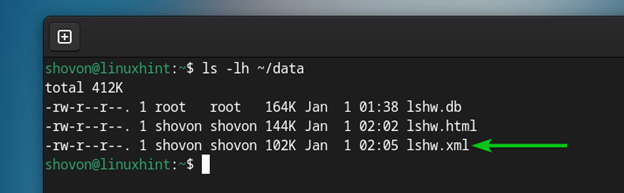
As you can see, the “lshw.db” SQLite database file is created.
You can read the “lshw.db” database file with SQLite and print all the database tables as follows:

You can print an information on the network devices from the “lshw.db” file with the following SQLite command:

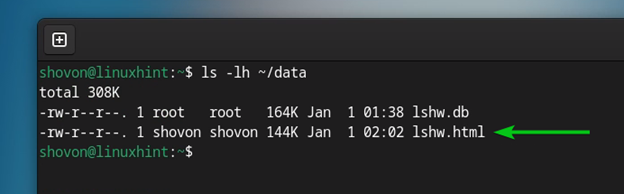
To export the lshw hardware information to an HTML file, run the following command:
If you want to sanitize/hide a sensitive information as well, run the lshw HTML export command as follows:
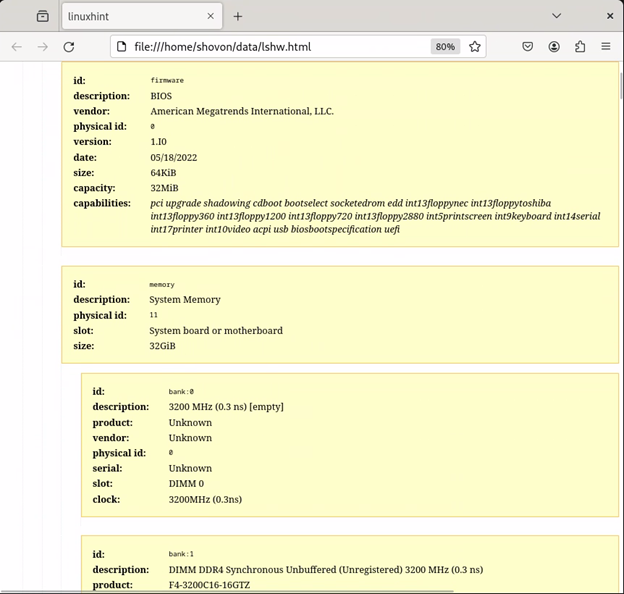
As you can see, the lshw hardware information is exported to an “lshw.html” HTML file.
You can open the “lshw.html” file with your favorite web browser.
We opened the “lshw.html” file with the Mozilla Firefox web browser and the hardware information is displayed as you can see in the following screenshot:
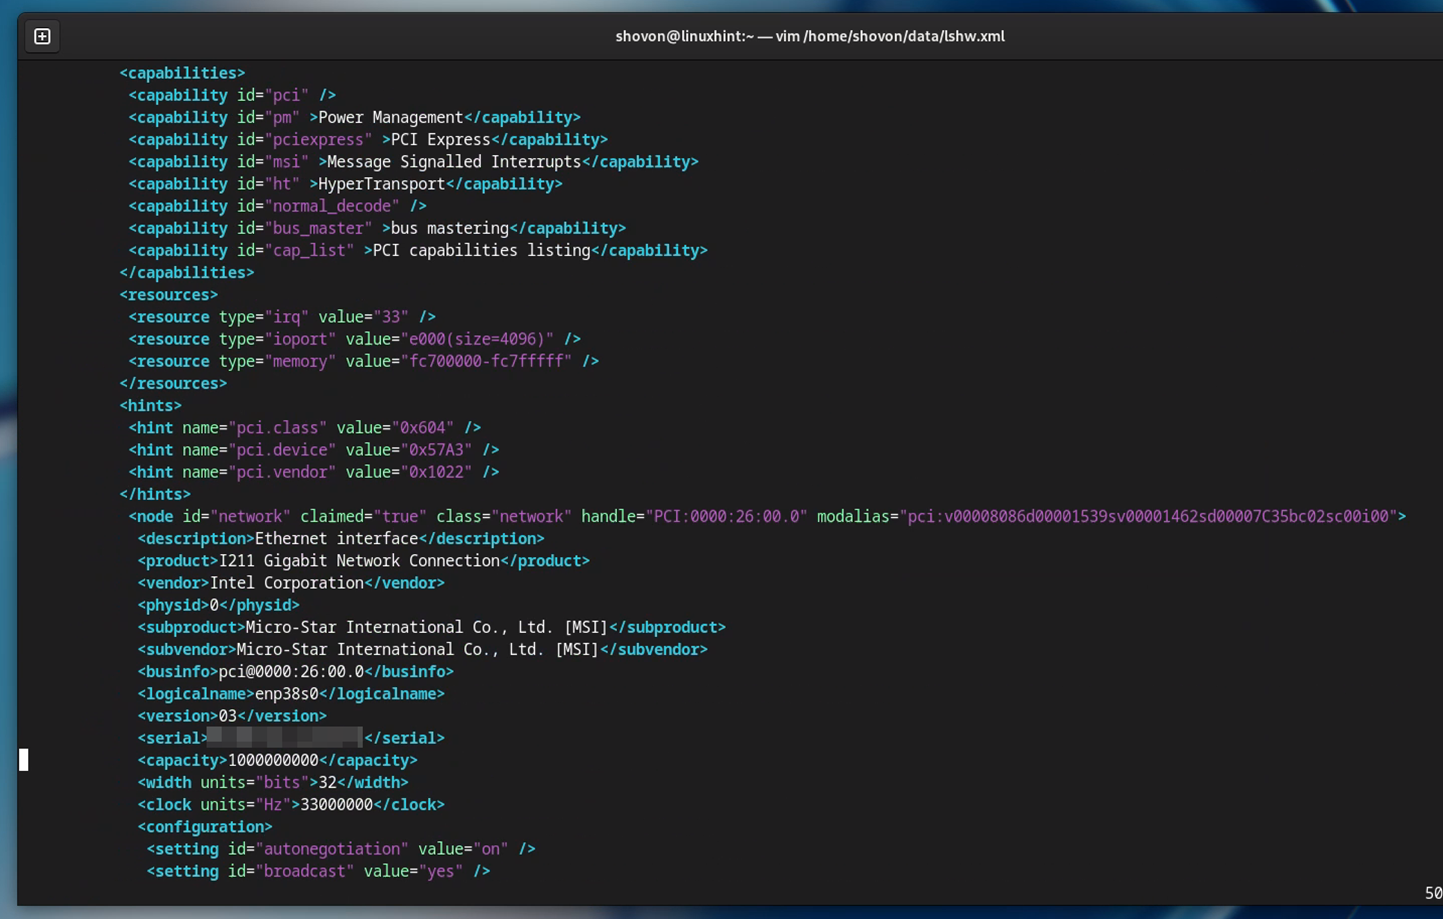
To export the lshw hardware information to an XML file, run the following command:
If you want to sanitize/hide a sensitive information as well, run the lshw XML export command as follows:
As you can see, the lshw hardware information is exported to an “lshw.xml” XML file.
We opened the “lshw.xml” file with the Vim text editor and the lshw hardware information is displayed in XML format as you can see in the following screenshot:
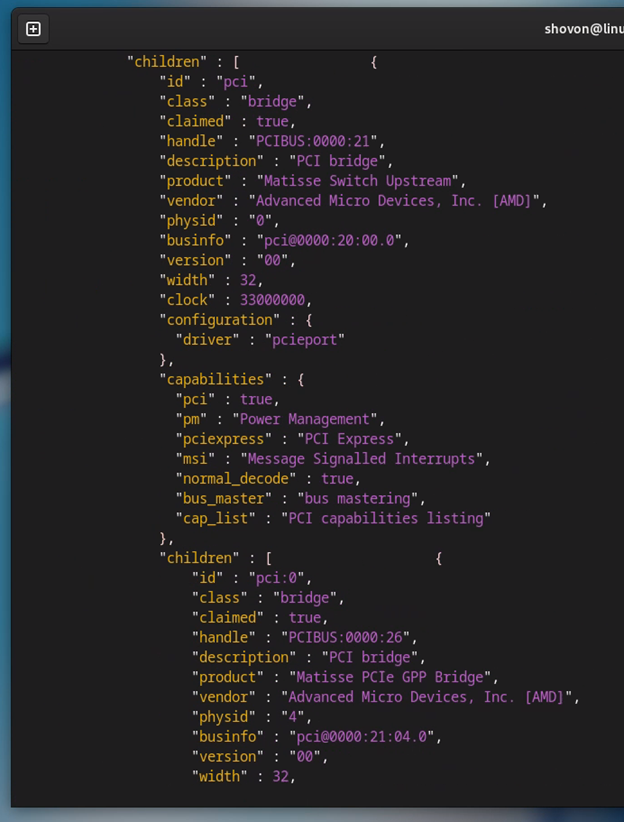
To export the lshw hardware information to a JSON file, run the following command:
If you want to sanitize/hide a sensitive information as well, run the lshw JSON export command as follows:
As you can see, the lshw hardware information is exported to an “lshw.json” JSON file.

We opened the “lshw.json” file with the Vim text editor and the lshw hardware information is displayed in JSON format as you can see in the following screenshot:
NOTE: The lshw -sanitize, -numeric, and -notime options will work for lshw HTML, XML, and JSON exports, not for SQLite export. For more information on these options, read the previous sections of this article.
Example 1: Finding the Installed GPUs of Your Computer/Server with Lshw
After installing a new operating system on your computer/server, one of the most important things to do is to find the GPU (graphics card/processor) that you installed on your computer/server and install the appropriate driver for it.
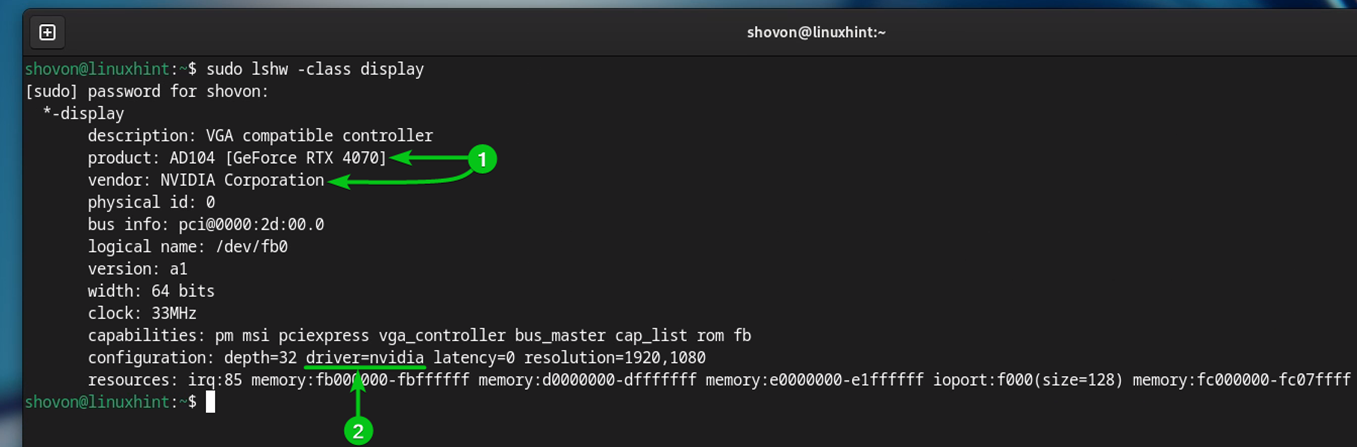
You can find the GPUs that you installed on your computer/server with the following “lshw” command:
As you can see, we have an NVIDIA GeForce RTX 4070 installed on our computer[1]. It’s using the official NVIDIA drivers (as we installed it)[2]. If you have an NVIDIA GPU installed on your computer/server, but the official NVIDIA drivers are not installed, you will see “driver=nouveau” instead. In that case, you will have to install the official NVIDIA drivers on your computer/server to be able to use all the features and get the best performance from your GPU.
Example 2: Finding the Chipset of the Network Devices/Interfaces with Lshw
Installing the correct network driver is also an essential part of a new Linux installation. Unless the correct network drivers are installed, your network devices may not work or may work with limited functionality (may result in a very poor network performance). To be able to install the correct network drivers, you need to know the chipset of your network devices.
To find the chipset and other information on the network devices that are installed on your computer/server, run the “lshw” command as follows:
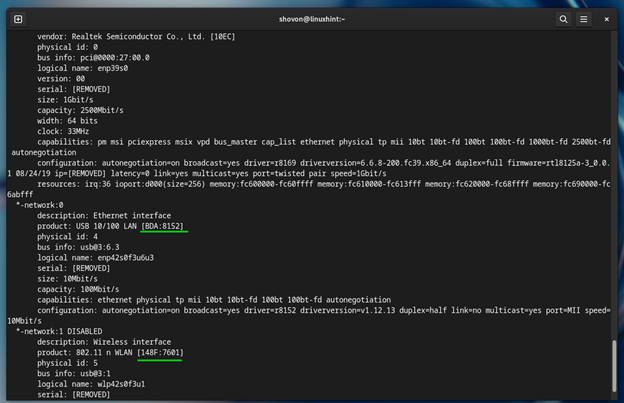
As you can see, we have two ethernet devices installed on our computer.
One of them is an Intel I211 Gigabit network interface[1]. The Linux kernel gave it a logical name as enp38s0[2]. As you can see, it uses the Intel igb chipset (driver=igb)[3]. So, to get this network interface working, you must install the Intel igb driver/firmware on your computer/server (if it is not installed already).
The other one is a Realtek RTL8125 2.5GbE network interface[4]. The Linux kernel gave it a logical name as enp39s0[5]. As you can see, it uses the Realtek r8169 chipset (driver=r8169)[6]. So, to get this network interface working, you must install the Realtek r8169 driver/firmware on your computer/server (if it is not installed already).

We also have a USB ethernet device and a WiFi adapter connected to our computer.
The USB 10/100 mbps LAN network interface[1] has the logical name, enp42s0f3u6u3[2]. As you can see, it uses the Realtek r8152 chipset (driver=r8152)[6]. So, to get this network interface working, you must install the Realtek r8152 driver/firmware on your computer/server (if it is not installed already).
The WiFi 802.11n network interface[4] has the logical name as wlp42s0f3u1[5]. As you can see, it uses the MediaTek mt7601u chipset (driver=mt7601u)[6]. So, to get this network interface working, you must install the MediaTek mt7601u driver/firmware on your computer/server (if it is not installed already).

Conclusion
This is an extensive guide on lshw. In this article, we showed you how to install lshw on popular Linux distributions (i.e. Ubuntu, Debian, Linux Mint, Kali Linux, Fedora, RHEL, AlmaLinux, Rocky Linux, CentOS Stream). We also showed you how to list the hardware of your computer, filter the output of lshw to display certain types of hardware, and hide a sensitive hardware information from the lshw output. We showed you how to display the numeric ID for PCIE and USB devices as well as remove the volatile timestamps from the lshw output. We also showed you how to export the lshw hardware information in the SQLite database, HTML, XML, and JSON format and read them. Finally, we showed you how to find the GPU and network devices that you installed on your computer and the chipset that the network devices are using with lshw to help you with the correct driver/firmware installation.