Network performance is a common problem that you may deal with at times. You can test your network performance using multiple tools. The iPerf3, which is available on Windows, Linux, and Unix, is one of them. iPerf3 is an open-source and free command-line tool used to check network performance between the two systems according to the speed and bandwidth. This tool is used for measuring TCP or UDP network throughput.
In this article, you will learn how to install and use iPerf3 on Ubuntu. We will also explain how to start an iPerf3 server to receive traffic and how to start the iPerf3 client to start a network performance test on the host running its server.
Key Features of iPerf3
-
- It does not share any code with the original iPerf from NLANR/DAST under its new implementation and is not backward compatible.
- iPerf3 is used on most Linux operating systems to measure the maximum attainable bandwidth over a network or IP.
- It supports tuning various parameters of buffers and protocols (IPv6, IPv4, UDP, SCTP with TCP).
- It reports loss, bandwidth, and other parameters for each test.
- iPerf3 is a very effective and reliable tool compared to other network testing tools.
- It is used to measure wireless LAN and LAN throughput.
How to Install and Use iPerf3 on Ubuntu
iPerf3 is available in most Linux Distros, which means it’s pretty easy for you to install this tool on the system.
Installation Process
We have divided this section into multiple parts because there are several ways to install iPerf3.
Using Apt Command
Before installing iPerf3 , please update the system by the following command:
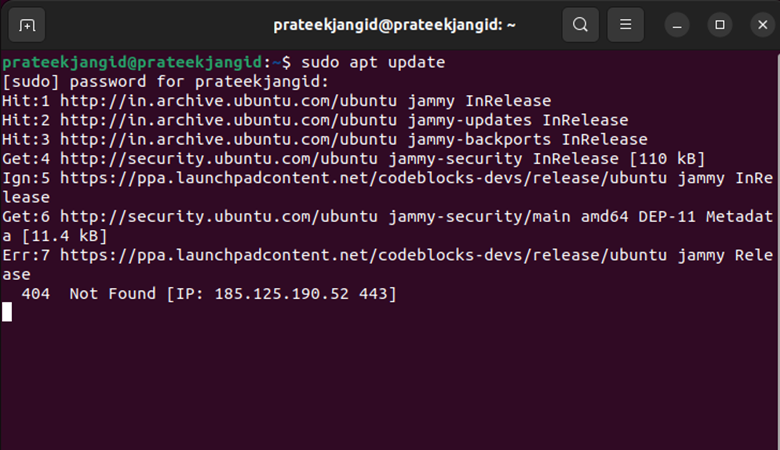
Once the system is updated, you can successfully install iPerf3 with the following apt command.
 In this way, you can install iPerf3 in a short time through the apt command.
Using Aptitude Command
To install iPerf3 following this method, you must first make sure that Aptitude is installed on your system. By default, Aptitude is not installed on Ubuntu. If your system does not have it, install Aptitude on the system using the following commands:
sudo aptitude update
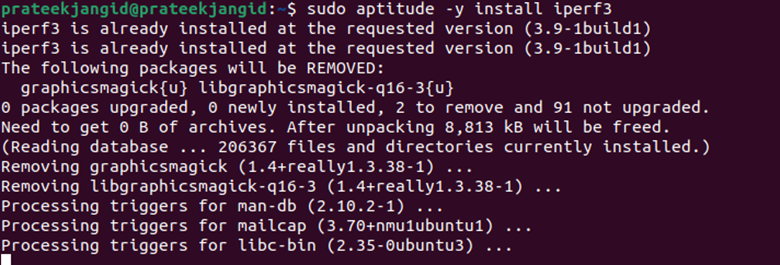
Once the system database is updated, you can install iPerf3 using the aptitude method by entering the following command.
After installing iPerf3 using any of the above methods, you can use the following command to check which is the current version of iPerf3 on your system. It will also provide you with complete information about the current Linux kernel version.

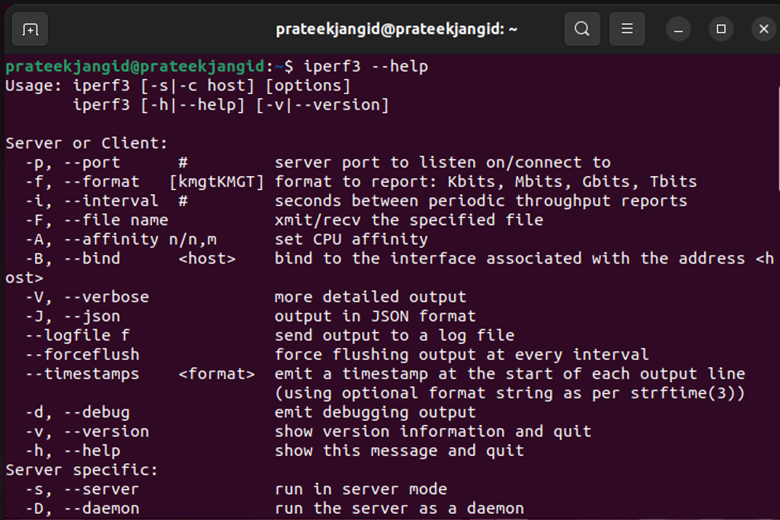
Also, you can get help with the following command:
How to Use iPerf3 in Ubuntu
Now you have installed iPerf3 on your Ubuntu. It’s time to check the bandwidth between the two systems. You can use one system as a server and another as a client.
At TCP Protocol Servers & Clients
Start iPerf3 on Server
First, you need to identify that your Ubuntu host can act as an iperf3 server using the following command.

If you see in the output that the iPerf3 server is listening to a specific port, it means that the iPerf3 server works as expected.
By default, the iPerf3 server will listen to all active interfaces of the host for new connections. You can use the below command to ensure that the iPerf3 server only listens on some specific interface.
From the above output, you can see that iPerf3 only listens on port 5201. However, you can also use a different port than the default one. You need to run the following command with that specific port number.
Start iPerf3 on the Client
Similarly, you need to identify that your Ubuntu host can act as an iPerf3 client using the following command.
After running the above command, you can see that the client needs to connect with the server, whose IP address is shown in the above output.
You can check from the output that the iPerf3 server successfully accepted a connection from an iPerf3 client. Now the server will exchange all the data with the client.
Note that you will see the exact output when an iPerf3 client targets some specific iperf3 server.
If you use some specific port number other than the default, you also need to specify that port number.
You can reverse the direction of packets using the following command:
At UDP Protocol Servers & Clients
By default, iPerf3 measures the TCP protocol for network performance testing. For UDP performance testing, you always need to use ‘-u.’ First, start the UDP iPerf3 server by running the below command.
Now you can connect your iPerf3 server with your client using the following command.
If you want the best network bandwidth in the UDP testing results, you can increase the sending bandwidth using the option “-b value.” Here, ‘value’ indicates the bandwidth by which you want to increase.
Measuring the MTU (Maximum Transfer Size)
You can easily check the maximum transfer size by using the below command.
Here, the -m option instructs iPerf3 to show the MTU.
Measure Downstream and Upstream Throughput
If you want to check the downstream and upstream throughput, use the ‘-bidir’ option with the above command.
For a specific port, run the following command.
Bidirectional Test Using iPerf3
Sometimes you may need to check the maximum throughput of both servers. You can do this easily using the bidirectional testing feature, which is pre-built-in offered by iPerf. You can test the connection from both sides by running the below command:
After executing the above command, iperf3 connects the iPerf3 server to the client. It acts as both a client connection and a server connection.
How to Uninstall iPerf3 in Ubuntu
For some reason, you may need to remove iPerf3 or no longer have it in your system. Therefore, uninstalling it is just as easy as installing it.
To uninstall only the iPerf3 package, use the following command.
Please run the following command to remove iPerf3 with dependencies, data, and configuration completely.
Wrapping Up
iPerf3 is the latest updated version of iPerf. It is one of the best command-utility tools by which you can measure the network performance between the two systems. You can use any of the installation methods described in this article to install iPerf3 and test your network performance with various protocols. We also explain how you can commonly use iPerf3 and run it on different hosts.