After reading this tutorial, you will know how to install dig (domain information groper) on Debian and its based Linux distributions. This tutorial also includes instructions on using this program to obtain DNS-related information. At the end of the article, I added information on dig alternatives you may want to try.
All steps explained in this article include screenshots, making it easy for all Linux users to follow them.
How to install and use dig on Debian 11 Bullseye:
To install the dig command on Debian and Ubuntu Linux distributions, run the following command shown in the screenshot below.
Now dig is installed, but before learning the practical application, let’s review some concepts you will need to understand the dig process and output.
qname: This field represents the address or host we are asking for information about.
qclass: In most cases, or maybe all cases, the class is IN, referring to “internet.”
qtype: The qtype refers to the type of record we are asking about; for example, this type can be A for an IPv4 address, MX for mail servers, etc.
rd: In case the resource we are asking for information does not know the answer we are looking for, the rd (Recursion Desired) requests the resource to find the answer for us, for example, using the DNS tree.
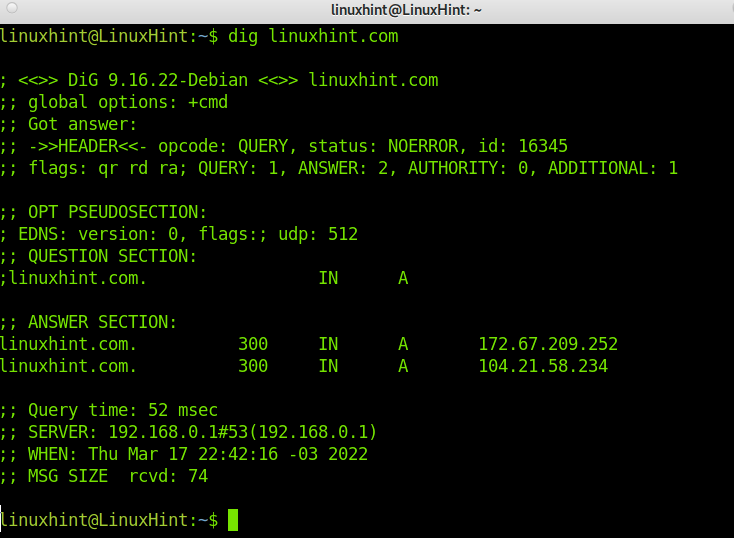
Now let’s try the dig command without flags; just run dig followed by an URL; in this case, I will use linuxhint.com. Then we will analyze the output to understand it.
Run the command below.
As you can see, dig returns several lines with information on the process and the result. Let’s explain the important ones:
“status: NOERROR”: This output (The RCODE) shows whether the process suffered errors or was successfully executed. In this case, the query was successful, and you can keep reading the returned information. In other cases, you may get the output REFUSED, FAIL, in which keeping reading the output is useless.
“flags: rd ra da”: As explained previously, the rd (Recursion Desired) is followed by the ra flag, which means the answering server agreed to answer our query. The da flag tells us the answer was verified by DNSSEC (Domain Name System Security Extensions). When da isn’t in the output, the answer wasn’t validated, yet it may be correct.
“ANSWER: 2”: Although we made a query, as you can see in the screenshot, we got two answers in the “ANSWER SECTION”:
And
“ADDITIONAL: 1”: This output means the result includes EDNS (Extension Mechanisms for DNS) for unlimited size.
“ANSWER SECTION”: As said previously, we can get more than one answer; reading it is pretty easy. Belo, we have one of the answers:
Where the first data shows the domain/host, we queried about. The second data is the TTL, which tells us how much time we can store the returned information. The third data (IN) shows we made an internet query. The fourth data, in this case, A, shows the record type we queried, and the last data is the host IP address.
“Query time”: This output shows the time it took to get the answer. This is especially useful to diagnose problems. In the example above, we see it took 52 milliseconds.
“MSG SIZE”: This shows us the packet size; it is also important data since if the packet is too big, the answer may be refused by any device filtering big packets. In this case, 74 bytes is a normal size.
As you can see in the output, we can learn LinuxHint A records pointing to IP addresses 172.67.209.252 and 104.21.58.234.
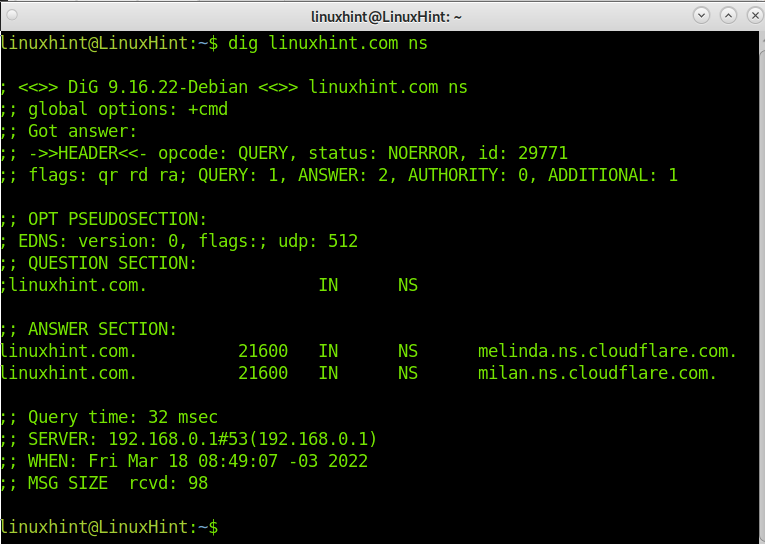
Now let’s query LinuxHint.com DNS by running the command below adding the ns option.
As you can see, LinuxHint DNS is managed by Cloudflare; the DNS are melinda.ns.cloudflare.com and milan.ns.cloudflare.com.
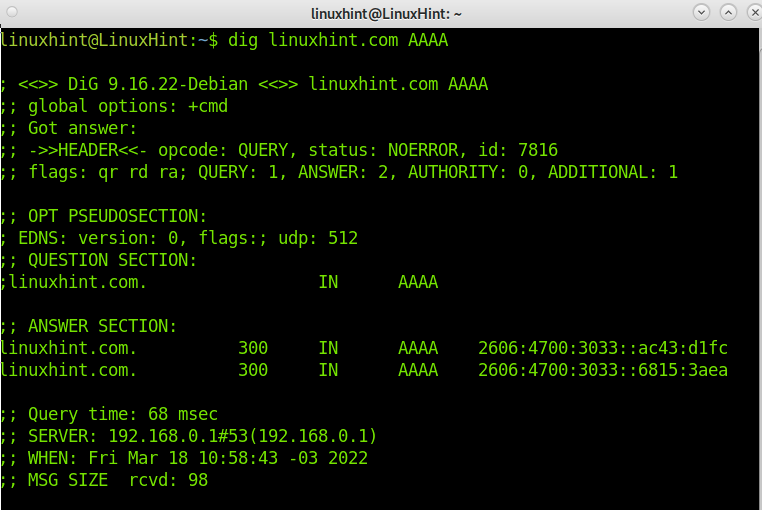
Now, let’s check the LinuxHint.com IPv6 address. By default, dig checks the A (IPv4) record. To check the IPv6 address, we need to specify it by adding AAAA, as shown below.
You can see in the output LinuxHint IPv6 addresses are 2606:4700:3033::ac43:d1fc and 2606:4700:3033::6815:3aea.
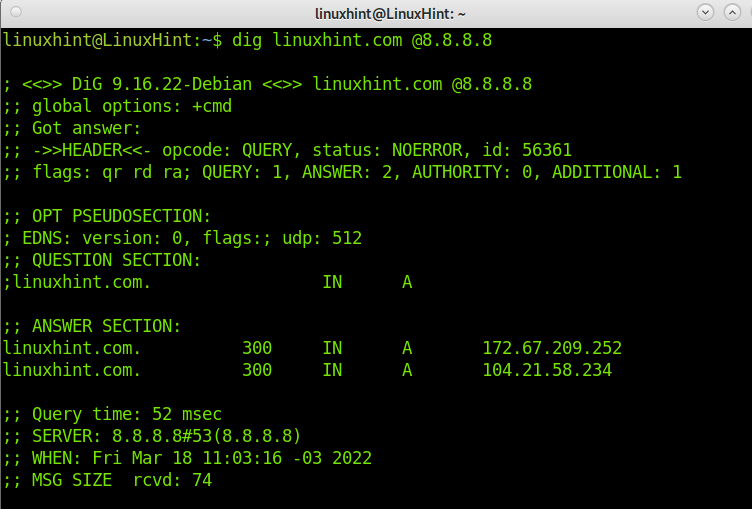
It is important to clarify that if you don’t specify a DNS to answer, dig will automatically use the server(s) defined in your resolv.conf file. Yet when you do a query, you can specify the server, which will resolve it by adding a “@” followed by the server address. In the example below, I will use Google DNS:
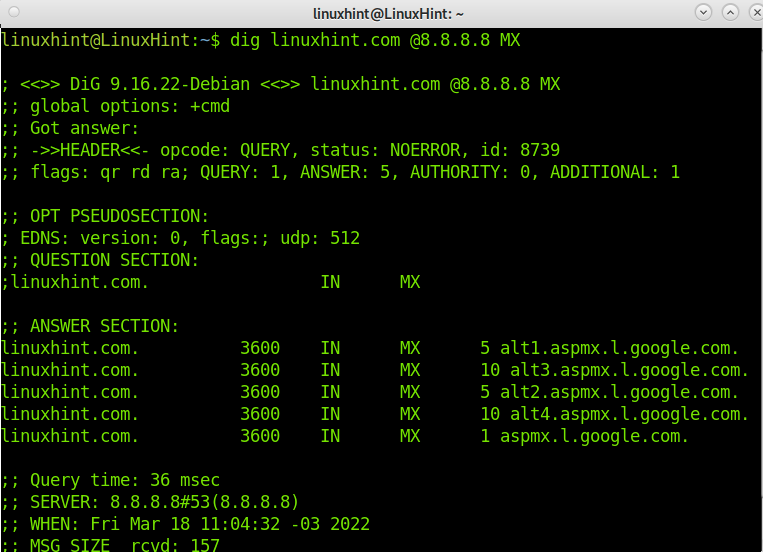
To finish this tutorial, let’s check the LinuxHint resolution of mail records by implementing the MX option, as shown in the following image.
That’s all; now you have an idea to use dig and to understand the output.
Conclusion:
As you can see, installing dig on Debian is pretty easy; you only need to execute a command. Learning how to use dig is also easy if you know the meaning of each item provided in the output. A dig command is a formidable tool for getting information on a host or domain name and diagnosing some problems. dig is very easy to use; it is flexible and provides a clear output. It has additional functionalities when compared with other lookup tools.
There are more dig applications that were not covered in this tutorial; you can learn at https://linux.die.net/man/1/dig.
Thank you for reading this tutorial explaining how to install dig on Debian 11 Bullseye and how to use it. I hope it was useful for you. Keep reading LinuxHint for more Linux professional tutorials.


