Puppet can help you define your infrastructure’s desired state as a code which is known as a “manifest”. The manifest specifies the resources and configurations that you want Puppet to manage such as packages, files, users, and services. Puppet ensures that the actual state of the resources on the target systems match the desired state that is defined in the manifest.
Puppet offers exciting features such as a declarative language, resource abstraction, idempotency, agent-based architecture, and extensibility. This tutorial provides a step-by-step guide on how to install and configure Puppet on Ubuntu 20.04.
Prerequisites to Install Puppet on Ubuntu 20.04
Before installing Puppet on Ubuntu 20.04, you need to ensure that your system meets the following requirements:
- Installed Ubuntu 20.04 on the target system
- A user account with sudo privileges
- A stable internet connection to download and install the required packages
- Sufficient disk space to install and run Puppet
Additionally, you may need to configure the firewall to allow the communication between the Puppet server and agent and any other required ports. You may also need to configure the DNS or the host file entries to resolve the hostname of the Puppet server.
Step-by-Step Guide to Install Puppet on Ubuntu 20.04
Once you meet the prerequisites, you can proceed to install Puppet on Ubuntu 20.04 using these steps:
Step 1: Update the Package Index on Your System
Update the package using the following command:
The output for this command looks like this:
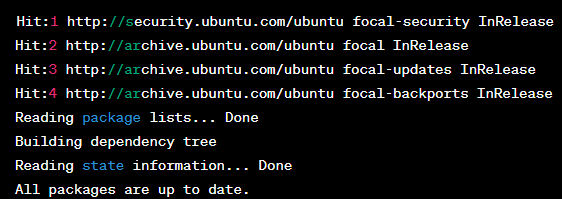
This output indicates that the package lists are updated for the Ubuntu focal (20.04) release and that no new updates are currently available. The output also shows the sources that are checked for updates such as the main and security repositories.
Step 2: Install the Puppet Repository and Dependencies
Install the necessary puppet repository using the following command:
curl https://apt.puppet.com/DEB-GPG-KEY-puppet | sudo apt-key add -
echo "deb http://apt.puppet.com $(lsb_release -sc) puppet7" | sudo tee /etc/apt/sources.list.d/puppet7.list
sudo apt update
The first command installs three packages – curl, ca-certificates, and gnupg2. If these packages are already installed, you will see a message stating that they are already up to date. The second command adds the Puppet repository GPG key to the system’s list of trusted keys.
The third command adds the Puppet repository to the system’s list of software sources. In this case, it is adding a source for version 7 of Puppet, and it uses the output of the “lsb_release –sc” command to determine the codename of the Ubuntu release that is currently running on the system.
Finally, the fourth command updates the package lists for the system including the newly added Puppet repository. The output shows which repositories are updated and indicates that 24 packages can be upgraded.
Step 3: Install the Puppet Server and Agent Packages
Proceed to install the Puppet server and agent packages using this command:
Step 4: Enable the Puppet Server and Agent Packages
Enable the Puppet server and agent packages using these commands:
sudo systemctl enable puppetserver
sudo systemctl start Puppet
sudo systemctl enable Puppet
Step 5: Configure the Puppet Agent
Configure the Puppet agent to communicate with the Puppet server. Edit the /etc/puppetlabs/puppet/puppet.conf file and set the server parameter to the hostname of your Puppet server.
Step 6: Test the Communication
Test the communication between the Puppet server and agent using the following command:
The sample output looks like this:
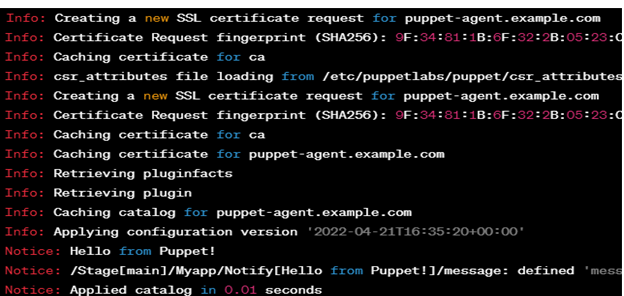
This output shows the Puppet agent performing a test run and applying the current configuration version. It first creates a new SSL certificate request, then retrieves the plugin information, caches the certificates, retrieves a catalog of resources to apply, and finally applies the configuration.
Creating and Managing the Puppet Modules
Puppet modules are reusable collections of code that contain resources and configurations to manage a specific aspect of infrastructure such as installing a package or configuring a service. To create and manage the Puppet modules, you can follow these steps:
Step 1: Create a Module Directory Structure
You can achieve this using the following code:
Step 2: Create a Manifest File
Create a manifest file using the following command:
Once done, add the desired resources and configurations such as:
package { 'nginx':
ensure => 'installed',
}
service { 'nginx':
ensure => 'running',
enable => true,
}
}
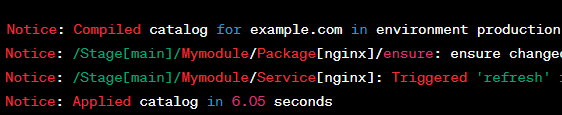
A sample output looks like what we have in the following figure:
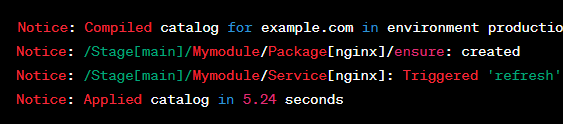
This output indicates that the Puppet agent has successfully applied the mymodule configuration and installed and started the Nginx service. The notice messages show that Puppet has compiled the catalog of resources and then created a Package resource to isntall Nginx, followed by a service resource to ensure that Nginx is running and enabled.
Step 3: Apply the Module to the Target System
Proceed to apply the module to the target system as shown in the following:
The output of the command looks like the following sample:
You can also download and use the existing modules from the Puppet Forge, a repository of community-contributed modules.
Conclusion
Puppet is a powerful and flexible configuration management tool that allows you to automate and manage the infrastructure at scale. With Puppet, you can define the desired state of your infrastructure using the Puppet language and apply the changes consistently across multiple nodes and environments.