Dropbear is an open-source lightweight SSH server and client designed for embedded Linux/Unix systems and IoT devices. Dropbear is used in systems with low memory resources and processing power. However, it can also be used on normal systems if you have SSH problems.
In this guide, I will cover how to install Dropbear on Linux and how to configure it. In the later section, I will use dbclient to connect with the Dropbear server.
- How to Install Dropbear on Ubuntu
- How to Configure Dropbear on Ubuntu
- How to Use Dropbear on Ubuntu
- What are Dropbear Utilities
- Conclusion
How to Install Dropbear on Ubuntu
Dropbear is available on all Linux distributions, we can use the package manager of that specific Linux distribution to install it.
There are many flavors of Debian-based Linux distributions such as Ubuntu, Deepin, Pop!_OS, and Zorin OS. To install Dropbear on a Debian-based Linux distribution use the apt package manager:
How to Configure Dropbear on Ubuntu
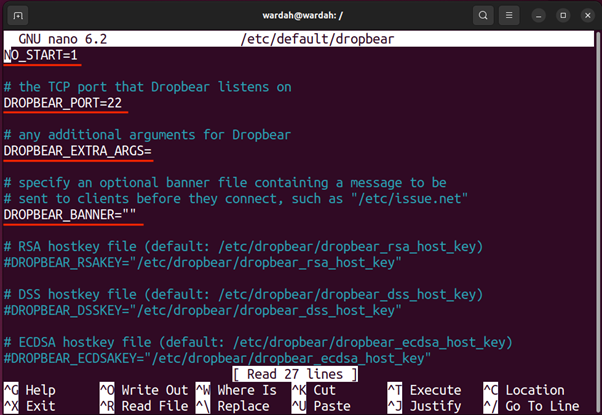
A few options need to be configured before getting started with Dropbear on Ubuntu. These options can be modified from the/etc/default/dropbear file. Open the file using any text editor:
The following file will open:
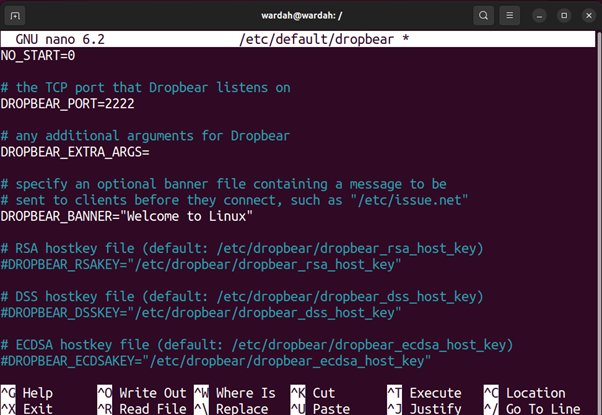
NO_START: Replace 1 with 0 to keep enabling Dropbear on boot.
DROPBEAR_PORT: The first option is the TCP port of Dropbear which is 22 by default. It is advisable to change it to some other port.
DROPBEAR_EXTRA_ARGS: This option is used to give extra arguments such as to disable login password use -s, and to disable password login for root use -g.
Some other arguments can be found on the man page of Dropbear.
DROPBEAR_BANNER: This option sets the banner message string; which will be displayed when the client logs in.
DOPBEAR_RSAKEY/DROPBEAR_DSSKEY: These options contain the default path of both RSA and DSS keys, which are assigned while installation. However, the alternative paths for both the keys can also be provided here.
To avoid any conflict with SSH, it is recommended to stop the SSH service on Linux, and use the service stop command:
And start the Dropbear service, using the service start command:
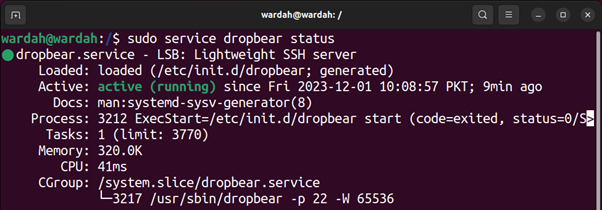
Now, to check the Dropbear status use the service status command:
Now, the Dropbear on Linux has been successfully configured.
How to Use Dropbear on Ubuntu
The Dropbear server can be accessed using the ssh command or dbclient utility. The syntax is:
Or:
What are Dropbear Utilities
Various Dropbear utilities come with the Dropbear package:
The details of all the utilities are mentioned below:
dropbearkey
This utility creates SSH private keys in various formats such as RSA, DSS, ECDSA, and Ed25519.
The syntax of using the dropbearkey is:
For example, to generate an RSA key of 4096 bits use the following:
RSA is a widely-used algorithm and recommended to use at least 4096 bits.
DSA is another old algorithm and not recommended, 1024 key size is normally used.
ECDSA is a new algorithm and is highly recommended for use usually comes with three key sizes, 256, 384, and 521.
Ed25519 is not generally used and does not require any specific key size because all keys generated using this algorithm are 256 bits.
dbclient
The Dropbear server can be connected using the ssh command. But another command that can be used is dbclient. The syntax is:
dropbearconvert
This Dropbear utility converts the private keys because both Dropbear and SSH have different private key formats.
For conversion use the following syntax:
Conclusion
The Dropbear is a lightweight alternative to OpenSSH and is designed for embedded devices. It can be installed on Linux if you are encountering issues with OpenSSH. Or if you have installed the Embedded Linux on a device then Dropbear is the software to go. The Dropbear is available in various Linux distributions and can be installed using the distribution’s default package manager. The configuration of Dropbear may vary from distribution to distribution.


