“TypeScript” is a well-reputed, object-oriented programming language. It is also known as the superset of JavaScript. This implies that all the JavaScript functionalities are present inside “TypeScript”. It also extends JavaScript with some other newly added functionalities for enhancing the developer process. Moreover, the development process can also be improved by adding external libraries and packages. In such situations, “npm” is considered the best package manager to add useful functionalities and tools to the system.
This post elaborates on the complete process to install and use the “npm” TypeScript version.
Installing TypeScript Version (Specific/Latest) Using “npm”
To install the specific/latest version of TypeScript in the local system, use the “npm (Node Package Manager)” command by following the given steps of instructions.
Step 1: Check Prerequisites
First, open up the command prompt and run the following commands to verify whether “node.js” and “npm” are installed in your local system or not and return their versions, if installed:
npm -v
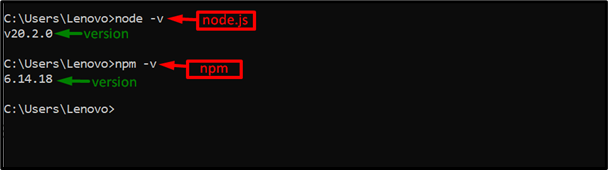
The output shows the installed versions of “node.js” and “npm”.
Step 2: Install “TypeScript”
Now, use the “npm” as a package manager to install the “TypeScript” latest/specific version in the current operating system.
Latest Version
For installing the latest version, specify the “latest” keyword with the “typescript” in this way:
In the above command, the “g”(global) flag installs “TypeScript” globally in the system i.e., the user can use TypeScript in any directory:

As seen, the output signifies that the “TypeScript” latest package has been added to the system.
Specific Version
On the other hand, if the user wants to install the specific version of “TypeScript”, then specify that version with it like this:

Here, the installation of the specific “TypeScript” version is carried out appropriately.
Note: Only one version of TypeScript can be installed at a time either latest/specific. If the user installs any specific version over the installed version of the TypeScript in the system, then its version will be updated with the new one.
Step 3: Verify TypeScript
To verify the TypeScript installation, check its version with the help of its compiler “tsc” and the “-v (version)” flag:

The outcome shows the installed version of TypeScript “5.1.3” which is the latest version.
Using TypeScript With “npm”
Once the TypeScript is installed in the local system, use it with the help of the “npm” package manager. Let’s follow the given steps to perform this task.
Step 1: Create and Navigate to the Directory
First, create a new directory and then navigate to it with the help of the following “mkdir (make directory)”, and the “cd (change directory)” commands:
cd TypeScript-Folder

Now, the user is in the newly created “TypeScript-Folder” directory.
Step 2: Create Configuration File
Next, create the essential configuration files for the TypeScript project by running the given initialization command:
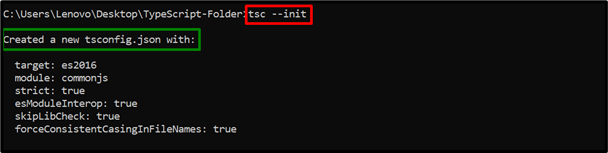
The above command has successfully created the “tsconfig.json” configuration file. This file contains all the mandatory configurations required while executing the TypeScript program.
Step 3: Create the “main.ts” File
Now, open up the created directory in the installed code editor (VS code) in this way:

The above command will open up the code editor.
Main.ts File (code)
Now, create a new “main.ts” file in the “TypeScript-Folder” and type the following lines of code in it in the code editor:
text = "Welcome to Linuxhint!";
console.log(text);
In the above lines of code:
-
- First, declare the “text” variable data type “string”.
- After that, initialize the stated string.
- Lastly, apply the “log()” method to display the initialized string as an output.
- Press “Ctrl+S” to save the file or “Ctrl+X” to close it.
Step 4: Run TypeScript Compiler and JS File
Lastly, run the TypeScript compiler “tsc” to create the compiled “JS” file for the “main.ts” and then run the “main.js” file using “NodeJS”:
node main.js

As seen, the command prompt executes the TypeScript code successfully.
Tip: Uninstall TypeScript Version (Specific/Latest) Using “npm”
The user can also uninstall TypeScript by running the given “uninstallation” command:

Upon doing so, the TypeScript package will be globally removed/uninstalled from the system.
Conclusion
The “npm (Node Package Manager)” can install the TypeScript version globally by specifying the “typescript” with “latest (for the latest)” or the “@5.x.x”(for specific) version. Once it is installed, check its version using the “tsc” TypeScript compiler. After that, create a directory, navigate to it, add configuration files, create a “.ts” file, compile it, and then run the “NodeJS” to execute the “.js” file. This post deeply elaborated on the complete process to install and use the “npm” TypeScript version.