
One of the benefits of Cockpit is that it provides a unified interface to manage multiple Linux servers which can be particularly useful for system administrators who need to manage several systems. With Cockpit, the administrators can perform many common tasks from a single web interface without the need for a terminal or command-line interface.
Cockpit is also highly customizable and extensible, with a wide range of plugins that are available to add additional functionality. For example, plugins are available to manage the virtual machines, Docker containers, and Kubernetes clusters.
This article explores how you can install and use Cockpit on Ubuntu 20.04.
Prerequisites to Install Cockpit on Ubuntu 20.04
Before installing Cockpit on Ubuntu 20.04, you must meet specific system requirements and dependencies. Here’s a rundown of what you’ll need:
System requirements:
- Ubuntu 20.04 LTS or later
- A user account with administrative privileges
- Network access to the Ubuntu system
Step-by-Step Guide on How to Install Cockpit on Ubuntu 20.04
Notably, there are two methods that you can use to install Cockpit. They include:
Using the Command Line Interface
Cockpit depends on several packages that are not installed by default on Ubuntu 20.04. You’ll need to install these packages before you can install Cockpit. Here are the commands that you can use to install the necessary dependencies:
sudo apt install cockpit
These commands install Cockpit and its dependencies on your Ubuntu 20.04 system. Once you met the system requirements and installed the necessary dependencies, you’re ready to proceed to installing Cockpit on your Ubuntu 20.04 system.
Using the Graphical User Interface
This method involves the following steps:
- Open the Ubuntu Software application.
- Search for “Cockpit” in the search bar.
- Click on the “Cockpit” application in the search results.
- Click the “Install” button.
- Wait for the installation process to complete.
Once Cockpit is installed, you can access it by opening a web browser and navigating to https://localhost:9090. This action opens the Cockpit login page where you can enter your Ubuntu system’s username and password to log in.
Note that if you’re installing Cockpit on a remote Ubuntu system, you may need to configure the firewall rules to allow the incoming connections to the Cockpit web interface. It applies to either of the methods. Let’s discuss how to do this in the following discussion.
Configuring the Firewall
By default, the Ubuntu 20.04 firewall (UFW) does not allow the incoming connections to the Cockpit web interface. If you want to remotely access the Cockpit, you must configure the firewall rules to allow the incoming connections.
Configuring the firewall involves the following steps:
Open a terminal window on your Ubuntu 20.04 system.
Enter the following command to allow the incoming connections to the Cockpit web interface:
This command adds a new firewall rule that allows the incoming connections to the Cockpit web interface. The output looks like this:

This output indicates that the firewall rule for Cockpit has been successfully added to the Ubuntu system’s firewall using the “ufw” command. The “Rule added” message confirms that the rule has been added for IPv4 and IPv6 protocols. This allows the incoming network traffic to access the Cockpit service on the Ubuntu system without being blocked by the firewall.
Verify that the new rule has been added by running the following command:
This shows you the current status of the UFW firewall, including any rules that have been added. The following is a sample output:
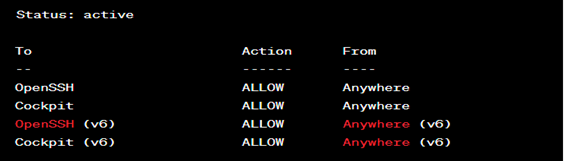
This output indicates the current status of the firewall on the Ubuntu system using the “ufw” command. The “Status: active” message confirms that the firewall is active and is enforcing the defined rules.
With these firewall rules in place, you should be able to remotely access the Cockpit web interface from another machine on the network. Open a web browser and navigate to https://<your-ubuntu-ip-address>:9090 (replace <your-ubuntu-ip-address> with the IP address of your Ubuntu 20.04 system).
Accessing the Cockpit Web Interface and Logging In
To access the Cockpit web interface on your Ubuntu 20.04 system, open a web browser and navigate to https://localhost:9090. If you’re remotely accessing the interface, replace the localhost with the IP address of your Ubuntu system.
Once you navigate to the Cockpit login page, enter your Ubuntu system’s username and password to log in. After logging in, you’ll be presented with the Cockpit dashboard which provides an overview of system resources and services.
From the dashboard, you can perform various tasks such as managing the user accounts, starting and stopping the services, monitoring the system performance, and more. You can also install additional plugins to add more functionality to Cockpit.
Managing Services with Cockpit
Cockpit makes it easy to manage the services on your Ubuntu 20.04 system. From the dashboard, you can view the status of running services, start and stop the services, and enable or disable the services to start automatically at boot time.
To manage the services in Cockpit, you need follow these steps:
- Log in to the Cockpit web interface.
- Click on the “Services” tab in the sidebar menu. Here, you’ll see a list of all services that are running on your system and their current status.
- To start or stop a service, click on its name and select “Start” or “Stop” from the dropdown menu.
- To enable or disable a service, click the gear icon next to the service name and select “Enable” or “Disable” from the dropdown menu.
- If you want a service to start automatically at boot time, click the gear icon and select “Enable at boot”.
Cockpit makes the managing of services on your Ubuntu 20.04 system quick and easy.
Managing the User Accounts with Cockpit
Cockpit also allows you to manage the user accounts on your Ubuntu 20.04 system. From the dashboard, you can create new user accounts, modify the existing accounts, and delete the accounts that you no longer need.
To manage the user accounts in Cockpit, you need follow these steps:
- Log in to the Cockpit web interface.
- Click on the “Accounts” tab in the sidebar menu. Here, you’ll see a list of all user accounts on your system.
- To create a new user account, click the “Create User” button and follow the prompts.
- To modify an existing user account, click on its name and make the desired changes.
- To delete a user account, click on its name and select “Delete User” from the dropdown menu.
Managing the user accounts on your Ubuntu 20.04 system with Cockpit is a breeze.
Conclusion
Cockpit is a powerful web-based interface to manage your Ubuntu 20.04 server. With Cockpit, you can efficiently perform various tasks, from managing the packages and services to monitoring the system performance and creating user accounts. The intuitive interface and comprehensive feature set make Cockpit an excellent choice for novice and experienced Linux administrators.