In C++, we can declare and initialize the arrays of different data types like int, string, char, etc. An array is a variable that may hold several values of a similar data type. The “char array” is utilized for storing the character’s collection and the strings in it. The “char array” is similar to the “int array”. As the int array stores the numerical values, the “char array” stores the collection of characters or strings in C++ programming. In this guide, we will initialize the char array in C++ in our codes.
Example 1:
Let’s begin the C++ code by including the header files. The first header file in this example is the “iostream”. Some functions like “cin” or “cout” are declared in this header file which we need in this code. The second header file is the “string.h” which is added here since many functions that we require to manipulate the character of the array are defined in it. The “std” namespace is also added in this code. Then, we invoke the “main()” method here.
To initialize the character array, we place the “char” keyword. Then, the array’s name is typed here. The character array name is “new_Array” whose size is adjusted to “50”. Then, we initialize this character array with the line. The line that we include here to initialize the character array is “My first Character Array is here!”. Now, we want to print these character arrays, so we place the “new_Array” in the “cout”. This renders the character array on the console.
Code 1:
#include <string.h>
using namespace std;
int main()
{
char new_Array[50] = "My first Character Array is here!";
cout<< new_Array << endl;
return 0;
}
Output:
The character array that we initialized in the code is displayed here in the given outcome. All the data that we used to initialize the character array is rendered in the following:

Example 2:
The “iostream” and “string.h” header files are included here. Underneath this, we add the “std” namespace. Then, after calling the “main()”, we initialize the character array with the name, “Arr_1”. We place the “char” data type and then put the name of the character array.
Then, we assign the characters to this array, or we can say that we initialize this array here with the characters. We insert the characters in this array and then utilize the “for” loop below this because we want to display all these characters separately. Then, we use the ”cout” and add “Arr_1[i]” in this cout which displays all the characters of the char array.
Code 2:
#include <string.h>
using namespace std;
int main()
{
char Arr_1[10] = {'a', 'e', 'i', 'o', 'u', 'n' , 'z', 'b', 'w', 'x'};
for(int i = 0; i < sizeof(Arr_1) / sizeof(Arr_1[0]); i++)
{
cout<<"The character of Array is " << Arr_1[i] <<endl;
}
return 0;
}
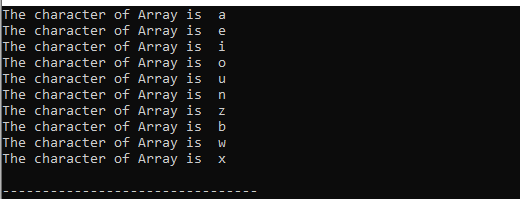
Output:
All the characters of the char array are now displayed here. We insert these characters while initializing the array in our provided code and then render them.
Example 3:
We include the “iostream” and “string.h” header files as we need to work with the functions that are defined in them and then put the “std” namespace underneath them.
Next, we initialize the character array with the name “a” after invoking the “main()” function. The size of this “a” array is “12”. Now, what we do is to insert the name of the character array after setting the data type to “char”. After that, we initialize the characters to this “char” array. To display each character individually, we first add the characters to this array and then use the “for” loop. Next, we appended “a[i]” to this cout using the “cout” function which displays all of the characters of this “char” array.
Code 3:
#include <string.h>
using namespace std;
int main()
{
char a[12] = {'a', '@', '#', '%', '!', '^' , '&', '*', '', 'z', '@'};
for(int i = 0; i < sizeof(a) / sizeof(a[0]); i++)
{
cout<<"The character is " << a[i] <<endl;
}
return 0;
}
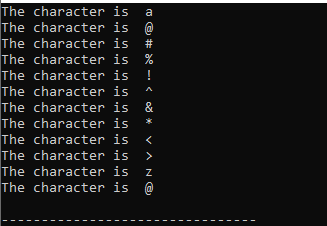
Output:
This now shows every character of the “char” array. In the given code, we initialized the array and added these characters, thus rendering them here.
Example 4:
We must work with the functions that are defined in the “iostream” and “string.h” header files; we include these first, followed by the “std” namespace. We then use the name ” myCharArray ” to initialize the character array following the aforementioned “main()” function call. The size of the “myCharArray” is adjusted to “20” and we initialize it with “Character Array”.
Now, we want to display this character array. We use the “cout” where we add “myCharArray” to display the collection of characters that we added to this array. The character array is then initialized with the name, ” myCharArray2″. Here, the ” myCharArray2″ array has a size of “5”. All that remained to be done is to set the data type to “char” and insert the name of the character array.
The characters are then initialized in this “char” array. We insert the characters into this array first, then use the “for” loop below to show each character separately. Next, we use the “cout” function to append “myCharArray2[a]” to this cout, displaying all of the characters in this char array.
Code 4:
#include <string.h>
using namespace std;
int main()
{
char myCharArray[20] = "Character Array";
cout<< myCharArray << endl;
char myCharArray2[5] = {'a', 'b', 'c', 'd', 'e'};
for(int a = 0; a < sizeof(myCharArray2) / sizeof(myCharArray2[0]); a++)
{
cout<< myCharArray2[a] <<endl;
}
return 0;
}
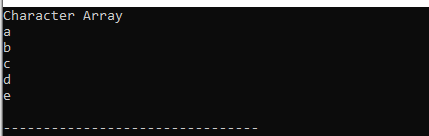
Output:
Both the values of the character arrays are displayed in the following. First, we rendered the complete string that we added in the first char array. Then, the second char array is displayed in which we inserted the characters and displayed them separately in a single line.
Example 5:
After adding the “iostream” and “std” namespace, we call the “main()” here and then initialize the “c_array” of the “char” data type with the size of “100”. Then, we display a message in which we add the “Enter data in the character array here” so the user will enter the characters when this line prints.
The “cin” function is utilized to get the character in the “char” array from the user. We place the “c_array” after “cin” so the data that the user inputs is saved in this “c_array”. Now, we print the characters of the array with the help of “cout” by putting “c_array” in it.
Next, a message is shown, to which we added, “Now again, enter data in the character Array”. The user enters the characters in this area when this line prints. To retrieve a character from the user to use in the “char” array, we use the “cin” function. Now, we use “cout” to print the characters from the array by feeding “c_array” into it.
Code 5:
using namespace std;
int main()
{
char c_array[100];
cout <> c_array;
cout << "You entered: " << c_array << endl;
cout <> c_array;
cout << "You entered: "<<c_array<<endl;
return 0;
}
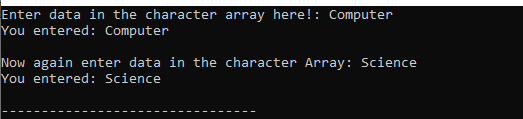
Output:
Here, we entered “Computer” in the first “char” array. Then, it is displayed in the next line after hitting “Enter”. After this, we entered “Science” in the second “char array”. This is also rendered in the following after hitting “Enter” again.
Conclusion
The concept of initializing the “char array” C++ programming is explained in detail here. We discussed that the “char array” is utilized for storing the collection of characters and the string in C++. We initialized multiple “char arrays” and displayed them in our codes. We also initialized a “char array” to get the characters from the user in our last code in this guide. All the examples are explained thoroughly here.