Installing ImageMagick
We need the ImageMagick for this process. First, let’s install it:
Creating a Text Image from Scratch
Let’s say that we want to create an image from scratch. We don’t have to go to paint if we only want to add some text to it. Basically, we don’t have an initial image here. But let’s say we write the following:
Please notice how we didn’t give it an input image. What this does is to create a new image that looks like this:
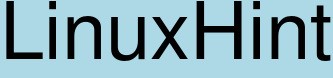
- background : This is the color of the background. Here, it is set to light blue.
- fill : The color that is used to fill a graphic primitive. Use the option -list color to list all the colors that are available to you. Here, the text is filled with black.
- pointsize : It’s the pointsize of the font. Here, we set it to 80.
- label : To an image, it gives it a label. Here, it’s LinuxHint.
- image.jpeg : The name of the output image.
Now, let’s add another switch – the size switch:
The size switch is used to set the width and the height of the image. The size of the canvas itself is now 165×70. By default, the text is located at the NorthWest (unless you specify the location).
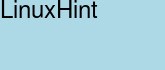
But, you don’t have to give it the complete dimensions! Here, in this first example, we write 160x. We leave the second part blank.
![]()
Or, you can also do this:
![]()
Now, note that the text finds itself at the top-left corner of the image if the canvas is too big. ImageMagick offers you an option to reposition the text. So, to reposition the text, use the gravity switch.
The choices for the gravity include NorthWest, North, NorthEast, West, Center, East, SouthWest, South, SouthEast.
Let’s choose the SouthEast for the sake of our example:

You can obviously play around with the choices offered.
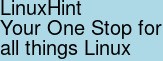
Now, we don’t want a one-liner but we want multiple lines. Basically, what if you had lots to say? Please note that for the label, we use \n to create a new line.
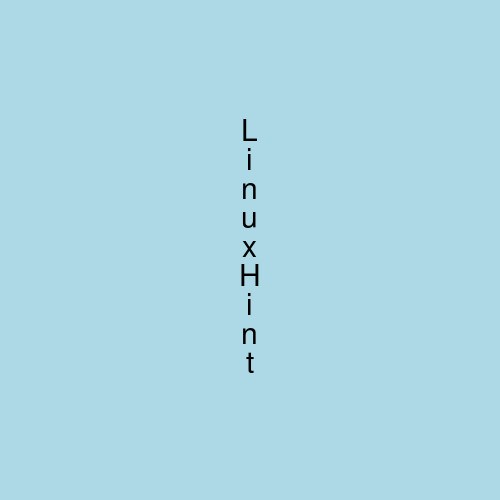
Vertical Labels
A vertical label is basically just a piece of text that is positioned vertically instead of horizontally. Here, you can opt to use the code that’s a bit more complex or use your brain for an instance and write this:
![]()
Once again, you can add more switches to beautify it if you wish. For example:
Well, the idea that we are trying to get across is that you can add any switch you want and turn it into something special.
Caption
Much like the label that is used to add text, you can also use the caption. The difference between the two is that the caption word wraps everything. If you have a very long sentence, for example, the label (if you don’t give it a size) will try to fit everything on one line. If you use the size switch with label, there’s a chance it will overflow. The caption will automatically word wrap it (use new lines to finish the sentence). But the caption also needs the right canvas size, or else it will also overflow.
Let me show you:

As you can see, the size that we used wasn’t big enough to contain the entire line, so it’s overflowing.
Now, let’s give it some leeway (-size 320x).
![]()
Please note that if we give it some leeway, it can write the entire line in a single line! It doesn’t word wrap.
Now, let’s use the caption:

We gave it a leeway, but it word wrapped. Please note that as with label, if the size of the canvas isn’t big enough, it can overflow or be cut off. For example:

But you can write many lines using the caption as well. For example:

For more information about the text images, please visit https://legacy.imagemagick.org/Usage/text/.
Conclusion
ImageMagick is truly fantastic. With just one line of code, we can create just about anything we want. In particular, in this tutorial, we learned a few things. We learned that we don’t need an initial image to create the text images. We learned that we can create the text images and adjust it using a variety of switches such as the size switch, the gravity switch, the pointsize switch, etc. We learned that we can create the text image horizontally and vertically. And that we can word wrap it using the caption instead of the label. Now, this is just the basics of it. There’s a lot more to it. But if you can handle the basics, you can also handle the hard stuff. The next time you need to create a text image, use the ImageMagick instead of Paint!