“PDFs are typically best used when you want to send/print documents. However, PNGs have more uses. On websites, the two most used formats are PNG and JPEG. PNG files are also known as lossless files, which means that no matter how much you compress them, they won’t lose their resolution. This can be very useful for some and in certain instances. In this tutorial, we’ll be learning how to convert a PDF to a PNG file using ImageMagick.”
Installing ImageMagick
We will need ImageMagick for this, so first, let’s install it:
Problems Encountered
In my case, when I entered the code to convert a PDF to a PNG, I got an error – it didn’t want to allow the conversion.

In order to fix this error, we need to modify a few things.
Check to see if you have ghostscript:
If you get a version, then find <policymap> in /etc/ImageMagick-6/policy.xml.
sudo nano policy.xml
In it, you should comment on the following:
<policy domain="coder" rights="none" pattern="PS2" />
<policy domain="coder" rights="none" pattern="PS3" />
<policy domain="coder" rights="none" pattern="EPS" />
<policy domain="coder" rights="none" pattern="PDF" />
<policy domain="coder" rights="none" pattern="XPS" />

In my case, I just added <!– (text) –>.
Then save it and exit.
PDF to PNG – The Simplest Way


So let’s try to turn our first PDF into a PNG:
The output is as follows:
So let’s examine the code we just wrote:
linuxhint.pdf : the input PDF file.
-density: the density defines the image resolution; it is in DPI (dots per inch). By default, this value is set to 72 DPI.
-depth: defines the depth of the image.
-quality: this is the JPEG/MIFF/PNG compression value. A quality value of 1 means that the compression is at its highest and the image quality is at its lowest; if, on the other hand, the quality is 100, it means that the compression is at its lowest, but the image quality is at its highest.
-colorspace: is used to set the colorspace of the image
linuxhint1.png: the output PNG file name
But I don’t like the quality that it chucked out. If I were to zoom in to the first page of the PNG that it chucked out, this is what it would look like:
This (the latter) is bad in terms of quality, so let’s try again, but this time by improving the quality. The quality using the previous method can become really, really horrible in some cases.
The original quality of the PDF file was as follows, so this is what we’re trying to replicate:

Improving the Quality
So now, let’s try to improve the quality of the output:
Now let’s zoom in to the first page (Page 1), and this is now what we get:
This is a lot better in terms of quality.
In this case:
-units: units for the resolution of the image. Your options are: Undefined, PixelsPerInch, or PixelsPerCentimeter.
-density: here, it’s the DPI which is at 72 by default (that is, if you don’t specify a number). So we’re increasing the density by a factor of 4.
linuxhint.pdf : this is your input file. This is the original PDF that we’re trying to convert into a PNG.
-resize: since we supersized the page, we now have to bring it back down to a reasonable number. So we tone it down by resizing it to 25% of its original size.
output.png: this is the name of your output.
In order to understand what we just did, take a look at the following code:
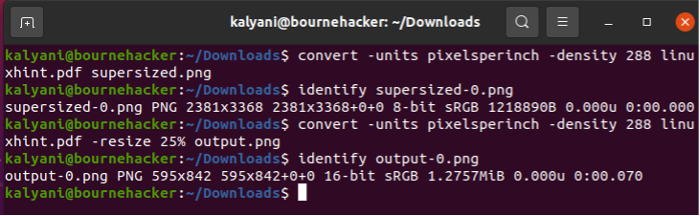
When I use the following code:
convert -units pixelsperinch -density 288 linuxhint.pdf supersized.png
I get an output with a resolution of 2381×3368.
When on the other hand, I use the following code (the only difference is that it’s been resized):
The resolution of the PNG is now 595×842.
If you want to supersize it and keep it that way, it’s up to you, but the point is that you can resize it if you want.
Selecting Pages
The PDF that I randomly created was just for fun and consisted of 2 pages, but in real life, this wouldn’t be the case. I mean, I’ve seen PDFs with 100s of pages. So what do you do then? What can you do if you only want pages 50-51 from a 100-page document?
So let’s start selecting pages. Since my PDF document is only 2 pages long, I’m going to select page 2 and only page 2. So basically, even if I have a document that is two pages long, I can choose to turn only page 2 into a PNG.
Now, we have to remember that when coding, almost everything begins with a 0, so page 1 is indexed by 0, and page 2 is indexed by 1.
In order to select a specific page, put the page number in brackets ([ ]) after the name of the original file that you’re trying to convert.
The latter will select only page 2 (indexed by 1 – math.pdf[1]) and won’t touch the other pages.
If, on the other hand, let’s say your document had 10 pages and that you wanted pages 5-8, you’d write the following:
Conclusion
PNG is a format that is widely used. Using ImageMagick, you can convert even PDFs to PNGs. It’s actually quite simple; you just have to remember that you really need to use the density switch. The problem with typical commands, however, is the quality of the image rendered. At times, it can be horrible – the quality of the output PNG file! In order to improve the quality of the image outputted, what you can do is to define the units switch and supersize the picture. The latter will for sure produce great quality PNG files out of PDF files! However, if after that you want or need a reasonable size, then shrink it. But just remember to supersize it first! Simple enough, right?
Happy Coding!