An animation is pretty cool. I mean, it’s animated, how can you not like it, right? But did you know that an animation is nothing more than a bunch of pictures put together and played one after the other, super fast? When you see an animation, it’s nothing more than a bunch of pictures that are played fast enough such that your eyes can’t tell that they’re pictures. Your eyes interpret them as a small movie. Now, that we know how an animation is made, let’s get to it and make some.
In this tutorial, we will show you how to animate using the ImageMagick. Please note that ImageMagick is a very thorough package, and you can do a lot. So, we will only cover the basics of animation.
Installing ImageMagick
We need ImageMagick for this process, so let’s install it first using the following command:
Basic Animation
Images are the base of an animation. For this animation, we have 10 pictures. The first picture is a blank canvas. The second one has an L on it. The third one has an L and an i on it. The fourth one has an L, an i, and n on it, and so on until the it completes to spell “LinuxHint”.
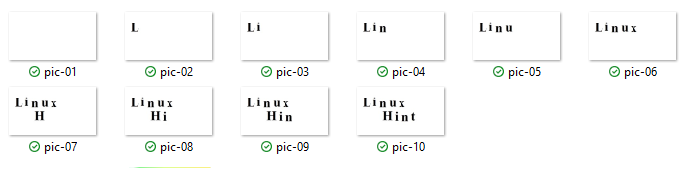
Remember that when you number the pictures, you have to be careful. In this case, if we had numbered the pictures as pic-1 until pic-10, the program would not have generated the same GIF as if we had numbered it as pic-01 until pic-10. This is because pic-10 comes after pic-1. But pic-10 does not come right after pic-01; pic-02 comes after pic-01. So, if you have a 100 pictures, you want to use three digits to number them. For instance, use the numberings pic-001 until pic-100.
Let’s start animating.
cd Downloads
(Navigate to the folder that contains your images.)

pic-*.gif : The initial 10 images that we have (the star means include pictures with anything in that position).
animation.gif : The name of the output (the animated gif).
-loop : Loop is the number of times the animation has to be replayed. If you set this number to zero, then it will be an infinite loop (never ending loop).
-delay : Sets the delay in 1/100th of a second.
What have we written here? We’re taking the 10 pictures that we created and we create an animation which plays the images one after the other with a slight delay between the images. Once the gif is generated, it will be named “animation.gif” and will replay continuously.
If you’d like to resize the animation, use the following command:

The point is that you can add as many parameters as you want.
Page Animation
In the previous example, we played one picture at a time. But every time a picture is played, the previous picture is removed. Pic-01 was played first, then pic-02, then pic-03. But in this case, pic-01, pic-0, until pic-10 were not all in the same frame at any instant. In a page animation, pic-*.gif are all on the canvas at the end. So, the previous image is not removed. To give you an idea of what this is like, let’s take a new set of pictures.
-page +0+0 photo11.jpg \
-page +500+0 photo22.jpg \
-page +0+500 photo33.jpg \
-page +500+500 photo44.jpg \
-loop 0 animation03.gif

We know what the delay and the loop switches do.
-size : This is the size of your canvas. You can set it to any dimension that you want. in our example, we set it to 1000×1000.
xc:SkyBlue : This is the background color. In this case, we have chosen SkyBlue as the background color.
-page : The page switch is followed by the offset values. In other words, after the page switch, write down a plus sign and where on the x axis do you want the picture to be and then on the y-axis. Please remember that the top left corner is 0, 0 or +0+0. Here, the photo11.jpg image is placed at (0,0). The photo22.jpg image is placed at (500,0). The photo33.jpg image is placed at (0,500). And finally, the photo44.jpg image is placed at (500,500). Also remember that for the y-axis, downward is positive. All images here have a resolution of 500×500. After the offset values, you can write down the name of the picture for which this offset applies.
animation03.gif : The name of the output.
Dispose Previous
In the next example, if we want the image to revert to the initial canvas before proceeding, let’s take the code.jpg, place it on the canvas, remove it from the canvas, revert to the background canvas, and then place the food.jpg picture, etc. Let’s show you an example:
-size 1000x1000 xc:SkyBlue +antialias \
-dispose previous -delay 100 \
-page +0+0 photo11.jpg \
-page +500+0 photo22.jpg \
-page +0+500 photo33.jpg \
-page +500+500 photo44.jpg \
-loop 0 animation04.gif

Here, there’s only one new term: the dispose switch. When you use the word previous with the dispose switch, it returns the canvas to the previous state before putting the next image on it. Here, the initial permanent canvas is the canvas with SkyBlue color on it – this is our background canvas. Then, we add the code.jpg image and after a short delay, we revert back to our background canvas. Then, we display the food.jpg image and revert back to our background canvas, etc. You get the picture, right?
For more information about animations using the ImageMagick, visit https://legacy.imagemagick.org/Usage/anim_basics/.
Conclusion
Animations are pretty cool and they tend to be useful here and there. Using the ImageMagick, there’s a lot you can do in terms of animation. However, in this tutorial, we only learned about the basics of animations. In its simplest form, you can have many properly labeled images that you can use to create a slideshow – basically by displaying the pics in a given order (pic01, then pic02, then pic03, etc.). In the second method, you can overlay pictures. We have pic1, then pic1/pic2, then pic1/pic2/pic3, etc. Using the dispose previous method, you can show an image, revert back to the original canvas, then show a second image, etc. (background, pic01, background, pic02, background, pic03, etc.). Whichever method you use, you can create great animations in a blink of an eye. Although the code looks tedious, it’s still a one-liner!