Internet Control Message Protocol, also known as ICMP, is a protocol used to check the connectivity of the hosts in a network. We can also use this protocol to diagnose the problems in a network. But from a security point of view, it can also be used by someone to perform a DDoS attack. A ping flood or a Distributed Denial of Service (DDoS) attack is a form of attack in which someone sends a lot of ping requests to a host and the host becomes almost inaccessible to the routine traffic. To avoid this kind of situation, network administrators usually block ICMP on their network. In this article, we will learn how IP tables can be used to block ICMP on our server.
What are the IP Tables?
IP Tables is a firewall utility program for Linux operating systems. It can be used to accept, deny, or return network traffic to or from a source. It observes the coming network traffic using different sets of rules defined in a table. These sets of rules are called chains. IP tables observe packets of data and which packet matches with rules are directed to another chain or assigned one of the following values.
- ACCEPTED: Packet will be allowed to pass
- DROP: Packet will not be allowed to pass
- RETURN: The chain will return the packet to the previous chain.
Installing IP Tables
For most of the Linux distributions, IP tables come pre-installed. You can check whether IP tables are installed or not by typing the following command in the terminal.
If IP tables are not installed, you can install them by running the following command in the terminal.
ubuntu@ubuntu:~$ sudo apt-get install iptables
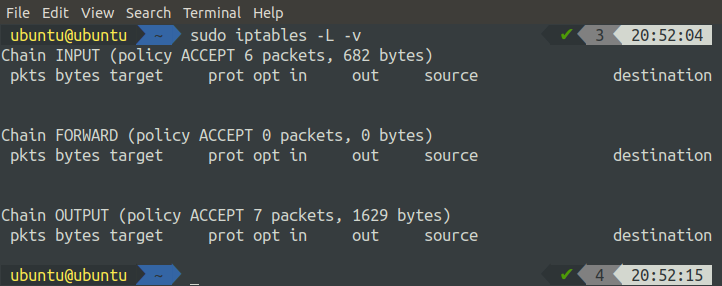
We can check the default status of IP tables by running the following command in the terminal.
‘-L’ flag lists all the rules, and the ‘-v’ flag shows detailed information.
Alternatively, we can also list all the rules added to the IP tables by the running the following command in the terminal.
By default, all the chains are accepting the packets and these chains have no rule assigned.
Assigning Rules to Chains
Initially, no rule is assigned to any chain, and they are all accepting network traffic. Now in this section, we will see how we can define custom rules to block or allow network traffic. In order to define a new rule, we use the ‘A’ (append) flag, which tells the IP tables that a new rule is going to be defined. The following options are also used along with the ‘A’ flag to describe the rule.
-i (interface): This option indicates through which interface you want your network traffic to be allowed or blocked. You can get a list of all interfaces on your system by running the following command in the terminal.
-p (protocol): This option defines which protocol you want to filter using IP tables. This may be TCP, UDP, ICMP, ICMPV6, etc. You can apply rules to all protocols by using all options.
-s (source): This option shows the source of network traffic like IP address or domain name.
-dport (destination port): This option is used to indicate the destination port for network traffic.
-j (target): This option is used to show the target. It may be ACCEPT, DROP, REJECT, or RETURN. This option is compulsory for every rule.
In general, the basic syntax for adding a rule will be as follows:
-p <protocol> -dport <destination port> -s <source>
Blocking ICMP using IP Tables
So far, we have a basic understanding of IP tables and their usage to allow or block traffic on specific ports through specific interfaces. Now, we will use IP tables to block ICMP on our server.
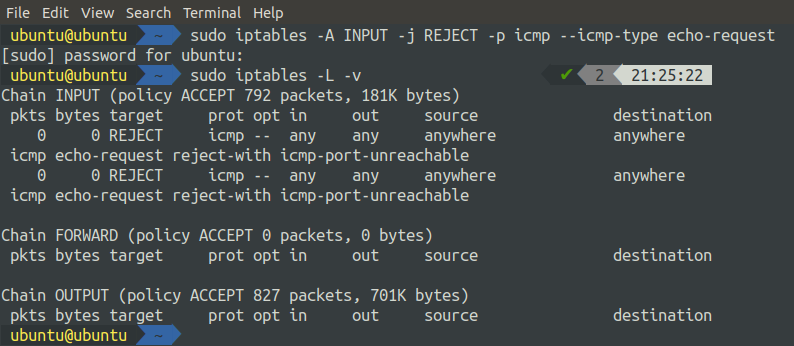
The following command will add a rule to block ICMP on your machine:
After running the above command, now check the status of the IP tables.
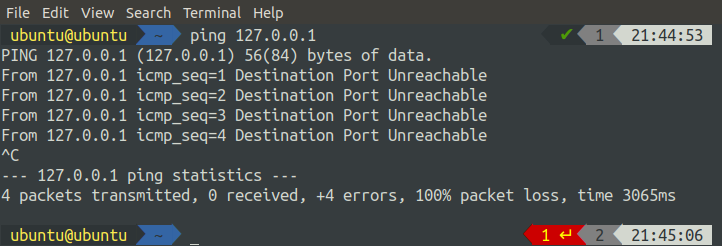
We can see that a rule has been added to the INPUT chain, which shows that all ICMP traffic will be rejected. Now, if we ping our system from any other system from the same network, it will reject the request. We can see the result by making a ping request from the localhost
We can see that we are getting rejection messages from the system if we try to make a ping request to it.
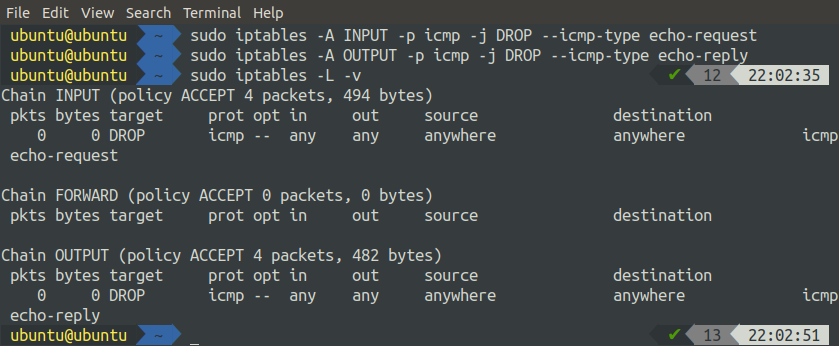
Alternatively, the following two commands can be used to add rules to block ICMP on our server.
ubuntu@ubuntu:~$ sudo iptables -A OUTPUT -p icmp -j DROP --icmp-type echo-reply
After adding these two rules, now check the status of the IP tables.
We can see that the above command added two rules, one to the INPUT chain and the other one to the OUTPUT chain.
The difference between the DROP and REJECT is that when we use REJECT, it shows us a warning (Destination port Unreachable) when we ping because the request is rejected and it does not reach the port. On the other hand, when we use a DROP, it simply drops the output. Input is not rejected, it gets processed, but the output is not displayed as shown below
Conclusion
Hackers adopt different methods to perform Distributed Denial of Service (DDoS) attacks to the servers. Ping flood is also a form of DDoS attack. Hackers send so many ping requests to the server that the server uses all its compute power to process the ping requests and does not perform its actual processing. In this scenario or multiple other scenarios, you may need to block ICMP on your server.
In this article, we have learned different ways to block ICMP using IP tables. We discussed how we can add different rules to block ICMP on our server. In the same way, we can use IP tables to block any kind of traffic on any port using IP tables.


