This study will explain:
- How to Create/Make a New Branch From the Latest Stash?
- How to Create/Make a New Branch From an Earlier Stash?
How to Create/Make a New Branch From the Latest Stash?
To create a new branch from the latest stash:
- First, view the latest stash changes.
- Then, run the “git stash branch <branch-name>” command to create a branch from the latest stash and apply its changes to it.
- Lastly, verify the newly created branch.
Step 1: View Available Stashes
First, type out the following command to display the list of available stashes in the repository:
It can be seen that the repository contains three stashes:
Step 2: View Latest Stash Changes
Then, view the latest stash changes with the help of given-provided command:
According to the below output the latest stash contains only one “new.txt” file’s changes:
Step 3: Create New Branch From Latest Stash
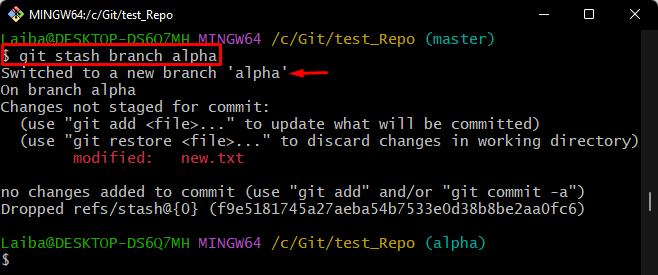
Now, execute the “git stash branch” command along with the desired branch name to create it. Here, “alpha” is our new branch name:
The below screenshot indicates that the “alpha” branch has been created from the latest stash with all changes:
Step 4: Verify Branch
Finally, verify whether the new branch has been created or not by viewing all branches:
The below output displays the newly created “alpha” branch:
How to Create/Make a New Branch From an Earlier Stash?
To create a new branch from the earlier stash, utilize the “git stash branch <branch-name> stash@{reference-no}” command and specify the branch name and reference.
Step 1: Navigate to the “master” Branch
First, move to the “master” branch:
Step 2: List Available Stashes
Then, display the list of all stashes in the repository and choose the desired stash reference:
According to the below image, the current repository contains two stashes:
Step 3: Create New Branch From Earlier Stash
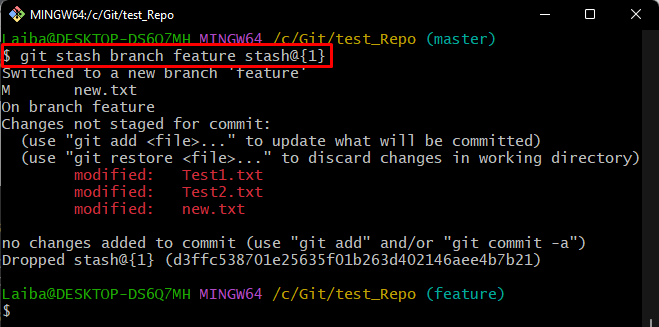
Utilize the “git stash branch” command and specify the new branch name and the stash reference to create a new branch from it. For instance, we have specified the “stash@{1}” stash reference to create a “feature” branch:
In the below output, it can be observed that the new “feature” branch has been created successfully including all its changes:
Step 4: Verify Branch
Finally, view all available branches to ensure whether the new branch has been created or not:
That’s all about creating a new branch from the stash in Git.
Conclusion
Git permits developers to create a new branch from stash. The “git stash branch <branch-name>” command is utilized to create a branch from the latest stash. Moreover, users can create a new branch from an earlier stash using the “git stash branch <branch-name> stash@{reference-no}” command. This study explained the methods to create or make a branch from a stash.


