
Note: The procedure shown here has been tested on Ubuntu 20.04. However, the same procedure can be followed in other Linux distributions which have Fail2ban installed.
What is a Log File?
Log files are automatically generated files by an application or OS that have a record of events. These files keep track of all events linked with the system or application which generated them. The purpose of log files is to maintain a record of what happened behind the scene so that if something occurs, we can see a detailed list of events that have happened before the problem. It is the first thing administrators check when they encounter any issue. Most log file ends with .log or .txt extension.
Fail2ban Log File
Fail2ban generates a log file that records all events for connection attempts. The Fail2banapplication itself monitors its log files for failed authentication attempts or any suspicious activities. After a predefined number of failed authentication attempts, it bans the source IP addresses for a specific amount of time. Hence, it is effective in preventing intrusion before it compromises your system.
How to Check Fail2ban Log File?
You can find the Fail2ban log file at the /var/log/fail2ban directory. To view the log file, use the command below:
This is the output of the above command that shows different events, along with the date and time of occurrence.
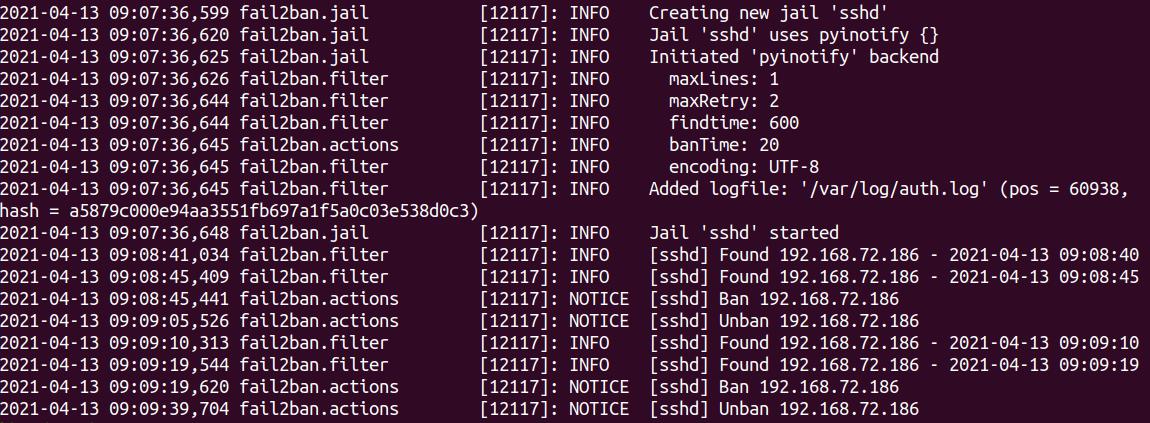
If we focus on the last four lines in the above output, we can see two Found entries that show two connection attempts by a source IP address 192.168.72.186. After the third attempt, the source IP was blocked, shown by the Ban entry (as maxretry=2). Then the last entry is Unban, which shows that the IP address has been unbanned after 20 seconds (as bantime=20sec).

Log Level
Log level tells the type and degree of severity of a logged event. There are different log levels in Fail2ban, these are as follows:
- CRITICAL (Critical Conditions; should be investigated immediately)
- ERROR (When something goes wrong but not critical)
- WARNING (Potentially harmful events)
- NOTICE (Normal but significant condition)
- INFO (Informational messages and can be ignored)
- DEBUG (Debug-level messages)
Log levels are defined in the /etc/fail2ban/fail2ban.local. To view the current log level, use the command below:
The following output shows the current log level of Fail2ban is INFO.

Changing Log Level
To change the log level of Fail2ban, you will have to edit its global configuration file. Fail2ban configuration file is fail2ban.conf under the /etc/fail2ban directory. However, it is suggested not to edit this file directly. Instead, if you need to make any configuration changes, create fail2ban.local file.
1. If you have already created the fail2ban.local file, then you can leave this step. Create fail2ban.local file using this command in the Terminal:
2. Edit fail2ban.local file using the command below in the Terminal:
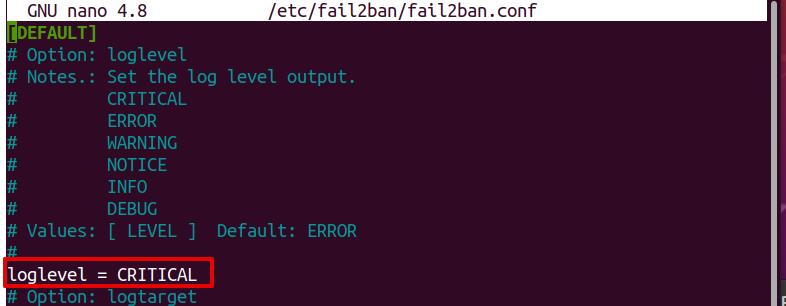
3. Now, find the loglevel entry in the fail2ban.local file (you can use the Ctrl+w to find any entry in the Nano editor). Then change the log level entry to the desired log level. For instance, to set the log level to CRITICAL, change its value:
Then, save and exit the fail2ban.local file.
4. Restart the Fail2banservice as follows:
5. Now, to confirm if the log level has changed to the desired level, use the command below:
Log Target
In Fail2ban logging, you can choose where to send the logs. A log target can be any file, STDOUT, STDERR, or SYSLOG. However, you can specify only one log target. By default, with Fail2banlogs, all the logging events are in a /var/log/fail2ban.log file. To find the current log target, use the command below:
The following output shows the current log target is a /var/log/fail2ban.log file.

Changing Log Target
The log target typically does not need to be modified. However, in case you need to modify it, you can do so as follows:
1. To change the log target, edit the fail2ban.local using the command below in the Terminal.
If fail2ban.local file is not created, you can create it, as shown in the previous Changing Log Level section.
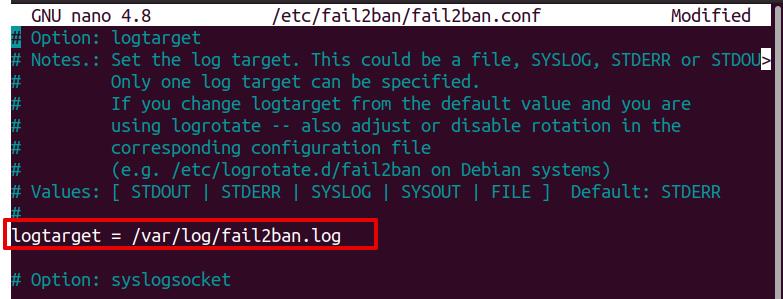
2. Now, find the logtarget entry in the fail2ban.local file. You can use the Ctrl+w to find any entry in the Nano editor.
3. Change the logtarget entry to the desired target, which can be any file such as STDOUT, STDERR, or SYSLOG. Then save and exit the fail2ban.local file.
4. Restart the Fail2banservice as follows:
5. After changing the log target, you can confirm it using the command below:
The output should now show the new log target.
In this post, you have learned how to check Fail2ban logs. You have also learned about Fail2ban log levels and log targets, and how to change them if you ever need to do so.