This blog will state the method for accepting all current and incoming changes in Git.
How to Accept All Current/Incoming Changes in Git?
To accept all current/incoming changes in Git, do follow the below stated procedure:
- Go to the Git local directory.
- View the available content with the help of the “ls” command.
- Make/Generate a new file using the “touch” command.
- Check Git status and track the file in the staging area.
- Commit changes by executing the “git commit” command with the “-m” flag.
- Utilize the “git remote -v” to view Git remote.
- Fetch the desired remote branch data from a centralized server.
- Pull changes in the current branch.
- Lastly, push changes to the GitHub server.
Step 1: View Git Local Directory
First, go to the Git local repository with the help of the “cd” command:
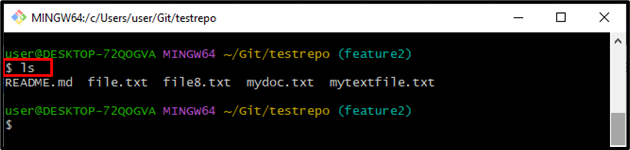
Step 2: List Available Content
Execute the “ls” command to list all available content:
As you can see, existing content has been listed successfully. Furthermore, the highlighted file is selected for further processing:
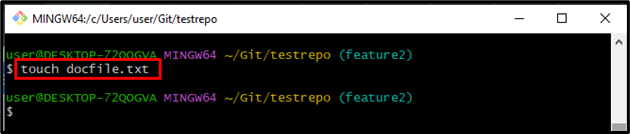
Step 3: Generate New File
Use the “touch” command to generate a new file:
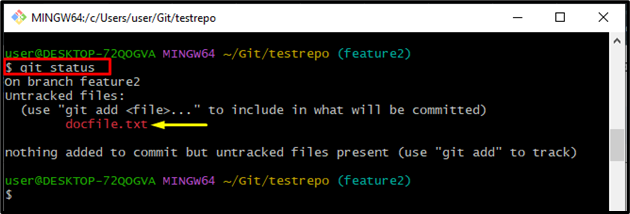
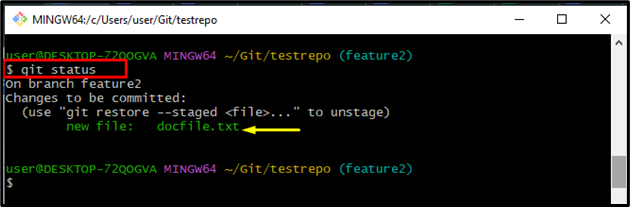
Step 4: View Git Status
Now, run the “git status” command to check the status of the current working repository:
According to the below-given output, the Git working area contains the untracked “docfile.txt” file:
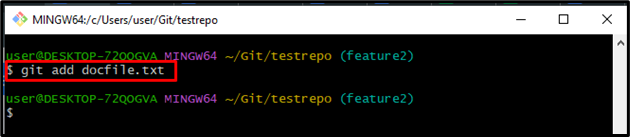
Step 5: Track the File in Staging Area
Execute the provided command and push the added changes to the staging area:
Step 6: View the Current Status
Utilize the below-mentioned command to check the current status:
It can be observed that the Git working area contains the changes which need to be committed:
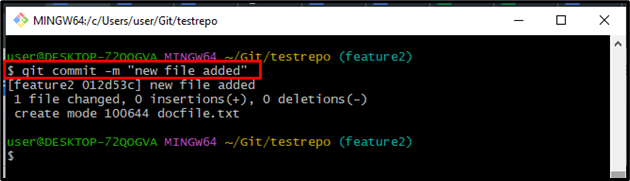
Step 7: Commit Changes
Next, run the “git commit” command along with the “-m” flag to add the desired commit message and push changes to the Git repository:
The below-provided output indicates that all the changes have been committed successfully:
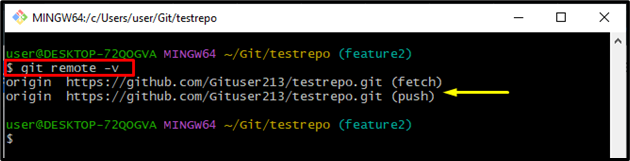
Step 8: Check the Remote
The “git remote” command is utilized for creating, viewing, and deleting connections to other repositories. Git remote assists a particular option “-v” to display the URLs which Git has saved as a short name. These short names are used during the reading and writing operation:
Step 9: Fetch Data
To fetch the data from your remote projects, run the below-provided command:

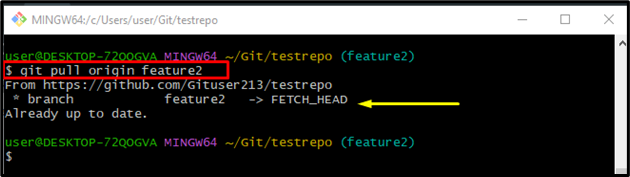
Step 10: Pull Changes
To pull changes into the local current working branch, execute the “git pull” along with the remote and branch name:
As a result, the below-stated output indicates that the current branch has been up to date successfully:
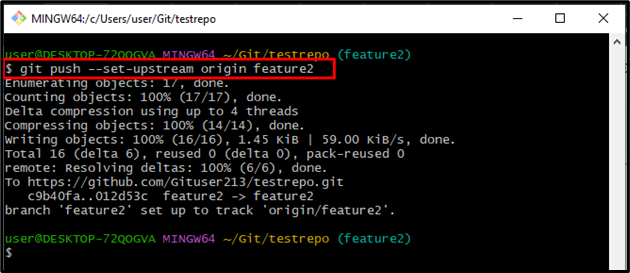
Step 11: Push Changes
Lastly, execute the “git push –push –set-upstream” to push all the local changes in the desired remote branch:
As you can see, the local branch changes have been pushed successfully:
That’s all about accepting current/incoming changes in Git.
Conclusion
To accept all current/incoming changes in Git, go to the Git local directory and list the available content with the help of the “ls” command. Then, create a new file using the “touch” command, check Git status, and track the file in the staging area. Commit changes by executing the “git commit” command with the “-m” flag and utilize the “git remote -v” to view the remote. Next, fetch and pull changes data from a remote branch into the current local branch. Lastly, push changes to the remote branch. This post illustrated the easiest way for accepting current/incoming changes in Git.