This tutorial will explain:
- Differentiate Between Git tag and Git Branch?
- Uses of Tag vs Branch in Git
- How to Generate a New Git Local Branch?
- How to Generate New Local Tag in Git?
Differentiate Between Git tag and Git Branch?
In Git, tags and branches are used for organizing the source code. However, they have different purposes. “Tags” are used when creating software releases to label a specific historical point. On the other hand, “branches” are permanent pointers used while doing feature development or bug fixes. Branches can be moved between repositories, which helps to add or fix bugs in the codebase without affecting other parts.
Uses of Tag vs Branch in Git
The uses of tags and branches in Git are:
- Tags are used for tagging objects while releasing software.
- Branches are used when developers add new features or fix errors.
Now, let’s move forward and check the method of generating a local branch!
How to Generate a New Git Local Branch?
For creating a new branch, first, navigate to a particular repository and execute the “git branch <branch-name>” command. Then, utilize the “git branch” command for verification.
Step 1: Navigate to Git Directory
Run the below-given command in the Git terminal and move to the required local directory:

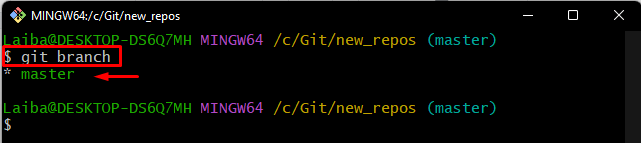
Step 2: Check List of Branches
Then, view the list of all available branches in the local repository by running the following command:
According to the below output, the current repository contains only the “master” branch:
Step 3: Create a New Branch
In order to create a new branch in the directory, run the “git branch” command and specify the target branch name:

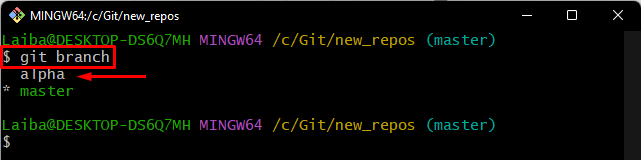
Step 4: Verify Newly Created Branch
Lastly, use the below-stated command to ensure whether the new branch has been created or not:
It can be observed that the new “alpha” branch has been created in the current repository:
How to Generate a New Local Tag in Git?
In order to generate a new local tag, execute the “git tag <tag-name>” command in the Git bash terminal. Then, use the “$ git tag” command to ensure the created tag.
Check out the given below instructions for a better understanding!
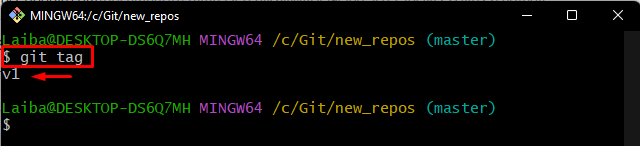
Step 1: View List of Tags
First, check the list of all existing tags in the current directory by using the following command:
It can be seen that the current repository contains only one tag, which is the “v1” tag:
Step 2: Create a New Tag
To create a new tag in the repository, utilize the “git tag” command along with the required tag name:

Step 3: Verify Created Tag
Lastly, ensure whether the new tag has been created or not with the help of the below-provided command:
According to the below screenshot, the new “v2” tag has been created successfully:

That’s all! We have illustrated the difference between tags and branches in Git.
Conclusion
Tags and branches are two ways to organize a Git repository. Tags are labels for a specific point in history used when developers need to mark the release of software that they have created. Branches are permanent pointers on top of commits representing different features or bug fixes that developers want to add or fix in their code. This tutorial demonstrated the difference between tags and branches in Git and how to create them.