In today’s article, we would like to share with you the methods of setting SELinux to the “Permissive” mode after walking you through its important details.
What is SELinux Permissive Mode?
The “Permissive” mode is also one of the three modes in which SELinux operates, i.e., “Enforcing”, “Permissive”, and “Disabled”. These are the three particular categories of SELinux modes, whereas generically, we can say that at any particular instance, SELinux will either be “Enabled” or “Disabled”. The “Enforcing” and “Permissive” modes both fall under the “Enabled” category. In other words, it means that whenever SELinux is enabled, it will either be operating in the “Enforcing” mode or the “Permissive” mode.
This is why most of the users get confused between the “Enforcing” and “Permissive” modes because, after all, they both fall under the “Enabled” category. We would like to draw a clear distinction between the two by first defining their purposes, and then mapping it on to an example. The “Enforcing” mode works by implementing all the rules that are stated in the SELinux security policy. It blocks the access of all the users that are disallowed to access a particular object in the security policy. Moreover, this activity is also logged in the SELinux log file.
On the other hand, the “Permissive” mode does not block the unwanted access, rather, it simply records all such activities in the log file. Therefore, this mode is mostly used for tracking bugs, auditing, and adding new security policy rules. Now, consider an example of a user “A” who wishes to access a directory named “ABC”. It is mentioned in the SELinux security policy that the user “A” will always be denied access to the directory “ABC”.
Now, if your SELinux is enabled and is operating in the “Enforcing” mode, then whenever the user “A” will try to access the directory “ABC” the access will be denied, and this event will be recorded in the log file. On the other hand, if your SELinux is operating in the “Permissive” mode, then the user “A” will be allowed to access the directory “ABC”, but still, this event will be recorded in the log file so that an administrator may know where the security breach occurred.
Methods of Setting SELinux to Permissive Mode on CentOS 8
Now when we have fully understood the purpose of the “Permissive” mode of SELinux, we can easily talk about the methods of setting SELinux to “Permissive” mode on CentOS 8. However, before heading on to these methods, it is always good to check the default status of SELinux by running the following command in your terminal:
![]()
The default mode of SELinux is highlighted in the image shown below:

Method of Temporarily Setting SELinux to Permissive Mode on CentOS 8
By temporarily setting SELinux to the “Permissive” mode, we mean that this mode will be enabled only for the current session and, as soon as you restart your system, SELinux will resume its default mode of operation, i.e., the “Enforcing” mode. For temporarily setting SELinux to the “Permissive” mode, you need to run the following command on your CentOS 8 terminal:
![]()
By setting the value of the “setenforce” flag to “0”, we are essentially changing its value to “Permissive” from “Enforcing”. Running this command will not display any output, as you can view from the image appended below.

Now to verify if SELinux has been set to the “Permissive” mode in CentOS 8 or not, we will run the following command in the terminal:
![]()
Running this command will return the current mode of SELinux and that will be “Permissive”, as highlighted in the image shown below. However, as soon as you will restart your system, SELinux will get back to the “Enforcing” mode.

Method of Permanently Setting SELinux to Permissive Mode on CentOS 8
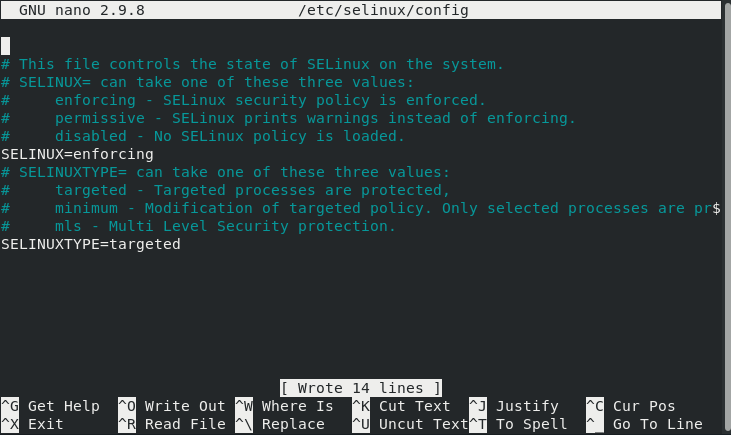
We have already stated in Method # 1 that following the above method will only temporarily set SELinux to the “Permissive” mode. However, if you want these changes to be there even after you restart your system, then you will need to access the SELinux configuration file in the following manner:
![]()
The configuration file of SELinux is shown in the image below:
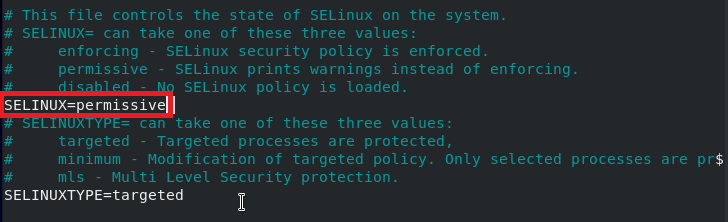
Now, you need to set the value of the “SELinux” variable to “permissive”, as highlighted in the following image after which you can save and close your file.
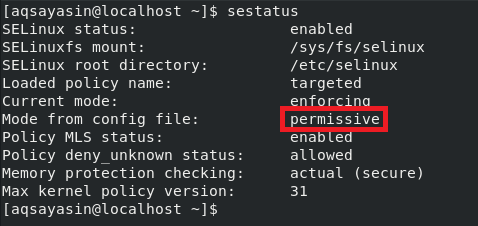
Now, you need to check the status of SELinux once again to find out if its mode has been changed to “Permissive” or not. You can do this by running the following command in your terminal:
![]()
You can see from the highlighted portion of the image shown below that, right now, only the mode from the configuration file is changed to “Permissive”, whereas the current mode is still “Enforcing”.
Now for making our changes to take effect, we will restart our CentOS 8 system by running the following command in the terminal:
![]()
After restarting your system, when you will check the status of SELinux again with the “sestatus” command, you will notice that the current mode has also been set to “Permissive”.
Conclusion:
In this article, we learned the difference between the “Enforcing” and “Permissive” modes of SELinux. Then we shared with you the two methods of setting SELinux to the “Permissive” mode in CentOS 8. The first method is for temporarily changing the mode, whereas the second method is for permanently changing the mode to “Permissive”. You can use any of the two methods as per your requirements.