This blog will discuss the process of switching to another Git tag in the local repository.
How to Switch to Another Git Tag?
To switch to another tag, follow the below-provided instructions:
- Move to the particular Git local repository
- Create a new local tag
- Display the list of all available Git tags
- Run the “git switch –detach <new-tag>” or “$ git checkout <tag-name>” commands.
Step 1: Navigate to Particular Repo
First, go to the desired Git local repository by running the “cd” command:
Step 2: Create New Git Tag
Now, execute the “git tag” command to create a new Git tag:
Here, the “v1.1.2” is the newly created tag name:
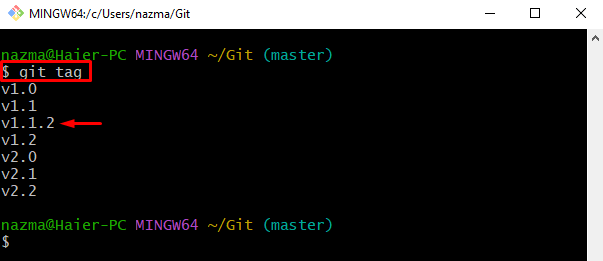
Step 3: Verify Created Git Tags
Then, show the list of Git tags by executing the “git tag” command:
It can be seen that the newly created tag exists in the tag list:
Step 4: Switch to Tag
Next, use the provided command and switch to the newly created tag:
As you can see in the below-provided output, the HEAD pointer now moves to the “894cf22” commit SHA-hash. Here, the “–detach” option enables developers to inspect and detach from some other point:
Note: Another way to switch to a tag is by using the “git checkout” command, which is as follows:
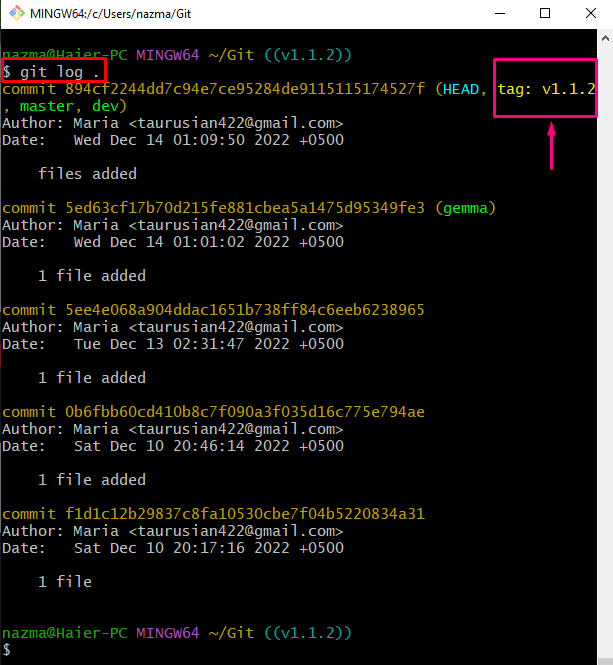
Step 5: Check Git Log History
Lastly, view the log history to ensure the HEAD is pointing into a new position by executing the below-listed command:
As you can see in the below-stated output, the HEAD is pointing to a “v1.1.2” tag, “master” and “dev” branch as well:
That’s all! You have learned how to switch to another Git tag in the local repository.
Conclusion
In Git, switch to another tag first, go to the required local repository and generate a new local tag. Then, display the list of all available Git tags. After that, run the “git switch –detach <new-tag>” command to switch to the newly created tag and enable developers to inspect and detach from another point. Lastly, execute the “git checkout <tag-name>” command. This blog demonstrated the process of switching to another Git tag in the local repository.


