
This tutorial will explain:
- What is the “.gitattributes” File in Git?
- How does the “.gitattributes” File Configure Git to handle line endings?
What is the “.gitattributes” File in Git?
The “.gitattributes” is a configuration file allowing users to specify attributes for pathnames and files within a repository. It provides an efficient procedure for controlling how Git handles certain files, such as setting different line endings, specifying merge strategies, and defining attributes for language-specific files.
Multiple options can be used to generate and modify the “.gitattribute” file in Git. Some of them are listed below:
- “text=auto”: It is a default option that is used for handling the files in each possible way.
- “text eol=lf”: It is always utilized for converting the line endings to LF on checkout and is effective for those specific files that must have LF endings, even on Windows.
- “text eol=crlf”: It is used for modifying line endings to CRLF on checkout and efficiently works for those particular files that must store CRLF endings, even on OSX or Linux.
- “binary”: The binary setting determines an alias for -text -diff. Using this option, Git will understand that the specified files are not in the text, so it will not try to modify them.
How does the “.gitattributes” File Configure Handle Line Endings?
To configure Git to handle line endings using the “.gitattributes” file, try out the below-mentioned instructions:
- Redirect to the Git local directory.
- Generate a file using the “echo” command along with the “text=auto” option.
- Add the file in the tracking area and commit changes.
- Then, modify the content of the file with the “text eol=crlf” option and verify it.
- Next, add and commit changes.
- Verify the modification by running the “ls -a” command.
Step 1: Go to Git Local Directory
Initially, set up the path of your preferred repository with the “cd” command and move to it:
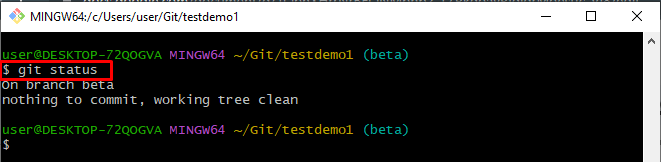
Step 2: Check Working Area
Utilize the “git status” command for viewing the current status of the working repository:
The below-stated output shows that there is nothing to commit in the working area:
Step 3: Generate and Edit File
Execute the “echo” command to make a new file and insert data simultaneously:

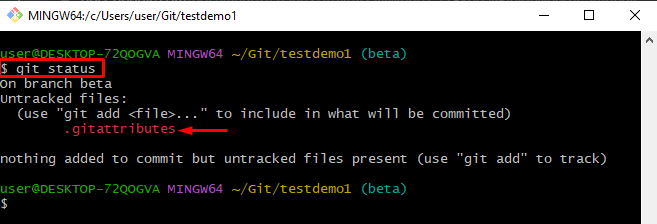
Step 4: Check Generated File
Verify the generated file by using the below-provided command:
It can be noticed that the “.gitattributes” file has been generated and exists in the Git working directory:
Step 5: Track File
Add the created file in the stated staging area the using “git add .” command:
As you can see, the warning has been prompted on the console. According to it, in the available working copy of the “.gitattributes” file, LF will be replaced by CRLF:

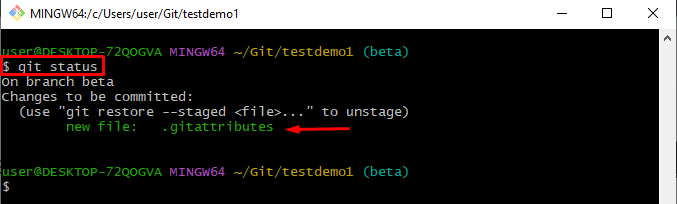
Step 6: Verify the Tracked File
Check the status of the Git repository for verification purposes whether the file has been tracked from the working area or not:
The resultant image shows that the file has been tracked successfully:
Step 7: Commit Changes
Execute the “git commit” command to commit all the changes. Also, use the “-m” option to specify the commit message:

Step 8: Modify the File
To modify the “.gitattributes” file, use the “echo” command along with the “* text eol=crlf” option:
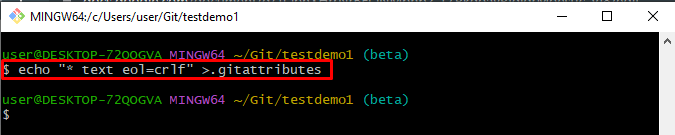
Note: You can use your preferred option instead of “* text eol=crlf” according to your requirements.
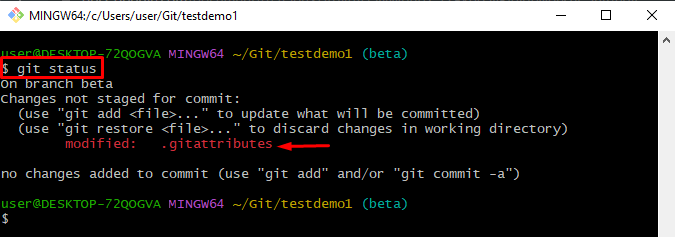
Step 9: View Git Status
After that, run the provided command to check the current state of the modified file:
The below-stated output indicates that the file has been modified and exists in the Git working area:
Step 10: Track Modified File
Next, use the “git add” command along with the “–renormalize .” option to add the “.gitattributes” file:

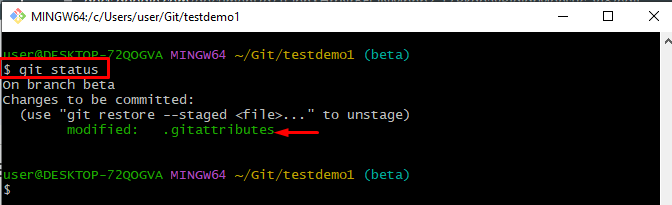
Step 11: View Tracked File
Check the current working status by running the “git status” command:
As you can see, the modified file has been tracked successfully:
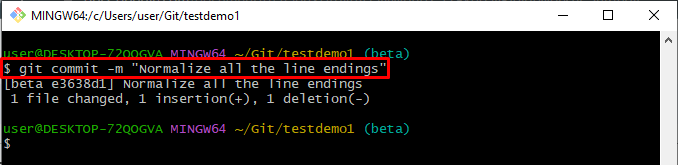
Step 12: Commit Changes
Now, commit the added changes by using the “git commit” command and specify the commit message with the help of the “-m” option:
It can be noticed that all the changes have been committed successfully:
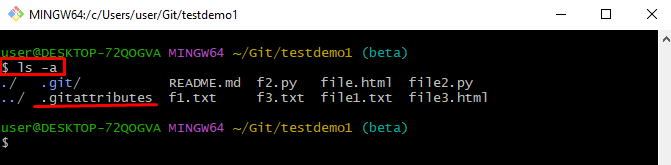
Step 13: Verification
Verify the “.gitattributes” file by running the “ls -a” command. It will list all files including hidden files of the stated Git directory:
That’s all about the “.gitattribute” file in Git.
Conclusion
The “.gitattributes” file in Git is a configuration file that will allow the users to specify attributes for paths and files within a repository. To configure Git to handle line endings using the “.gitattributes” file, generate a file. Then, add the file in the tracking area and commit changes. After that, modify the existing option with the “text eol=crlf” and verify the modifications. Add and commit changes. Then, verify the “.gitattributes” file in the Git directory. That’s all about the “.gitattribute” file in Git.