Linux is an extremely stable and powerful operating system that has become quite popular among the community. With it being open-source and free to use, Linux has rapidly grown and has garnered a large audience in its user base. The beauty of Linux is that it offers a variety of tools having the same kind of functionality and this is the same case with formatting your USB drive.
There are several excellent tools out there that allow Linux users to easily format their USB drives, which can be divided into either the command line category or the graphical interface category.
In addition to this, there are several file systems in which your USB drive can be formatted and for our USB device to have maximum compatibility with other devices, FAT32 is the way to go.
Therefore, in this tutorial, we will be discussing how one can format their USB drives as the FAT32 file system in Linux.
Formatting your USB Drive
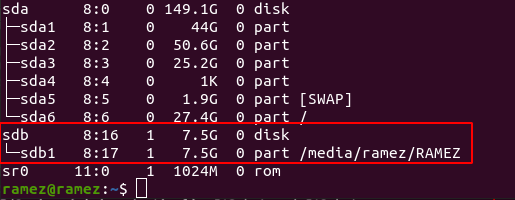
Before we move onto the process of formatting our USB device, we first need to locate it. This can simply be done by entering the following command into the terminal:
In my case, it will be the device found inside the rectangular region (/dev/sdb/):
After locating your device, we can now move onto the main process where, from the large collection of tools that Linux offers, we will be looking at two ways how users can format their USB drives in Linux.
Formatting your USB Drive using GParted
GParted is a partition editor that is responsible for creating and managing disk partitions which may include reorganizing as well as deleting partitions.
a) Installing GParted
First, we need to install GParted on our Linux systems which can be done by entering the following command into the terminal:
To verify if it has been installed, you can simply do so by running the following command:

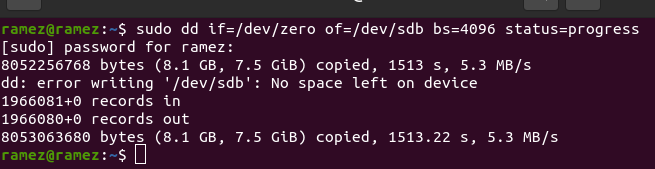
b) Wiping your Data by Adding Zeros (Optional)
The next step is to completely wipe out all data present on your USB device so that it cannot be recovered later by using any recovery tool. This, however, is an optional step and you can choose to skip this if you like. However, for security reasons, it is highly recommended that you go ahead with this. This process can be done by simply running the following command into the terminal:
Over here, you need to replace the /dev/sdb part that comes after of= with the target location of your USB device which you discovered previously.
c) Creating and Formatting your USB Device
Now, we finally arrive at the crux of the process. Over here, firstly, we have to the unmount /dev/sdb1 (use the location you found above) USB device on your system as we cannot format a mounted device. This can be done by using the following command:
Next, we will create a new partition table where we also have to mention the type of partition table that we want. In our case, this will be msdos. To do this, simply run the following command in the terminal:
Now, we have to create the partition where we will be specifying the partition type, the file system that we want our USB Device to be as well as the size that our partition will cover. In our case, we want our USB device to be of the FAT32 file system, primary partition type, and want the whole USB size for our partition. This can be done by using the following command:
Once this is done, we can finally format our USB device to FAT32 using the mkfs command which is the following:

Note, over here, we used the /dev/sdb1 location rather than the /dev/sdb location which we were using before. This is because over here we do not want the disk part of our device to be formatted.
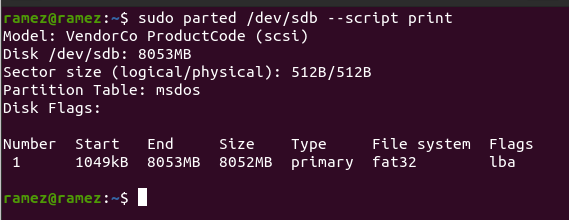
To check if your device has been partitioned correctly, run the following command to print the partition table:
And voila, that completes the entire process. You will now find your USB device completely formatted.
Formatting your USB Drive using Disks
For users more comfortable with the Graphical User Interface, Disks is a disk management tool that comes preinstalled with Ubuntu and almost every other Linux system. To open this, simply search for it in the Dash and click on it once its name appears.

After the Disk utility opens, first choose your device which you want to format from the available ones shown in the Disks application. In my case, it will be the following:

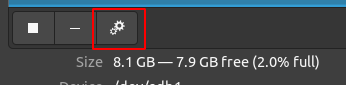
Over here, click on the gear icon present below the Volumes section and then select Format Partition from the choices given.
Gear Icon:
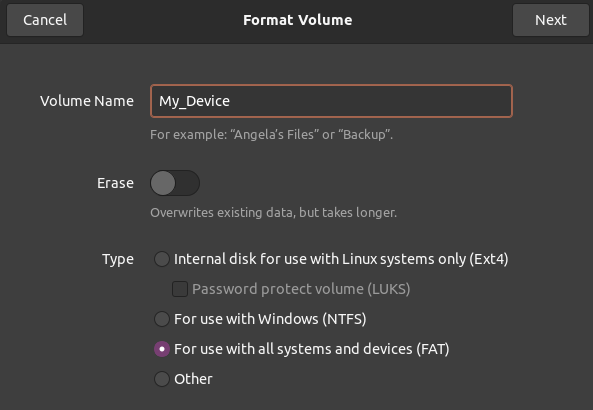
Format Partition:

After selecting this option, this will open a window, asking you to enter your new partition name as well as the type of your file system. Since we want our device to be of the FAT file system, we will select the following:
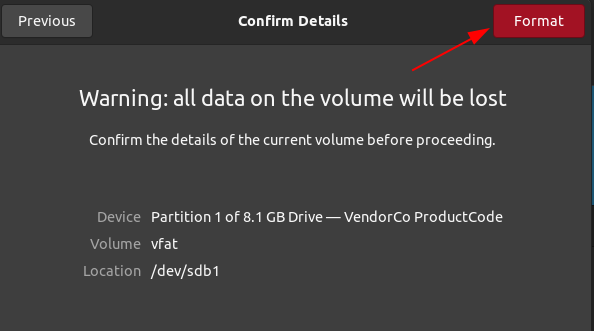
Next, confirm your details and once you’re sure everything is okay, click on the Format button on the top right-hand side as pointed by the arrow shown in the image below.
And voila, that completes the entire process. You will now find your USB device completely formatted.
Conclusion
As seen from the methods above, formatting USB drives on Linux is an extremely easy process. You just need to connect your device, choose the type of file system you want, and simply run the commands on the terminal or use the Disks utility to format your device. Of course, there are several other tools that you can use for formatting your USB devices but those shall be left for future tutorials.