Example # 01
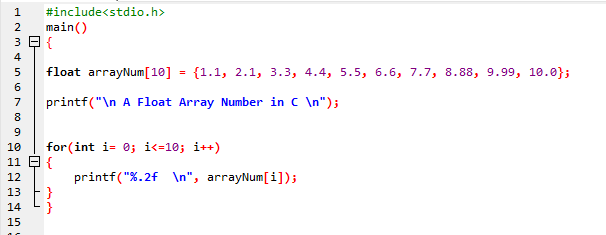
We are using “DevC++” tools for performing these C programming codes. When we work on the C programming language, then we first insert the “#include<stdio.h>”, which is the header file here. This will help us in utilizing the input/output function in our C program like “printf or scanf”. After this, we call the “main()” here. Then we create the Array, which is the Array of “float” data type. The name of this “float” array is “arrayNum,” and then we pass “10,” which is the size of this “arrayNum” array.
Now, we have to add values to this array, so we have initialized this array with floating point numbers, and these numbers are “1.1, 2.1, 3.3, 4.4, 5.5, 6.6, 7.7, 8.88, 9.99, and 10.0”. Now, we want to print this floating-point number array here. We place the “printf” statement before printing the array float numbers. This helps in printing the line which is written inside this “printf” statement. Below, we have utilized the loop, which is the “for” loop here, and in this loop, we have initialized a variable “i” and then put a condition after initializing this variable in this “for” loop. The condition we put here is that “i” is less than or equal to “10”, and then we write the “i++” and this “++” is the increment sign which will increase the value of “i” by “1” when the condition is true.
If this condition is true, then it moves to the “printf” statement, which is added below this “for” loop. In this “printf” statement, we have inserted the “%.2f,” which means that it displays the float value and also places two values after the decimal point. The “\n” helps in adding a new line after printing one value. We also insert the “arrayNum[i]” so the floating-point numbers of the array which we have added above will display there. Now, this code is completed here, and we have saved it. Now, we will move ahead with compiling and executing this C language code.
For compiling the code in “DevC++”, we have to press “F9” after the successful compilation; we then press the “F10” key for execution. The output is also shared below. The floating-point number array is shown in this image, and we can also note the values after the decimal point in these floating-point numbers array. All contain two values after the decimal point because we have set this in the code above.
Example # 02
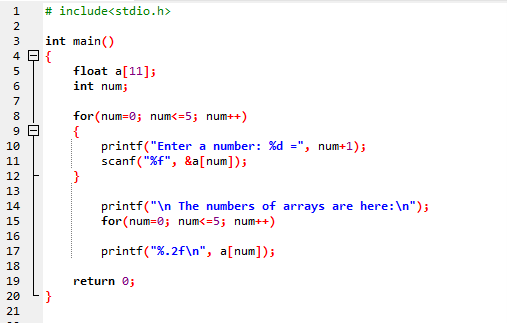
In this example, we are getting the floating-point numbers in an array from the user. After including the header file and then calling the “main()” function in this code, we are declaring the array of a float data type with the array size of “11,” and the name of this array is “a” here. Then, we also declare the “num” variable, which is the “int” data type.
After this, we have a “for” loop here in which the “num” variable is initialized, and the condition here is “n<=5” and also “n++”. Below, we have used the “printf” in which we have written “Enter a number: %d” and “num+1”. This “%d” is used here for the integer number. It shows the numbers after adding “1” to the “num”. As we have initialized the “num” with “0”, it will add “1” in the “0” and show “1” here.
Then, we have the “scanf” statement, and this helps in getting the input value from the user. We have added “%f” here, which is used for the float data type and stores the floating-point numbers that the user enters; we also add the address of the array here by using the “&” sign, so these values will store in this array whose address is given here. After this, we have to print the float numbers that we get from the user. So, we again use the “for” loop in the same way as explained above, and below, we have added the “.2%f” and also inserted the array here, which is “a[num]”. Now, it will print all floating-point values that the user enters.
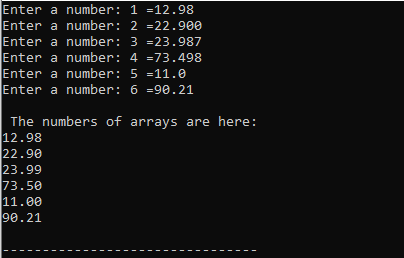
First, it prints the line “Enter a number: 1,” and we add “12.98” here and press “Enter”. Then, it displays the same message again with the number “2,” and we have added another float number. We have to insert six floating-point numbers here because we have set the condition to get only six values from the user, and then it shows all these floating-point numbers below this.
Example # 03
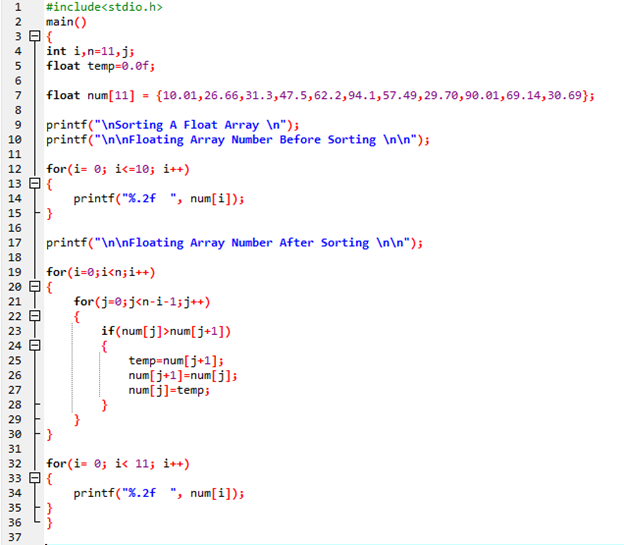
We will sort the floating-point numbers array in this example. We have declared and initialized three variables here which are “i, j, and n”. Then, we have the “temp” variable of the “float” data type and initialize it with “0.0f”. After this, we created the float array and also passed some floating-point numbers to this array. First, we print this float array without sorting, and then we move ahead and sort this array below after printing the unsorted array. We have added the nested loop there.
In the first loop, we have initialized “i” and put “i<n”, and i++. After this, we have added another loop inside this “for” loop, which is the nested loop, and we have initialized “j” here, and the condition is “j<n-i” here and also “j++”. Then, we have added an “if” condition inside this “for” loop and put “num[j]>num[j+1]”, if this condition is true, then it will swipe the values and save the value of “num[j+1]” in the “temp” variable and the value of “num[j]” will save in the “num[j+1]” array and also the “temp” value will store in “num[j]” array so, in this way all the values will check one by one and will store in ascending order, or we can say that after applying this, we will get the sorted float array. We print these floating-point sorted values by again using the “for” loop and then the “printf” statement.
It shows the unsorted float array first, and then it sorts this array. After sorting this array, it also shows the sorted float array in this outcome.
Conclusion
We have explained the “Floating Point Number Arrays in C” in this guide and also discussed how to create this floating-point number array in C programming. We have shown three distinct examples here in which we have created and added the float numbers in the float array in our C code in the first example. In the second example, we have shown how to get the floating-point numbers in the float array from the user, and also, in the last example, we have explained how to sort the floating-point number array in C programming in this guide.


