Indexes Using MySQL WorkBench
Firstly, start your MySQL Workbench and connect it with the root database.

We will be creating a new table ‘contacts’ in the database ‘data’ having different columns in it. We have one primary key and one UNIQUE key column in this table, e.g. id and email. Here, you have to clarify that you don’t need to create indexes for the UNIQUE and PRIMARY key columns. The database automatically creates the indexes for both types of columns. So we will be making index ‘phone’ for the column ‘phone’ and index ‘name’ for the columns’first_name’ and ‘last_name’. Execute the query using the flash icon on the taskbar.
You can see from the Output that the table and indexes have been created.
Now, navigate towards the schema bar. Under the ‘Tables’ list you can find the newly created table.
Let’s try the SHOW INDEXES command to check indexes for this particular table as shown below in the query area using the flash sign.
This window will appear at once. You can see a column ‘Key_name’ which shows the key belongs to every column. As we have created the ‘phone’ and ‘name’ index, it appears as well. You can see the other relevant information regarding indexes e.g., sequence of the index for a particular column, index type, visibility, etc.
Indexes Using MySQL Command-Line Shell
Open the MySQL command-line client shell from your computer. Enter the MySQL password to start using.
Example 01
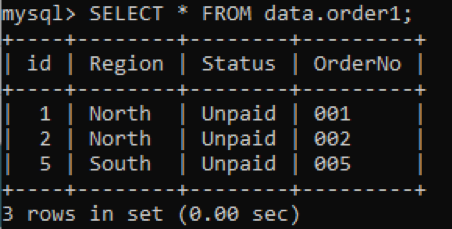
Assume that we have a table ‘order1’ in the schema ‘order’ with some columns having values as illustrated in the image. Using the SELECT command, we have to fetch the records of ‘order1’.
As we haven’t defined any indexes for the table ‘order1’ yet, it is impossible to guess. So we will be trying the SHOW INDEXES or SHOW KEYS command to check the indexes as follows:
You can perceive that table ‘order1’ has only 1 primary key column from the below output. This means that there are no indexes defined yet, that’s why it is showing only 1-row records for the primary key column ‘id’.
Let’s check the indexes for any column in the table ‘order1’ where the visibility is off as shown below.
Now we will be creating some UNIQUE indexes on the table ‘order1’. We have named this UNIQUE INDEX as ‘rec’ and applied it to the 4 columns: id, Region, Status, and OrderNo. Try the below command to do so.
Now let’s see the result of creating the indexes for the particular table. The result is given below after the use of the SHOW INDEXES command. We have a list of all the indexes created, having the same names ‘rec’ for each column.
Example 02
Assume a new table ‘student’ in the database ‘data’ with four-column fields having some records. Retrieve the data from this table using the SELECT query as follows:
Let’s fetch the primary key column indexes first by trying the below SHOW INDEXES command.
You can see it will output the index record for the only column having the type ‘PRIMARY’ due to the WHERE clause used in the query.
Let’s create one unique and one non-unique index on the different table ‘student’ columns. We will first create the UNIQUE index ‘std’ on the column ‘Name’ of the table ‘student’ by using the CREATE INDEX command on the command-line client shell as below.
Let’s create or add a non-unique index on the column ‘Subject’ of the table ‘student’ while using the ALTER command. Yes, we have been using the ALTER command because it is used to modify the table. So we have been modifying the table by adding indexes to the columns. So let us try the below ALTER TABLE query in the command-line shell add the index ‘stdSub’ to the column ‘Subject’.
Now, it’s the turn to check for the newly added indexes on the table ‘student’ and its columns ‘Name’ and ‘Subject’. Try the below command to check through it.
From the output, you can see that the queries have assigned the non-unique index to the column ‘Subject’ and the unique index to the column ‘Name’. You can also see the names of the indexes.
Let’s try the DROP INDEX command to drop the index ‘stdSub’ from the table ‘student’.
Let see the remaining indexes, using the same SHOW INDEX instruction as below. We have now left with the only two indexes remained in the table ‘student’ as per the below output.
Conclusion
Finally, we have done all the necessary examples about how to create unique and non-unique indexes, show or check indexes, and drop the indexes for the particular table.


