This post will provide the process of fetching the particular remote Git repository branch.
How do Fetch Only One Branch of a Remote Git Repository?
Try out the below-given instructions if you want to fetch the particular remote branch of a Git remote repository:
- Move to the Git local repository.
- Set the new remote URL for tracking.
- Check the added remote URL by checking its list.
Run the “$ git fetch <remote-name> <remote-branch-name>” command and check the all branches list.
Let’s move ahead and check the demonstration of the above-discussed scenario!
Step 1: Navigate to Git Repository
Go to the desired local repository by executing the “cd” command:
Step 2: Add Remote URLs
Next, use the “git remote add” command along with the remote name and remote repository URL for tracking changes:
Step 3: Verify Remote URLs List
Now, check the newly added remote URL in Git by running the following command:
It can be seen that the remote URL has been added successfully:
Step 4: Fetch Particular Remote Branch
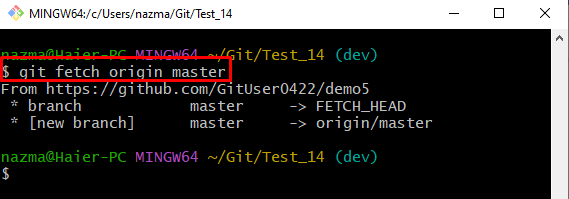
Finally, execute the “git fetch” command with the remote name and the desired remote branch name:
Here, we have specified the remote branch name as “master”:
Step 5: Verify Fetch Remote Branch
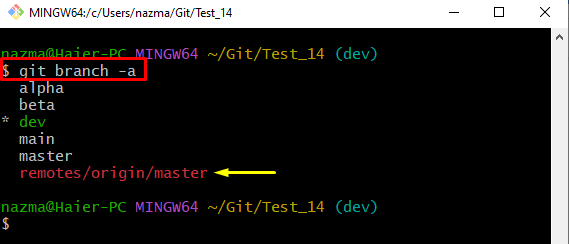
Lastly, run the “git branch” command along with the “-a” flag to list all branches including the local and remote:
As you can see the particular remote branch has been fetched successfully:
That was all about fetching the particular remote Git repository branch.
Conclusion
To fetch the particular remote branch of a Git remote repository, first, move to the Git repository and add the remote URL for tracking. After that, verify the added remote URL by checking its list. Next, execute the “$ git fetch <remote-name> <remote-branch-name>” command and check the all branches list. This post illustrated the process of fetching the particular remote Git repository branch.


