This guide will demonstrate the method for fetching a branch from the upstream to the local Git repository.
How to Fetch a Branch From the Upstream to the Local Repository?
To fetch a remote branch from the upstream to the Git local repository, try out the below-given instructions:
- Navigate to the Git local directory.
- Open the GitHub account to copy the code of a forked repository.
- Utilize the “git remote add <remote-name> <remote-url>” command to add a remote connection.
- Check the remote connection by executing the “git remote -v” command.
- Fetch and switch to the remote branch.
- Pull changes by running the “git pull <remote-name> <branch>” command along with the branch name.
Step 1: Redirect to the Stated Repository
First, launch the Git Bash terminal and move to your preferable repository by using the “cd” command:
Step 2: Copy the HTTPS Link
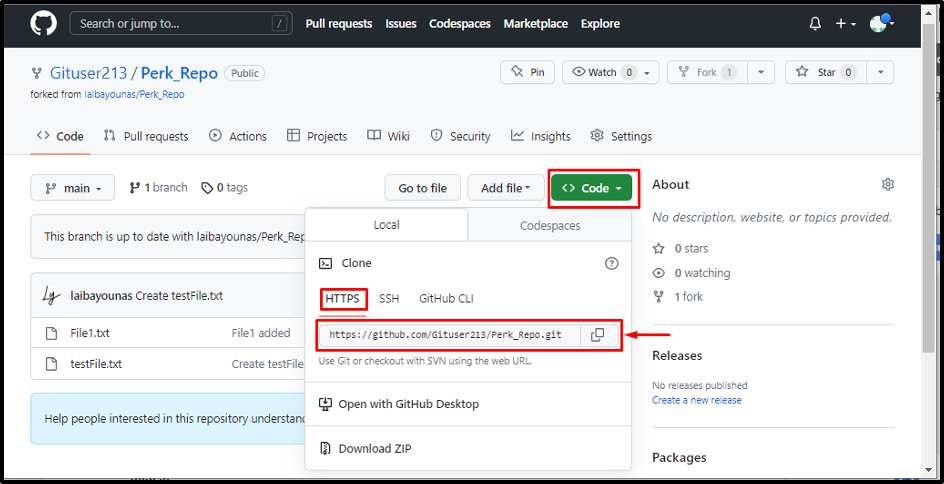
Then, go to GitHub and sign in to your account. Then, select a forked repository to launch it on GitHub. For that purpose, navigate to the “Your repository> Forked repository> Code” and copy its “HTTPS” URL:
Step 3: Add Remote Connection
Use the “git remote add” command and specified the remote name along with the copied remote URL:
Step 4: Check the Remote Connection
Next, check the added remote by executing the “git remote -v” command:
The resultant output shows that the remote has been added successfully:
Step 5: Fetch Remote Branch
After that, run the following command to fetch the remote branch into the local Git repository:
It can be noticed that the “main” branch from the upstream has been fetched into the “demo1” local repository successfully:
Step 6: Switch to Remote Branch
Switch to the fetched branch by running the “git checkout” command:
Here:
- “–track” option is used for setting a particular branch for tracking.
- “-b” option indicates the branch.
- “main” is the particular branch that needs set up to track the current working branch.
Step 7: Pull Changes
Run the “git pull” command to pull all the changes from the remote branch into the local:
According to the below-stated output, we have successfully pulled the “main” remote branch data through the specified remote named “upstream”:
We have provided a detailed method for fetching a branch from the upstream to the local repository.
Conclusion
To fetch a branch from the upstream to the local repository, first, navigate to the Git local directory and open GitHub, and copy the HTTPS URL of a forked repository. Next, use the “git remote add <remote-name> <remote-url>” command to add a remote URL. After that, fetch, and switch to the remote branch. Lastly, pull changes by executing the “git pull” command along with the remote and specified branch name. That’s all about fetching a branch from upstream to the local repository.


