XZ is a command-line tool like the gzip and bzip used for lossless data compression. For normal files, XZ Utils gives 30% more compression than gzip and 15% smaller output when compared to bzip2.
It supports .xz files and works with the legacy .lzma files and the raw compressed streams that do not have container format headers. The compression and decompression operations are carried out as per the operation mode of XZ. If no files are passed, or the file is ‘-,’ standard input is used for reading, and the output is written to standard output. If the standard output is a terminal, XZ will not write the compressed data. In the same way, if a terminal is used as standard input, XZ will not read the compressed data.
What will we cover?
In this guide, we will see how we can extract a tar.xz file in Linux. We have performed this guide on Ubuntu 20.04.
Installing the XZ Utils Package
The XZ list of supported platforms contains a long list of distributions, including FreeBSD, Windows, Mac OS, Linux, etc. On major Linux systems like Ubuntu, Debian, Fedora, we can use the below steps for installing the XZ Utils package.
A. To install the xz-utils package on Debian/Ubuntu, use the command:
B. To install the xz-utils package on Fedora/RedHat, use the command:
C. To install the xz-utils package on Opensuse, use the command:
Compressing and Decompressing .xz Files in Linux
Now that the xz-utils package is installed on our system, we can play with it to learn how to use it.
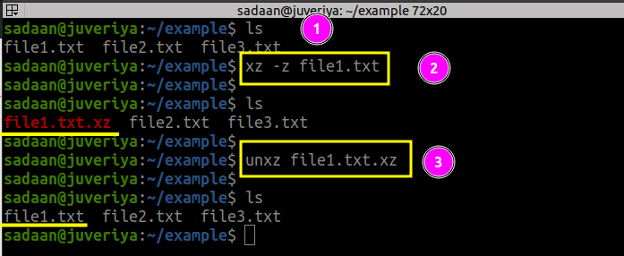
1. Compressing a file with XZ: Suppose we have a sample file abc.txt, and we want to compress it with .xz format. The command, in this case, will be:
Now check whether the file is created or not using the ‘ls’ command.
2. To extract the above file, use the command:
Using tar archiving utility with xz utility
Another exciting thing you can do with XZ uses the TAR utility. The tar utility comes pre-installed with most Linux distros. Let us see some use cases for working with a tar.xz file.
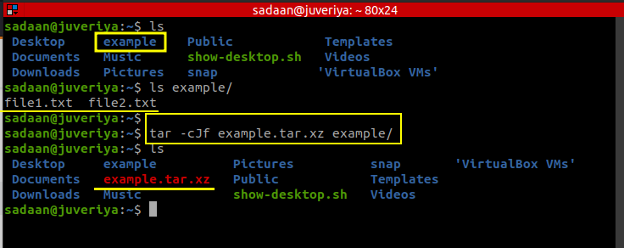
A. We will create a tar.xz file from the example folder (which contains file1.txt and file2.txt) and name it as example.tar.xz. For this run, the command:
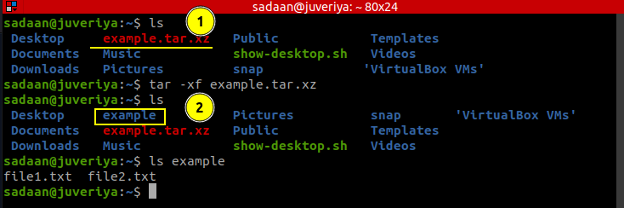
B. To Extract a tar.xz file, use the ‘-x’ or ‘–extract’ option. Let us extract the above file using the command:
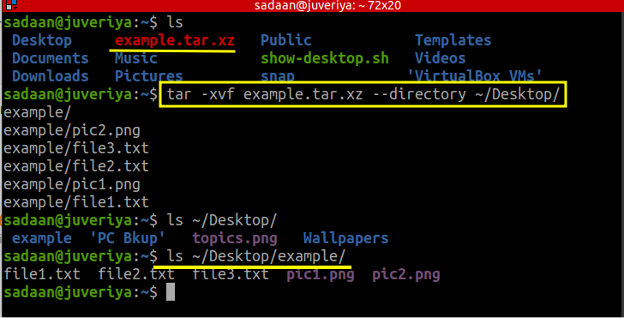
C. To see what files are being compressed or decompressed, you can use the ‘-v’ option for verbose output.
D. For extracting the archive contents to a specific folder, use the ‘–directory’ or ‘-C’ option. Let us extract the above file to the “Desktop” folder of the user, use the below command for this:
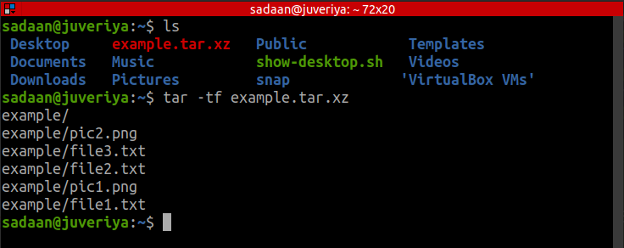
E. To list the contents of an archive without extracting it, use the command:
F. To extract a specific file from those contained inside the archive, use the syntax below:
The important thing to note is that the ‘path_to_file_name’ parameter should be the file’s path, as shown by the ‘tar -tf’ command. In our case, if want to extract ‘file2.txt’, this command will be as follows:
G. Extracting files following a specific pattern: We have only five files in our archive; we can add a few more files to it. Now suppose we want to extract all those files with the ‘.txt’ extension. For this, we need to use the ‘–wildcard’ option as:
Conclusion
There are many techniques/algorithms available for compressing and decompressing files in Linux. These include gzip, zcat, .bzip2 etc. Each technique has its own pros and cons. Tar.xz file formats are more commonly used in the Linux world. On Windows and Mac OS, one can use the WinZip program to extract this file format. More information about XZ compression and other related techniques can be found using the Manual pages (man pages).

