This post covers what the “find” command is and how it works. Further, we will see how you can use the command while excluding the directories in Linux. Read on!
Working with the Find Command
The “find” command in Linux helps locate the files and directories to avoid having to find them manually. It uses the following syntax:
Here’s an example where we try to find a file named “linuxhint.c” in the home directory:
The output gives the absolute path to find the target file. Suppose we want to find the files using a pattern. Let’s say we want to find any text files in the Documents/ on our Linux system. We specify our command as illustrated in the following:
Note how the “find” command outputs all the directories that contain the text files. That’s a simple example of using the Linux “find” command.
How to Exclude the Directories in Linux Find
When you execute the “find” command, it searches the specified directory and subdirectories. Use any of the following three methods to exclude a subdirectory in the search:
1. The Prune Option
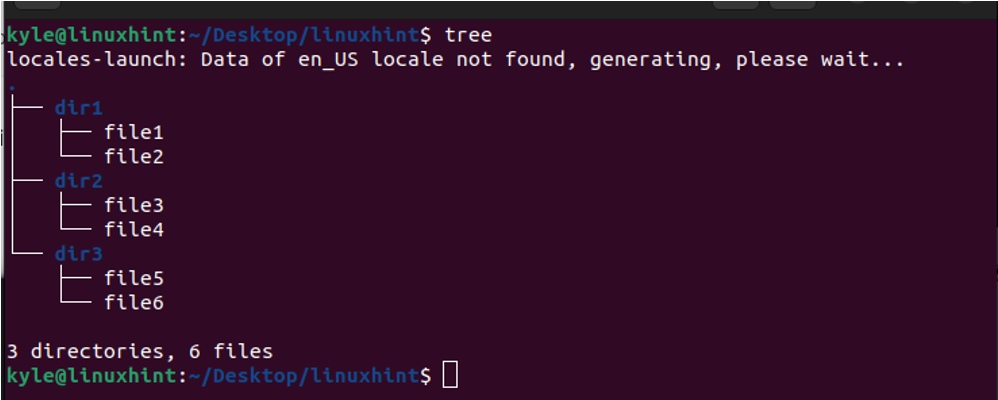
For demonstration, we use the linuxhint/. We can see that it has three subdirectories as displayed in the following image:
When used with -print, the “prune” option helps to exclude any specified subdirectories when working with the “find” command. In the previous image, we can use the “find” command and give the path to the Linuxhint directory. Then, specify to exclude the dir2 from the search output.
We execute our command as follows:
Notice how dir2 is not displayed anywhere in the output which confirms that we managed to exclude it.
We can also execute the same command in a shortened version as displayed in the following:
You can also exclude numerous directories. For that, we use the -o option. The following example excludes the dir1 and dir3 to leave the dir2 only. If you are certain that the file or folder that you want to find is not in the other directories, this option reduces the search output.
2. Via the “Not” Option
In the find query, it’s possible to add “not” to specify which directories to exclude. Its implementation is more straightforward than the prune option.
Here’s the syntax to use:
Suppose we want to exclude the dir1 in the “find” search output that we implemented with the prune option. We execute the command as follows:
We get the same output as when using the prune option. The specified directory is excluded; only the remaining subdirectories appear in the search output.
3. Via the “!” Option
The last method of excluding the directories in the Linux “find” command is adding the “!” operator. It works like the “not” operator, and its syntax is almost identical.
Suppose we repeat the earlier example to exclude the dir2 using the “!” operator. We still get the same output. Only a section of the command that we use has changed.
Those are the three ways of excluding the directories in the Linux “find” command.
Conclusion
The Linux “find” command is handy in quickly locating the files and folders. It gets better as you can exclude the directories in your search command to reduce the search output. To exclude the directories, you can use the “prune”, “not”, or “!” options. This post discussed how the three options work with the given examples of excluding the directories. Try it out!


