Elasticsearch engine is responsible for ingesting data, storage, analysis. Although Elasticsearch is powerful as a standalone service, it becomes mightier when powered with its sisters’ services such as Kibana and Logstash.
This tutorial will show you how to install Elasticsearch and Kibana and discover how to enable Elasticsearch security feature: Xpack.
Requirements
To follow along with this guide, you will require:
- Root or sudo account
- Fresh Linux install – preferably Ubuntu or Debian
Step 1: Install Elasticsearch and Kibana
Let us start by setting up Elasticsearch on our system.
Install Java
Elasticsearch requires a Java environment to run. For this, we can install the OpenJDK package. Use the command:
sudo apt-get install openjdk-11-jdk
Upon completion, verify Java is installed correctly with the command:
You should see an output similar to the one shown below:

Installing Elasticsearch
Once we have Java installed, we can proceed to install Elasticsearch. By default, Elasticsearch packages are not available in the official Debian/Ubuntu repositories. Hence, we need to import and add them manually.
Execute the command below to download and install the Elasticsearch repository signing key:
sudo apt-key add -
Next, install the apt-transport-https package before installing Elasticsearch. Run the command:
Finally, save the repository with the command:
main" | sudo tee /etc/apt/sources.list.d/elastic-7.x.list
Install Elasticsearch:
sudo apt install elasticsearch
Once you have Elasticsearch installed, enable and start the service:
sudo systemctl start elasticsearch.service

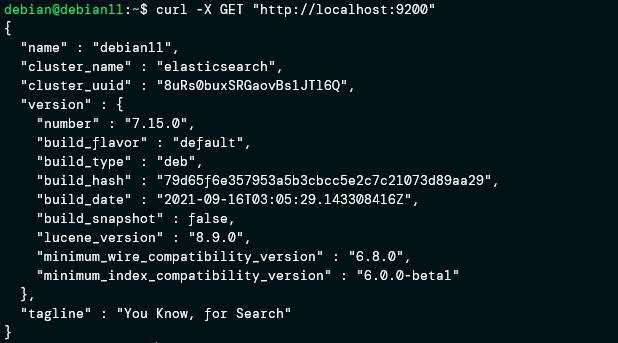
To verify that the Elastisearch service is up and running, use the curl command as:
If you have curl installed and Elasticsearch is running, you should see an output as shown:
Install Kibana
The next step is to install and set up Kibana. Kibana acts as a front-end interface for Elasticsearch and helps visualize, view, and search indexed data. It also helps to manage Elasticseach clusters from the web interface.
To install Kibana, enter the command:
Upon installation, edit the Kibana configuration and configure Elasticsearch.
Locate the following entries and uncomment them:
server.host: localhost
elasticsearch.hosts: ["http://localhost:9200"]
Save the file and close.
Enable and start the Kibana service:
sudo systemctl start kibana.service
Once the Kibana service is up and running, open the browser and navigate to its endpoint:
Step 2: Enable Elasticsearch Security Feature (Xpack)
Now that we have both Elasticsearch and Kibana running, we can proceed to enable the Xpack feature.
Xpack is an extension of the ELK stack that provides features such as monitoring, report, alerts, security, and many other features. Depending on the version of ELK stack installed, you should have Xpack installed by default.
CAUTION: The process discussed in this guide will cause cluster downtime. Do not run in a production environment.
If you are using a free Elasticsearch license, you will have access to the standard xpack features. For all features, you may need to get a subscription.
Stop Kibana and Elasticsearch
The first step before enabling Xpack is to stop the Kibana and Elasticsearch services.
Enter the command:
sudo systemctl stop elasticsearch.service
Edit Elasticsearch configuration
To enable Xpack, edit the elasticsearch.yml config file. Depending on the installation method, the path of the file may vary.
In our example, run the command:
Add the following entry to the elasticsearch.yml file.
Next, set up single node discovery.
Add the following entry
If you have multiple nodes, you will need to configure Elasticsearch security for each node in your cluster using TLS.
Check the documentation to learn more.
NOTE: Once you enable Xpack on your Elasticsearch cluster, you must specify the username and password to communicate with the cluster.
Conclusion
In this guide, we focused on how to set up and configure Elasticsearch and Kibana. We also covered how to enable the Xpack security feature of an Elasticseach cluster.