PowerShell remoting or “PSRemoting” helps the users to execute the commands on the remote computers. The “PSRemoting ” is by default enabled on the system. However, sometimes it is not enabled on the systems. When the PSRemoting is enabled, commands are executed on the local system first and then sent to the remote systems. In return, the result is sent back to the local computer/system from a remote computer/system.
The following post will cover the method to enable the “PSRemoting” in PowerShell.
How to Enable PSRemoting (Locally and Remotely)?
The below approaches will be discussed in the below guide:
Method 1: Enable PSRemoting on the Local System
Enabling the “PSRemoting” on the local computer is not a difficult task. All it requires is to run a single command which is the “Enable-PSRemoting” cmdlet. For further assistance, overview the mentioned examples.
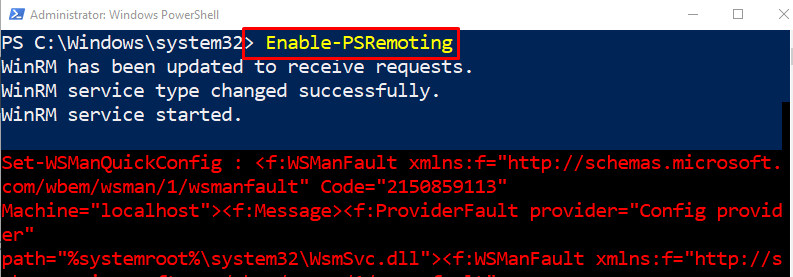
Example 1: Enable PSRemoting on the Local System by Executing the “Enable-PSRemoting” Command
Running only the “Enable-PSRemoting” cmdlet will enable the “PSRemoting” but it will check the network. While checking the network the errors are likely to come, as demonstrated below:
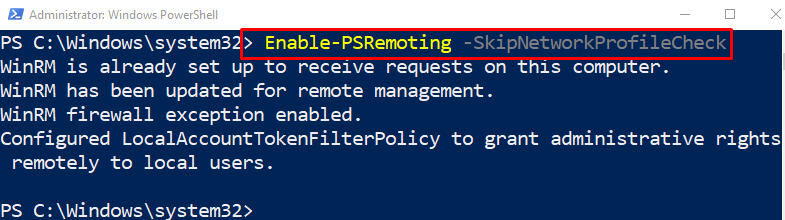
Example 2: Skip the Network Profile Check While Enabling PSRemoting
Now, when the “-SkipNetworkProfileCheck” parameter will be added along with the “Enable-PSRemoting” cmdlet, the network checking will be skipped while enabling the “PSRemoting”. This means the error messages won’t be displayed:
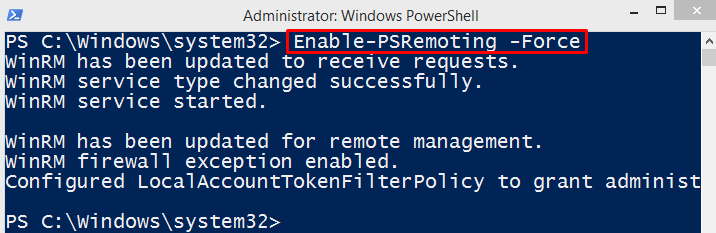
Example 3: Re-Enable the Existing PSRemoting
If the “PSRemoting” is already enabled and creating some problems while using it, then it can be re-enabled by executing the “Enable-PSRemoting” cmdlet along with the “-Force” parameter:
Method 2: Enable PSRemoting on the Remote System
Enabling the “PSRemoting” on the remote system is quite a tricky and difficult task. However, it is not impossible. Enabling PSRemoting on the remote computer requires the installation of the “PsExec” utility.
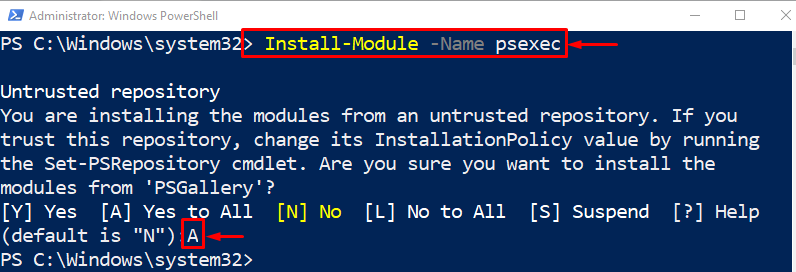
Step 1: Install the PsExec Utility
Enabling the “PSRemoting” on the remote computer requires the “PsExec” utility to be installed on the system. For that reason, execute the given command:
Step 2: Enable the PSRemoting on the Remote Computer
After enabling the “PsExec” utility, enable the “PSRemoting” on the remote computer:
According to the above code:
-
- First, write the “psexec.exe” followed by the remote computer name.
- Then, write the “-s” parameter and assign it the value “powershell”.
- After that, write the “Enable-PSRemoting” along with the “-Force” parameter.
That was all about enabling PSRemoting on local and remote computers.
Conclusion
The “PSRemoting” can be enabled on the local system by executing the “Enable-PSRemoting” cmdlet. While on the remote computer, it is enabled with the support of the “psexec.exe” utility. The PSRemoting is the process to enable the system administrators to run the commands on the remote computer from a local computer. This post has explained the procedure to enable PSRemoting on both local and remote computers.