
Enabling Point-to-Point Protocol (PPP) on Ubuntu Linux can be a helpful way to establish a direct network connection between two devices, whether for remote access, data transfer, or other purposes. PPP is a standard protocol that allows for the transmission of network data over serial interfaces such as phone lines, modems, or even Ethernet connections.
While PPP is often used alongside the dial-up internet connections, you can also configure it on Linux systems to enable the direct communication between devices.
This article walks you through the process of enabling PPP on Ubuntu Linux, step by step. Whether you’re a Linux newbie or a seasoned pro, you’ll find this guide helpful to setup PPP on your Ubuntu system.
Checking Whether PPP Is Already Installed on Your Ubuntu System
Before you can start using PPP on your Ubuntu system, you must ensure that it’s already installed. Fortunately, Ubuntu comes with PPP which is pre-installed by default. In most cases, you won’t need to do anything special to enable it. However, it’s always a good idea to double-check just to be sure.
To check whether PPP is installed on your Ubuntu system, you can use the following command in the terminal:
This searches for the “ppp” package in your system’s list of installed packages. If PPP is installed, you should see an output that looks something like this:

If you don’t see any output, PPP is not available on your system. In that case, you need to install it before you can use it.
Installing PPP on Ubuntu If It’s Not Yet Installed
If PPP is not available on your Ubuntu system, you can install it using the following command in the terminal:
This code snippet downloads and installs the PPP package and any necessary dependencies. Once the installation is complete, you can use PPP on your system.
Note that depending on your Ubuntu version and system configuration, you may need to enable the “universe” repository to install PPP. To do this, you can use the following command:
After enabling the universe repository, you should be able to install PPP using the previous command.
Configuring Your PPP Connection Settings
Once you confirmed that PPP is installed on your Ubuntu system, the next step is to configure your PPP connection settings. This process involves specifying the username and password that you’ll use to connect to your remote device or network, as well as any additional required network settings.
To configure your PPP connection settings on Ubuntu, you must edit the /etc/ppp/peers/provider file. This file contains the configuration settings for your PPP connection. Here’s an example configuration file:
# Replace "myusername" and "mypassword" with your actual login credentials
user myusername
password mypassword
# Specify the serial device that you'll use for your PPP connection
/dev/ttyUSB0
# Specify the baud rate for your serial connection
115200
# Enable debugging output to help troubleshoot connection issues
debug
# Enable compression to improve network performance
nobsdcomp
nodeflate
# Specify any additional network settings that are required, such as IP addresses or DNS servers
# For example:
# connect "/usr/sbin/chat -v -f /etc/chatscripts/provider.chat"
# noipdefault
# defaultroute
# usepeerdns
To configure your PPP connection, you need to modify this file to match your specific requirements. Here are some of the key configuration options:
- user and password: Specify your username and password to authenticate your connection. Replace “myusername” and “mypassword” with your actual login credentials.
- /dev/ttyUSB0: Specify the serial device that you’ll use for your PPP connection. This may be different depending on your hardware configuration.
- 115200: Specify the baud rate for your serial connection. This may also be different depending on your hardware configuration.
- debug: Enable the debugging output to help with troubleshoot connection issues.
- nobsdcomp and nodeflate: Enable the compression to improve the network performance.
- connect, noipdefault, defaultroute, usepeerdns: Specify any additional required network settings such as IP addresses or DNS servers. Uncomment and modify these options as needed.
Once you configured your PPP connection settings, you can save the file and exit your text editor. You’re now ready to establish your PPP connection and start communicating with your remote device or network.
Establishing Your PPP Connection
Now that you installed PPP on your Ubuntu system and configured your connection settings, you can establish your PPP connection. To do this, use the pon command which stands for “PPP on“.
Here’s the basic syntax:
Replace “provider” with the name of the configuration file that you edited in the previous step (e.g.,/etc/ppp/peers/provider). You also need to run this command with administrative privileges, so be sure to include the sudo utility at the beginning.
When you run the pon command, Ubuntu attempts to establish your PPP connection using the settings in your configuration file. If everything is configured correctly, you should see an output that looks something like this:
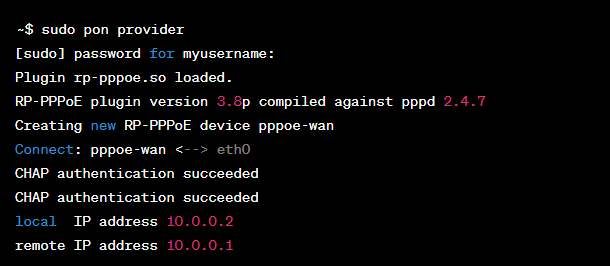
This output confirms that your PPP connection has been successfully established and shows the IP addresses that are assigned to your local and remote devices.
To disconnect your PPP connection, you can use the poff command which stands for “PPP off“. Here’s the basic syntax:
Again, replace the “provider” with the name of your configuration file. When you run this command, Ubuntu disconnects your PPP connection and releases any associated network resources.
Conclusion
With your PPP connection being established, you can now start using PPP to communicate with your remote device or network. Depending on your specific use case, this may involve running the network applications, transferring files, or configuring the additional network settings.