You can automate processes and manage Windows systems with the help of the robust scripting language and command-line tool known as PowerShell. You can use the PowerShell Remoting functionality to execute PowerShell scripts and commands on distant machines. This can help you perform administrative tasks, troubleshoot issues, and execute commands across multiple machines. However, PowerShell Remoting is not enabled by default in Windows 10.
What is Remoting in PowerShell?
You can access complete PowerShell sessions or execute PowerShell commands on distant Windows systems using the PowerShell functionality known as remoting. For connecting to remote terminals on other operating systems, it is comparable to SSH. You may manage many PCs from a single console and automate tasks with PowerShell remote control.
The default PowerShell remoting protocol is WS-Management, it is a secure and interoperable protocol that uses HTTP or HTTPS as the transport layer. WS-Management based PowerShell remoting works on all supported versions of Windows and requires some configuration steps to enable it.
SSH is a more recent remote PowerShell solution and is a popular protocol that offers safe and secured communication across any network. SSH based PowerShell remoting works on both Windows and Linux systems and requires PowerShell Core (version 6 or higher) to use it.
How to Enable PowerShell Remoting in Windows 10
PowerShell supports different technologies for remoting, such as Windows Management Instrumentation (WMI), Remote Procedure Call (RPC), WS-Management, and Secure Shell (SSH). Here are some steps for enabling PowerShell remoting in Windows 10:
Step 1: Check the Network Connection Profile
Before enabling PowerShell remoting, you need to check the network connection profile of the remote system. The network connection profile determines the firewall rules and security settings that apply to the network interface. For PowerShell remoting to work, the network connection profile should be set to Private or DomainAuthenticated.
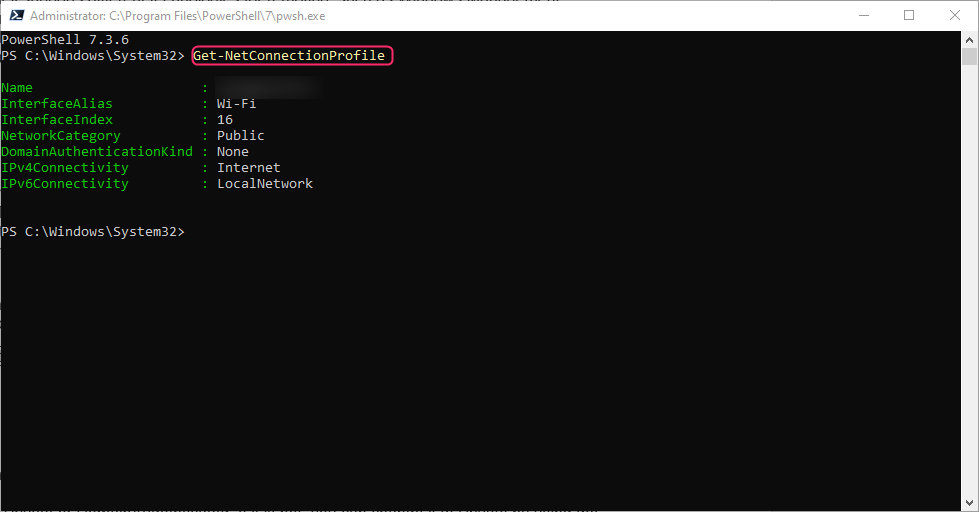
To check the network connection profile, you need to log in to the remote system and open a PowerShell session with administrator privileges.
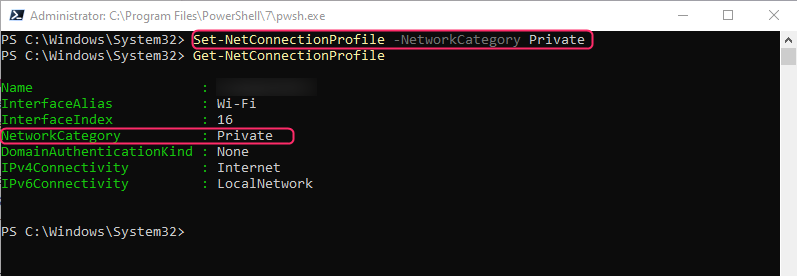
This command will display information about the network connection profile, such as the name, interface index, interface alias, network category, and IPv4 connectivity. The network category should be either Private or DomainAuthenticated, if it is not you can change it to Private by executing:
Step 2: Enable PowerShell Remoting
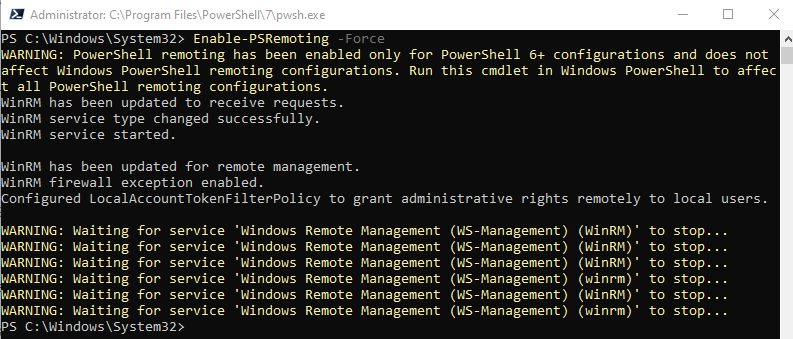
After checking the network connection profile, you can enable PowerShell remoting by using the Enable-PSRemoting cmdlet. This cmdlet will configure the remote system to receive PowerShell commands that are sent by using WS-Management and to enable PowerShell remoting execute:
The -Force parameter will suppress any confirmation prompts and automatically create any required firewall rules. Using the Test-WSMan cmdlet, you may check if PowerShell remoting is enabled. The WS-Management service will be tested using this cmdlet to see whether it is running locally or remotely:
This command will display information about WS-Management service, such as the protocol version, product version, product vendor, and configuration details.
Conclusion
You can access complete PowerShell sessions or execute PowerShell commands on distant Windows systems using the PowerShell remoting functionality. You can use it to manage numerous machines from a single terminal and automate processes. PowerShell supports different technologies for remoting, such as WS-Management and SSH. To enable PowerShell remoting in Windows 10 use WS-Management as the protocol check the network connection profile and enable PowerShell remoting.


