
Within the awall tool, you can easily follow the high-level concepts like single source, policies, limits, and zones for IPv6 and IPv4 protocols. This tutorial shows how to use this package to enable/disable the firewall on Alpine Linux.
How to Set up a Firewall (Awall)
Setting up the firewall on an Alpine Linux system is one of the most important tasks that you can do to strengthen your system’s security.
Installing a Firewall (Awall)
You can install awall on the Alpine very easily with the help of a terminal. To do this, follow these steps:
Before installing any package in the system, it’s better to update the system first.

Next, install the Iptables for both IPv6 and IPv4 protocols using the following command:

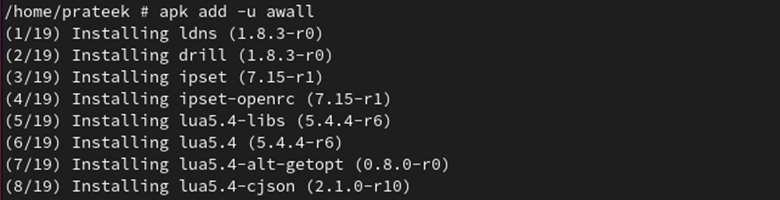
The awall firewall is available under the Alpine Linux repositories for many architectures, including the arch64, c86, and x86_64 architectures. You need to install the awall firewall using a simple apk command. Run the following command to install awall:
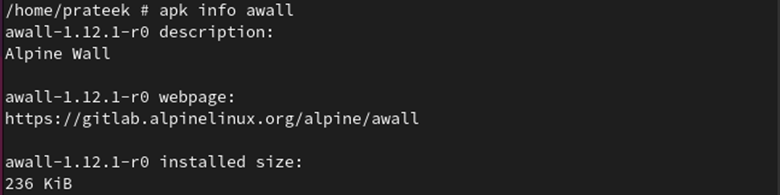
Using the following command, you can confirm that awall is installed:
Use the following command to check the version of the installed awall:

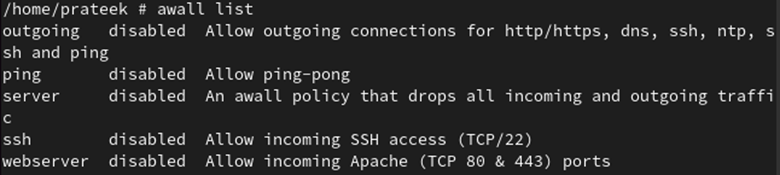
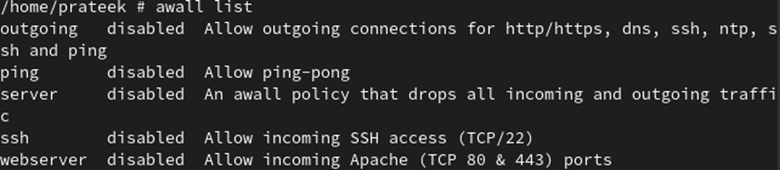
The /usr/share/awall/mandatory directory contains a predefined set of firewall policies in JSON format. You can list these policies with the following command:

Prerequisites Before Enabling/Disabling the Firewall in Alpine Linux
Once awall is installed successfully, you can enable and disable it. However, before that, you have to configure it.
First, you need to load the iptables kernel modules for the firewall using the following command:
modprobe -v ip6_tables

Note: The previous command is used only when installing awall for the first time in Alpine Linux.
Autostart the firewall at boot time and autoload the Linux kernel modules using the following commands:

You can control the firewall services using the following commands:
rc-service ip6tables {start|stop|restart|status}
Now, we start the service using the following command:

Using the following command, you can check the firewall service status:

As you can see, the firewall service has now started.
Worth noting is that awall is a frontend tool that generates rules. All its firewall rules are stored in the /etc/awall/ directory. Now, we create some rules under this directory.
First, open this directory using the following command:
Check the files that are present in it with the ls command:

You can see that two files are available in /etc/awall: optional and private. Here, we create some policies under the optional file.
Open the optional file of the directory with the help of the following command:
1. First, create a new file named “server.json” through a touch command. It drops all the incoming and outgoing connections.
You can open this file using any text editor. In this example, we use the vi editor to open the file.
![]()
Once you are done, paste all the following lines:
"description": "An awall policy that drops all incoming and outgoing traffic",
"variable": { "internet_if": "eth0" },
"zone": {
"internet": { "iface": "$internet_if" }
},
"policy": [
{ "in": "internet", "action": "drop" },
{ "action": "reject" }
]
}
After pasting all the previous lines, press “Esc”. Write “:wq” and hit “Enter” to exit the file.
2. We create an “ssh.json” file that accesses the SSH connections on port 22 with a maximum login limit. This file avoids the attackers and thwarts the brute-force attacks from Alpine servers.
vi ssh.json

Paste the following details in this file:
"description": "Allow incoming SSH access (TCP/22)",
"filter": [
{
"in": "internet",
"out": "_fw",
"service": "ssh",
"action": "accept",
"src": "0.0.0.0/0",
"conn-limit": { "count": 3, "interval": 60 }
}
]
}
3. Create a “ping.json” file to define the firewall policy which allows the ICMP ping requests.
vi ping.json
![]()
Paste the following lines in this file:
"description": "Allow ping-pong",
"filter": [
{
"in": "internet",
"service": "ping",
"action": "accept",
"flow-limit": { "count": 10, "interval": 6 }
}
]
}
4. Create a “webserver.json” file to define the rules for opening the HTTPS and HTTP ports.
vi webserver.json
![]()
Paste the following lines in this file:
"description": "Allow incoming Apache (TCP 80 & 443) ports",
"filter": [
{
"in": "internet",
"out": "_fw",
"service": [ "http", "https"],
"action": "accept"
}
]
}
5. Lastly, we create an “outgoing.jsopn” file that allows the outgoing connections to some of the most commonly used protocols such as ICMP, NTP, SSH, DNS, HTTPS, and HTTP ping.
vi outgoing.json
![]()
Paste all the following details in this file:
"description": "Allow outgoing connections for http/https, dns, ssh, ntp, ssh and ping",
"filter": [
{
"in": "_fw",
"out": "internet",
"service": [ "http", "https", "dns", "ssh", "ntp", "ping" ],
"action": "accept"
}
]
}
You can see that all the previously-created files are present in the /etc/awall/optional directory.

Using the following command, you can list all the firewall policies:
Now, you can enable or disable the firewall on Alpine Linux.
How to Enable/Disable the Firewall on Alpine Linux
Once you installed and configured awall, you can enable and disable the firewall in Alpine Linux.
Enable the Firewall on Alpine Linux
By default, all the policies of the firewall are disabled. To enable it, their policies need to be enabled first.
You can enable all the created policies using the following command:
Now, we enable all the created policies:
awall enable server
awall enable webserver
awall enable ping
awall enable outgoing

Using the following command, we can see that all the policies are enabled:

Finally, you can enable the awall firewall by running the following command:

Thus, the firewall is now enabled on your system.
Disable the Firewall on Alpine Linux
When you don’t want to use it, you can disable the awall firewall in Alpine Linux by disabling all its policies.
Using the following command, you can easily disable the firewall policy:
To disable the firewall, we disable all the previous policies:
awall disable server
awall disable webserver
awall disable ping
awall disable outgoing

Using the following command, you can see that all its policies are disabled:
If you don’t want to use the firewall in Alpine Linux, you can stop its service for both IPv6 and IPv4 protocols through the following command:

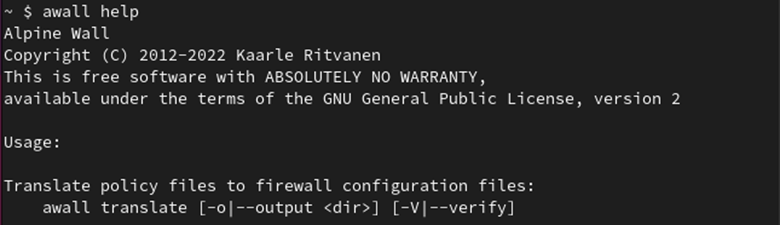
Apart from this, you can get more additional information about awall with the help of the following command:
Bonus Tip: You can also uninstall the awall firewall on Alpine Linux through the following command:

Conclusion
You can further enhance and strengthen the security of your system by enabling the firewall. This guide demonstrates how to enable and disable the firewall on Alpine Linux. The awall iptables firewall within Alpine is available for IPv6 and IPv4 protocols and is not pre-installed.
Awall is already included in the repositories of Alpine Linux, so you can easily install it. Once installed, you can enable the firewall by creating and enabling the policies. Similarly, you can also disable the firewall by re-disabling all the created policies.