This article explores the step-by-step process to enable BitLocker protection via PowerShell.
What is a BitLocker?
To grasp the importance of enabling BitLocker, it is essential to understand its role in securing data. Drives are encrypted by BitLocker using the “Advanced Encryption Standard (AES)”, preventing unwanted access to the theft of important data.
How to Enable BitLocker in PowerShell?
Below are the steps to enable BitLocker in PowerShell.
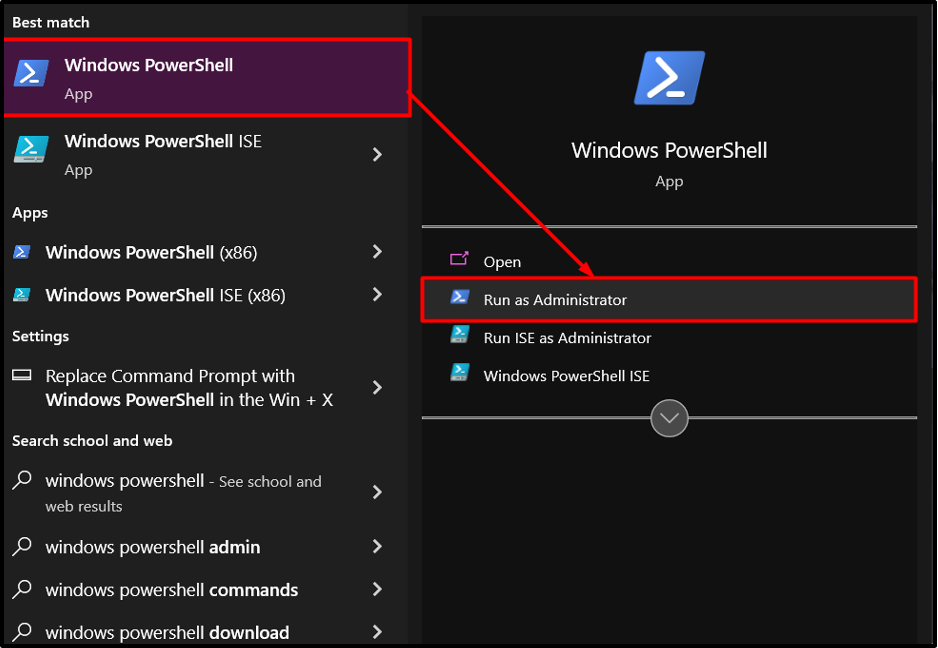
Step 1: Launching PowerShell
Begin by launching PowerShell as an administrator. In the start menu, open the “Windows PowerShell” as an administrator from the context menu. This ensures elevated privileges required for performing BitLocker operations:
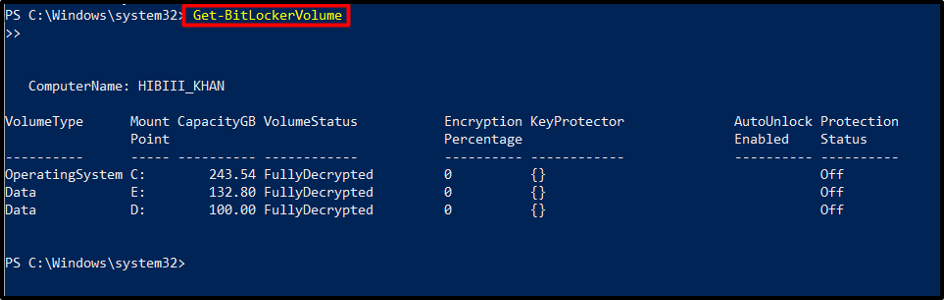
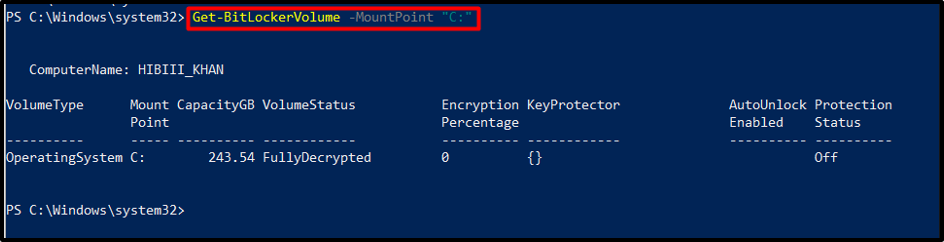
Step 2: Verifying Drive Eligibility
Once PowerShell is opened, verify the eligibility of the drive for BitLocker protection using the “Get-BitLockerVolume” cmdlet. This command provides details about the drive’s status, including encryption policies, and protection methods.
Step 3: Specifying BitLocker Protection Methods
Different BitLocker protection methods are available to ensure data integrity. PowerShell allows users to configure these methods during the encryption process. Some of the encryption algorithms are “XTS-AES 256-bit” or “XTS-AES 128-bit”.
Step 4: Enabling BitLocker on a Drive
To enable BitLocker protection on a specific drive, utilize the “Enable-BitLocker” cmdlet followed by the drive letter or mount point. This command starts the encryption process for the designated drive:
Enable-BitLocker -MountPoint "C:" -EncryptionMethod Aes256 -Pin $SecureString -TPMandPinProtector

Note: The TPM and a PIN for key protection are used in this example to enable BitLocker for a specific drive.
The first command creates a secure string containing a PIN using the “ConvertTo-SecureString” cmdlet and stores it in the “$SecureString” variable.
For the BitLocker volume with the drive “C:”, BitLocker encryption is enabled with the second command. The $SecureString variable’s PIN and an encryption technique are both specified by the cmdlet.
The command additionally specifies that the TPM and PIN are used in conjunction to safeguard keys on this volume. In addition, the command instructs the disk to only encrypt the utilized space data, not the full volume. In the future, the system will encrypt the data before writing it to the volume.
Step 5: Controlling Recovery Options
Enabling BitLocker initiates the creation of a recovery key to access the encrypted drive, ensuring data recovery in case of forgotten passwords or hardware failures. PowerShell immensely simplifies managing these recovery options by employing cmdlet such as “RecoveryKeyProtector”:

Using the pipe operator, this operation retrieves all of the BitLocker volumes for the present machine and sends them to the Enable-BitLocker cmdlet. For the volume or volumes, this cmdlet defines an encryption scheme. This cmdlet indicates that these volumes employ a recovery key as a key protector and specifies a path to a folder where the randomly generated recovery key will be kept.
Once the encryption process reaches 100% completion, the drive is fully protected by BitLocker.
Step 6: Monitoring the Encryption Progress
During the encryption process, it is important to monitor the progress. Utilize the “Get-BitLockerVolume” cmdlet with the specified drive letter to retrieve detailed status updates, including percentage completion, encryption mode, and encryption progress:
Executing this command will display detailed information about the BitLocker-protected volume, including the encryption percentage and status.
Output
Suspending or Resuming Encryption
At times, it may be necessary to suspend or resume the encryption process. To pause the BitLocker encryption, execute the following cmdlet:

To resume the process, use the below-stated cmdlet:

Finalizing BitLocker Configuration
After enabling BitLocker protection successfully, it is important to save or print the recovery key for future reference. PowerShell provides commands, such as the “Backup-BitLockerKeyProtector” cmdlet, to ensure the safekeeping of recovery keys:

Conclusion
Enabling BitLocker protection through PowerShell offers developers a powerful and efficient way to secure their data. Users can enable BitLocker via PowerShell by verifying drive eligibility, specifying protection methods, and enabling BitLocker on the drive.