“Elasticsearch is an incredibly versatile and powerful search and analytics engine. It can quickly ingest, organize, sort, aggregate, and manage large amounts of text data.
Despite all that, one of the most outstanding features in Elasticsearch and its entire ecosystem is the ironclad security features. Elasticsearch includes features such as the signing of HTTP requests and allows only authenticated users to perform operations on the cluster.
Another security feature in Elasticsearch is the use of users and roles. Elasticsearch allows you to assign specific roles to users in the cluster. These are then used to determine what actions the username can perform on the cluster.
Elasticsearch will assign a default role to all users created in the cluster. The default role allows the users to access the auth endpoint, which is responsible for changing passwords, retrieving user information, etc.”
NOTE: The default role is also assigned to anonymous users.
The core of this tutorial is to give you the fundamentals of Elasticsearch roles. Using this tutorial, you will discover how to fetch the roles in the Elasticsearch native realm and view the roles assigned to a specific username.
Let’s dive in.
Elasticsearch Get Roles API
We use the Get Roles API to retrieve information about roles in the Elasticsearch cluster. The request syntax is as shown:
The query above should return all the roles in the system.
To retrieve information about a specific role, you can use the syntax as shown:
NOTE: This API requires the user to have manage_security privilege on the cluster.
If the request is successful, the query should return an array of roles.
Example 1 – Retrieve All Roles in the Cluster
The example request below will retrieve all the roles in the Elasticsearch cluster:
An example output is shown below:
"apm_user": {
"cluster": [],
"indices": [
{
"names": [
"apm-*"
],
"privileges": [
"read",
"view_index_metadata"
],
"allow_restricted_indices": false
},
{
"names": [
"logs-apm.*"
],
"privileges": [
"read",
"view_index_metadata"
],
"allow_restricted_indices": false
},
{
"names": [
"logs-apm-*"
],
"privileges": [
"read",
"view_index_metadata"
],
"allow_restricted_indices": false
},
{
"names": [
"metrics-apm.*"
],
"privileges": [
"read",
"view_index_metadata"
],
"allow_restricted_indices": false
},
{
"names": [
"metrics-apm-*"
],
"privileges": [
"read",
"view_index_metadata"
],
"allow_restricted_indices": false
},
{
"names": [
"traces-apm.*"
],
"privileges": [
"read",
"view_index_metadata"
],
"allow_restricted_indices": false
},
NOTE: The output above has been truncated for the scope of this tutorial.
Example 2 – Get Information About a Specific Role
The example below returns information about the kibana_admin role.
The resulting role information is as shown:
"kibana_admin": {
"cluster": [],
"indices": [],
"applications": [
{
"application": "kibana-.kibana",
"privileges": [
"all"
],
"resources": [
"*"
]
}
],
"run_as": [],
"metadata": {
"_reserved": true
},
"transient_metadata": {
"enabled": true
}
}
}
Retrieve Role Information in YAML
By default, the get roles API will return the result in JSON format. However, you can choose a different format using the format parameter.
The syntax is as shown:
For example, to retrieve the information about the kibana_admin role in YAML format, we can run:
Resulting output:
kibana_admin:
cluster: []
indices: []
applications:
- application: "kibana-.kibana"
privileges:
- "all"
resources:
- "*"
run_as: []
metadata:
_reserved: true
transient_metadata:
enabled: true
View Roles for a Specific User
If you wish to view information about a specific username (including their roles), you can use the request as shown:
For example, suppose we have a username “linuxhint” we can retrieve that user information as shown:
The request above should return information about the user in YAML format as shown:
linuxhint:
username: "linuxhint"
roles:
- "viewer"
- "watcher_user"
full_name: "linuxhint.com"
email: "[email protected]"
metadata: {}
enabled: true
We can see that the user has the viewer and watcher_user roles.
View Roles in Kibana
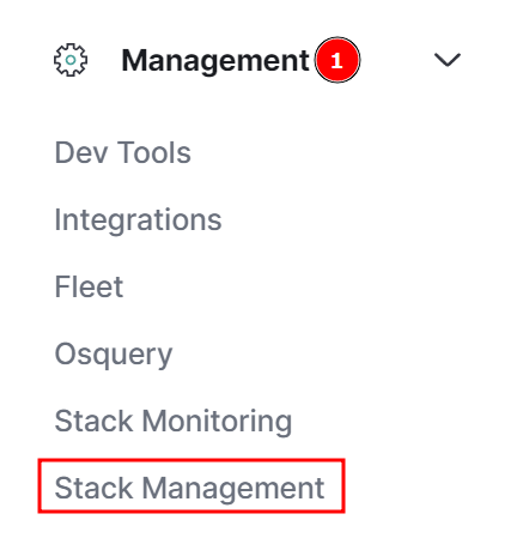
If you do not want to use the cat roles API, you can view the Elasticsearch roles in Kibana by navigating to Management -> Stack Management.
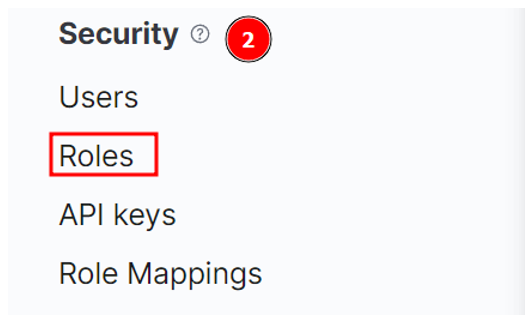
Next, navigate to Security -> Roles
You can then view and manage the roles.
Conclusion
In this article, you learned how to use the Elasticsearch Roles API to view information about specific roles in the cluster. You also discovered how to view the roles of a given username using the user API.
Thanks for reading!


