The outcomes of this article are:
- Differentiate Between “git reset”, and “git revert”, “git checkout” Commands?
- How to Undo Commits Using “git revert” Command?
- How to Switch Branch by Utilizing “git checkout” Command?
- How to Untrack Changes by Utilizing “git reset” Command?
Differentiate Between “git reset”, “git revert” and “git checkout” Commands?
“git revert”, “git checkout”, and “git reset” commands are ways to make changes to source code and then undo them if the user doesn’t like how they turned out. The difference between these commands lies in their functionality and uses, such as:
- “git revert” command is used to undo changes by creating a new repository commit from a previous commit and adding new history to the repository.
- “git checkout” command is used for switching from one branch to another and restore working tree files from the staging area.
- “git reset” command untrack changes from the staging index. It removes files from the staging area so they can be committed again later on if needed.
How to Undo Commits Using “git revert” Command?
In order to undo commits, first, go to the desired Git repository and create a file. Then, track the file and commit changes. After that, add some content to the new file, stage, and commit new changes. Lastly, execute the “git revert” command and verify the revert changes.
Step 1: Move to Git Directory
Execute the “cd” command along with the particular local directory path and navigate to it:
Step 2: Create New File
Generate a new file in the current repository with the help of the below-given command:
Step 3: Track New File
Then, utilize the “git add” command to add a new file to the staging area:
Step 4: Commit Changes
Next, execute the following command to commit the file from the staging area:
Step 5: Update New File
After that, add some content to the new file and update it with the help of the “echo” command:
Step 6: Add New Changes to Staging Area
Then, run the “git add .” command to stage all added changes:
Step 7: Commit New Changes
Commit the staged changes by executing the below-provided command along with the message:
Step 8: Check Git Log
To view the commit history, check the Git log using the below-provided command:
According to the below output, there are two commits, and the HEAD is pointing to the “File Updated” commit:
Now, suppose that the last commit was done by mistake, and we need to undo changes. In this situation, use the revert operation as follows.
Step 9: Revert Changes
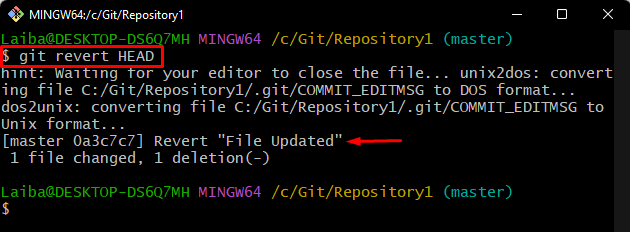
Run the “git revert” command along with the HEAD to undo changes of that commit:
In the below screenshot, you can see that the revert operation has been performed successfully:
Step 10: Verify Revert Changes
Lastly, check the Git reference log history to view the new changes in the commit history:
It can be observed that the “File Updated” commit is still in the project history even after the revert operation. So, instead of removing it, this particular command added a new commit to revert its changes:
How to Switch Branch by Utilizing “git checkout” Command?
To checkout from one local branch to another desired branch, first, check all the available branches in the repository. Then, run the “git checkout” command along with the desired branch name where developers need to switch.
Step 1: Check List of Branches
View the list of branches in the current repository with the help of the “git branch” command:
In the below output, it can be seen that there are two branches present in the repository, and the “master” is the current working branch:
Step 2: Checkout to Another Branch
Now, run the “git checkout” command along with the desired branch name and switch to it:
Step 3: Verify Current Branch
To ensure whether the checkout operation has been performed successfully or not, view the list of branches:
It can be seen that we have successfully checkout from the “master” branch to the “dev” branch. Now, “dev” is the current working branch:
How to Untrack Changes by Utilizing “git reset” Command?
In order to unstage changes, first, check the Git reference log history of the current repository. Then, execute the “git reset” command to move the branch pointer.
Step 1: Check Git Log
View the commit history and check where the HEAD is pointing by utilizing the “git log” command:
It can be observed that the HEAD is pointing to the “File Updated” commit:
Step 2: Reset Changes
To remove the commit from the Git local working directory, execute the “git reset” command along with the “–hard” option, and specify the desired HEAD position where it is required to move the pointer:
The given output signifies that the reset operation has been performed successfully:
Step 3: Verify Reset Changes
Lastly, view the new changes in the commit history by checking the Git log through the below-provided command:
As you can see that the “File Updated” commit has been removed from the commit history and HEAD is now pointing to the “Demo file added” commit:
We have explained the difference between “git revert”, “git checkout” and “git reset” commands.
Conclusion
“git revert” command is used to undo changes by creating a new repository commit from a previous commit and adding new history to the repository. “git checkout” command is used for switching branches in the repository and allows developers to work on different branches without having to make changes directly in the repository. On the other hand, the “git reset” command is used to unstaged changes from the tracking area. This article differentiated between the “git reset”, “git revert” and “git checkout” commands and how they work.


