Pre-requisites:
You have to complete the following tasks before starting the database seeding task.
- Create a new Laravel project named seederProject. Here, the composer has been used to create the Laravel project. If the composer is not installed before then, you must install it before executing the following command.
$ composer create-project laravel/laravel seederProject
- Go to the project folder.
$ cd seederProject
- All examples of this tutorial have been tested in Laravel version 9+. Check the installed version of Laravel.
$ php artisan --version
Setup Database:
You have to create a database in MySQL to implement the database seeding task. Complete the following tasks to create a database and set up the database for the Laravel project.
- Run the following SQL command to create a database named db_seeder from the MySQL prompt.
mysql> CREATE DATABASE db_seeder;
- Open the .env file of the Laravel project and initialize the values for the following information based on the database.
DB_CONNECTION=mysql
DB_HOST=localhost
DB_PORT=3306
DB_DATABASE=db_seeder
DB_USERNAME='username'
DB_PASSWORD='password'
Create Model and Migration file for a table:
Go to the Laravel project folder and run the following command to create the model and migration file for the Customers table.
The following output will appear if the model and migration file have been created successfully. The model file named Customers.php and the migration file named 2022_03_09_141143_create_customers_table.php has been created here. The migration file will require to modify for adding the fields of the Customers table based on the requirements of the project, and it has been done in the next part of the tutorial.
Modify the Migration file:
Open the migration file from the location, database/migration, and modify the file with the following content, according to the content of the migration file, 7 fields. These are id, name. address, email, contact_no. created_at, and updated_at fields.
use Illuminate\Database\Migrations\Migration;
use Illuminate\Database\Schema\Blueprint;
use Illuminate\Support\Facades\Schema;
return new class extends Migration
{
/**
* Run the migrations.
*
* @return void
*/
public function up()
{
Schema::create('customers', function (Blueprint $table) {
$table->id();
$table->string("name", 30);
$table->text("address");
$table->string("email", 50);
$table->string("contact_no", 30);
$table->timestamps();
});
}
/**
* Reverse the migrations.
*
* @return void
*/
public function down()
{
Schema::dropIfExists('customers');
}
};
Create the table based on the migration file:
Run the following migrate command to create the Customers table into the database. The fake data will be inserted in this table.
Create Factory to generate the fake data:
Run the following command to create the factory that will be used to insert fake data into the Customers table.
The following output will appear if the Factory is created successfully and the CustomersFactory.php file is created inside the database/factories folder of the project.
Open the CustomersFactory.php file and modify the file’s content with the following content. Three faker properties have been used to add a fake name, email, and address in the script. These are faker->name, faker->email, and faker->address. One faker method has been used to generate the fake phone number. The name of the method is numerify(). This method will insert a fake phone number starting with ‘880’, any numeric digits of 4 numbers followed by ‘-,’ and any numeric digits of 6 numbers followed by another ‘-.’
namespace Database\Factories;
use Illuminate\Database\Eloquent\Factories\Factory;
use App\Models\Customers;
/**
* @extends \Illuminate\Database\Eloquent\Factories\Factory<\App\Models\Customers>
*/
class CustomersFactory extends Factory
{
/**
* Define the model's default state.
*
* @return array<string, mixed>
*/
protected $model = Customers::class;
public function definition()
{
return [
'name' => $this->faker->name,
'address' => $this->faker->address,
'email' => $this->faker->email,
'contact_no' => $this->faker->numerify('880-####-######')
];
}
}
Create seeder class:
Run the following command to create the seeder class used to run the factory created before.
The following output will appear if the seeder class is created successfully and the CustomerSeeder.php class is created inside the database/seeders folder of the project.
Open the CustomersSeeder.php file and modify the file’s content with the following content. According to the script, 20 fake records will be inserted after executing the seed command.
namespace Database\Seeders;
use Illuminate\Database\Console\Seeds\WithoutModelEvents;
use Illuminate\Database\Seeder;
use App\Models\Customers;
class CustomersSeeder extends Seeder
{
/**
* Run the database seeds.
*
* @return void
*/
public function run()
{
Customers::factory()->count(20)->create();
}
}
Seed data into the table:
Run the following command to execute the seeder class that will insert 20 fake records to the Customers table.
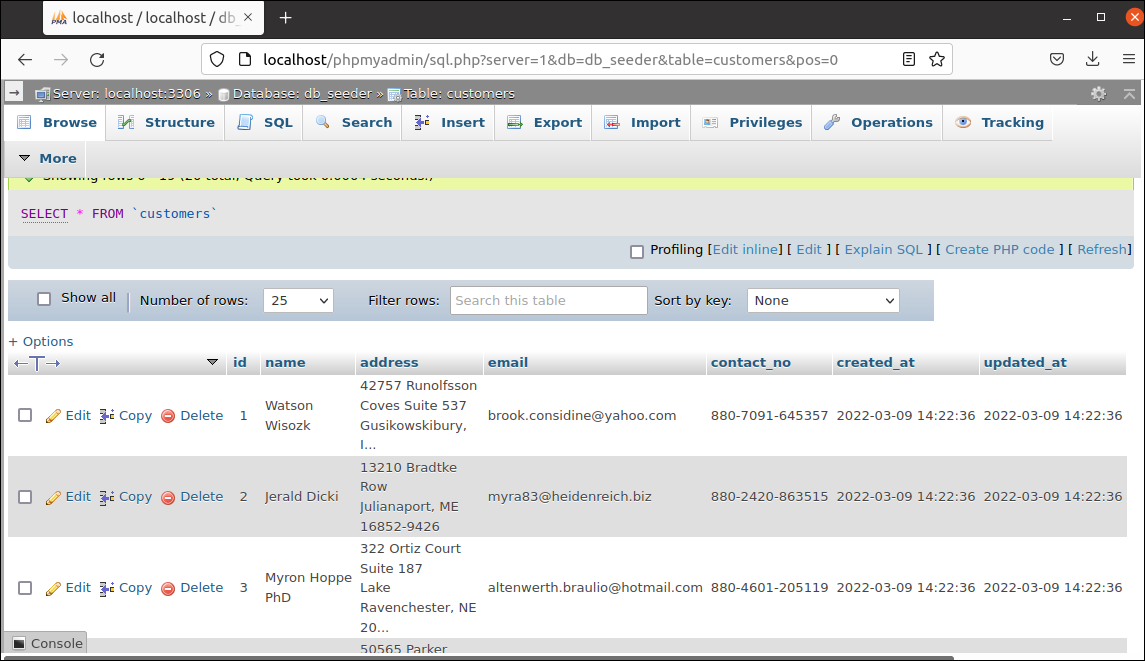
The following output will appear if the database seeding is done successfully. 20 fake records will be inserted into the Customers table after executing the command.
Next, you can open the Customers table to check the database seeding has been done properly and 20 fake records have been added. Open the Customers table from the URL, http://localhost/phpmyadmin, and check the content of the table. You will get the following similar output after opening the table.
Conclusion:
The database seeding task in the Laravel project has been shown in this tutorial by creating a simple table. Adding a large amount of data manually for testing purposes is time-consuming. The database seeding feature of Laravel makes this task easier. After reading this tutorial, I hope this tutorial will help Laravel users understand the purpose of using database seeding properly.


