Most of the time, timers are used as a replacement for CRON. It provides us with built-in support for calendar time events. The advantage of timers over cronjobs is that they provide the finer-grained controls of events. These are used when a task requires scheduling on a Linux operating system. For example, if we want to start a process when our machine boots, we use the timers for that purpose. Previously, cron was the tool to do these types of jobs. But nowadays, timers are being used for these purposes.
Timers are almost like cron in a way that they both provide an approach and mechanism for scheduling tasks in Linux OS. Cron has its drawbacks which is why timers are replacing it. For example, if we want to schedule our backup at 5 in the evening and somehow, our system shuts down between 4:50 and 5:10, cron skips the backup in that case which kills the purpose of scheduling.
To work with timers, we need the following things as prerequisites:
- Root privileges
- Terminal
The Systemd timers’ functions need two configuration files which are:
Timer Unit: The timer unit keeps track of when to use the service files. They use an extension of “.timer”.
Service Unit: These are unit configuration files. They manage and define the system processes. They have “.service” extension as previously discussed.
Now, we discuss how we can schedule an automated server backup. Another advantage of the systemd service is that it does not allow your tasks to have multiple instances. If somehow, we start a task again while it is already started, it skips the launch stem and holds it until the current running task has completed its job. After we configure our systemd service and made it to schedule, we create a file with the same name as our service.
The only difference is that it has an extension of “.timer” and not of service. For example, we have a service named “xyz”. In that case, we have “xyz.service” as our service name and “xyz.timer” as our timer’s name. Another thing to keep in mind is that both of these files must be in the same directory.
Steps to Create a Systemd Timer
Create a Test Script
This is a basic Bash script as an example:
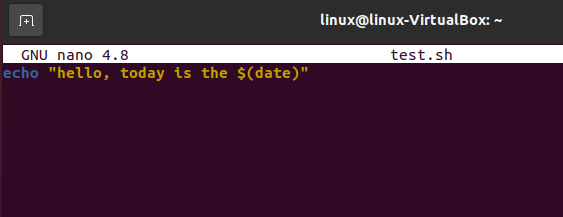
The previous script prints the date.
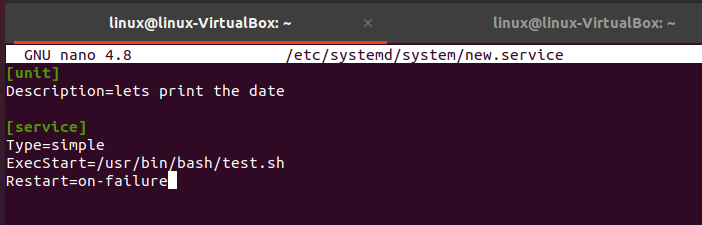
Create a Service File
Now, we create a service file or unit to run the Bash script.
This is an example script to create the service file. It has two options: one is “Unit” and the other is “Service”. In this step, we first tell the system of the name of the unit and what this unit is doing. Then, we define a service with the type of “simple”. Lastly, we define that the service starts in case of failure.
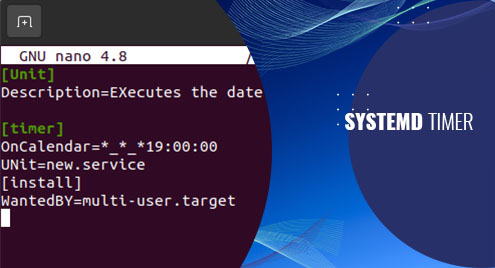
Create a Timer File
After creating the service file, we now create a timer file. We run the following command to create a timer file:
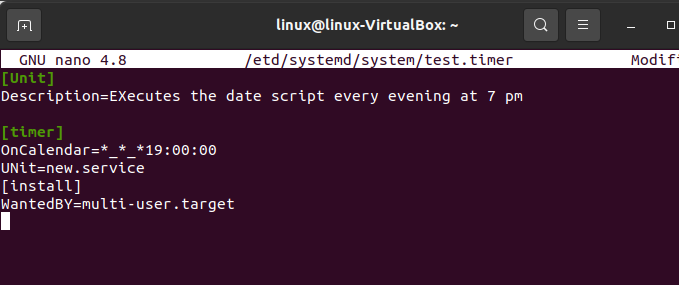
It has three options: “Unit”, “Timer”, and “Install”. Again, after running the command, we define what our unit is doing. It has a “Timer” option. With the help of which, we tell the system when our script is running. The last option, “Install”, indicates when our service starts according to the run levels. This option is enabled only when a service is enabled with the help of systemctl.
Now, let’s discuss the options in more depth to get a better grip on timers.
Unit: This specifies the device that we want to turn on when the timer runs out. The passed parameter is the name of a unit whose extension must not be “.timer”. If we are unable to do so or do not want to pass the unit name, the default value is the service that has the same name as the name of the “.timer” in that case. As already discussed, the best approach is that we should keep the name of the service and the name of the timer the same.
Timer: The timer option carries all the information about the timer that is defined. In the timer option, we find all the settings that we need to trigger the timer. The timer sections have many options such as:
In the timer section, we also tell the system when to run the process and when to end that process according to the server timezone.
The timer section also has a very useful and important option which is:
This option defines how frequently a task is performed. For example, if we want to schedule a task daily, we use this option like “OnCalendar=daily”. This performs the task daily.
If you want to be more specific, you can pass a specific DateTime as well according to your requirements. Another thing to keep in mind while working with timers is that the daily triggers are always at midnight which is a peak time in computer systems. So, to avoid the problems during that, we recommend you to use the “RandomizeDelaySec=”. It delays the schedule randomly with a difference of a few seconds. It requires a value that represents the seconds that the timer can be delayed.
The problem is that daily is always triggered at 12AM. Weekly is always triggered on Monday midnights. And Yearly is always triggered on the first of January. All of these are peak times and there is a network outage during these everywhere.
Enable and Start the Timer
This is the final step of our task. We perform this step systematically. To perform this activity, we must do a “daemon-reload”. To see if a new file is created or an old file is updated, the entire system is reloaded.
Troubleshooting
Sometimes, we are unable to catch all the issues beforehand. In the systemd timer, we can make sure to catch them by verifying the “systemd” timer units before enabling them. To do so, we use the “systemd-analyze-verify” command. This command helps us to find out a potential problem and fix it accordingly.
There are other commands as well that help us with troubleshooting and diagnosing our timers. For example, there is a command that helps us verify whether our service is executed successfully or not. The command is as follows:
This command shows us when the service last started and the result of our Bash command as shown in the following snippet:

Conclusion
We studied the system timer. After getting a detailed review of what a system timer is and its working, we implemented an example to explain the idea to you more briefly in which we explained every step in multiple parts.