In Ubuntu, the crontab directory records the cron jobs. Crontab is a configuration document that includes details about the timing and commands/scripts that should be run. This article will be explaining the way to schedule the cron jobs within Ubuntu 20.04 using some simple examples. So, let’s have a fresh start.
Install Cron
Make sure to update your system before any task. The apt command has been preferred to update the system followed by the sudo password. It has been shown in the attached photo.
![]()
Now, the same apt package will be used to install the cron utility in our system. The command uses the keyword “cron” after the word “install” as shown below and starts installing it.
![]()
After the successful installation, you need to start the cron utility by utilizing the system command i.e., systemctl keyword with “start” and mentioning the name of the utility i.e. cron. After starting it, enable the cron service and you will get the below-shown output.

After that, you can check out the status of a cron service by utilizing the systemctl command ith keyword “status”. The command output is showing that the cron service is currently active.

As we mentioned earlier, the crontab file has been utilized to check the already scheduled cron jobs for a specific system. Thus, we will use the crontab command with the “-l” flag in it to list all the scheduled cron jobs on our system. Currently, there are no cron jobs as shown below.
![]()
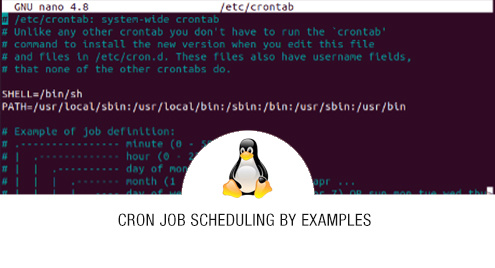
As we already know, the crontab file is the configuration file for scheduling cron jobs. So, we will be using it to schedule some jobs. We will take a look at the crontab configuration file and the syntax it shows us for scheduling. The configuration crontab file is located in the “etc” folder and can be launched within the GNU Nano editor using the below query.
![]()
We will not get this output screen of the crontab file after that. The 1st integer value shows minute, 2nd shows hour, 3rd shows a day of the month, 4th shows the month name, and the 5th shows the week.

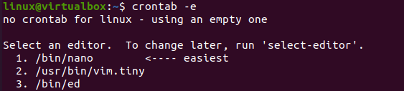
Another method can also be utilized to open the crontab configuration file. It’s a simple 1-word command using the “-e” flag as shown below. It will tell you that there is no scheduled cron job right now and ask you to enter 1,2,3 according to the need. Enter 1 to open it in the Nano editor.
Let’s open the crontab configuration file once again with the nano editor command.
![]()
You can also utilize the shown below crontab command to open the file.
![]()
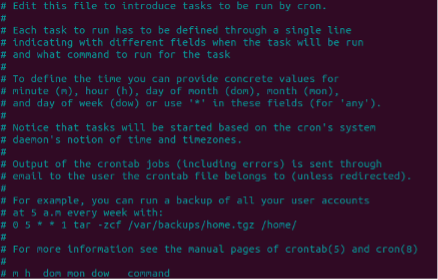
Another time, when we have opened the crontab configuration file within the nano editor, the output is shown below. It will be shown from right now at every opening. You can delete all the comments and start writing the cron jobs.
Examples For Cron Jobs
As the cron jobs help us secure our system and make backups, so we will take a look at a few examples. In these examples, we will be using some bash script stored in the file “sleep.sh” to be executed at a specific time in our system. If you want your script to run every 12 hours, try using the below-shown command followed by the script file path. The 0 represents no minutes.
![]()
Let’s suppose you want your script to work every 5 minutes, you have to use “/” with the value “5” at the first place of the instruction while all the values remain “*”.
![]()
If you want to specify the exact time on which the script must be executed, then you have to avoid the use of “*/” with value. So, we have used the value 2 for 2 AM to schedule this job.
![]()
If you want to schedule the execution of the script file at 2 PM, then you have to use the 24-hour format. As you can see, we have replaced 2 with 14 here.
![]()
Let’s say a user wants to execute the file “sleep.sh” every day at 12:30 AM, he/she needs to use the below-shown format of a cron command.
![]()
If a user wants to execute its script file every minute, he/she needs to replace all the numbers with “*” signs as shown in the photo below.
![]()
If a user wants to execute its script file at some specific time of a specific day, he/she must replace the 2nd and 5th “*” sign with the values i.e. 2 AM, and Saturday as shown.
![]()
To mention the specific “date” and “month”, you need to replace the 3rd and 4th “*” with the value. The command shows that the script will run on the 5th day of January, June, July at 1 AM.
![]()
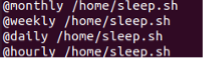
Instead of using numbers or “*”, simply replace the “@” sign with the values as shown.
Here is the command to list the scheduled cron jobs i.e., “-l” flag.
![]()
To delete all the scheduled cron jobs from the crontab, use the “-r” flag in the command. You will see that the list command will display that there are no scheduled jobs as below.
![]()
Conclusion
This article contains an explanation of cron utility to schedule the jobs in Ubuntu 20.04. There are a lot of other simple commands to be used in the crontab configuration file for scheduling but we have tried to cover the important ones. We hope this will be helpful.