Example 01
First, let’s have a simple example to elaborate and see how a user can create a menu in bash script within the Ubuntu 20.04 system. We have opened the terminal shell with the help of a “Ctrl+Alt+T” command shortcut on the Ubuntu 20.04 desktop screen. The terminal will be opened in a few seconds.
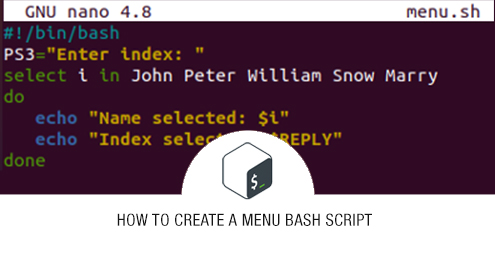
After the terminal is launched successfully, create a new bash file named “menu.sh” using the “touch” instruction for this purpose. We have been opening it in a GNU Nano editor using the “nano” command in the shell as per the output image beneath.
$ nano menu.sh
![]()
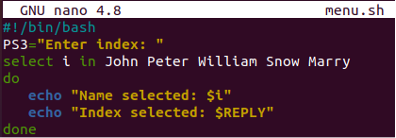
As the file is opened in the Nano editor, let’s make a bash code to create a menu. Firstly, add the bash support at the top of a file, i.e., “#!/bin/bash”. The built-in variable “PS3” has been used here to ask the user to input its choice.
The variable will save the user choice number and will utilize it within the select structure. Then, we use the “select” structure to get the value from an array of strings using the index number, i.e., choice selected by a user. If the choice matches, the do statement will display the value selected by a user and display the index number that the user has selected on the terminal. The “$i” variable iterator is used here to get the value, and the built-in “$REPLY” variable is used to get the index option.
Save your newly created bash code in the file using the “Ctrl+S” key and quit the file with the “Ctrl+X” shortcut. Now we have been returned to the terminal. Let’s run the newly made bash file to see the results.
For this, use the “bash” command along with the name of a file as below. The output shows 5 options at the terminal first. The user has to choose one of them. The first time, the user chose 3 and got “William” as a value, and the second time it got “John” upon entering the value 1 in the terminal shell as an input. Quit running via the “Ctrl+Z” shortcut.

Example 02
As you can see, the above example doesn’t cover the option of quitting the menu when it comes to choosing an option. So, within our next example, we will be covering the quit options as well. To update the code, open the bash file “menu.sh”. After opening it, you don’t need to change the bash support and “PS3” variable as they will continue to be used as the same.
On the other hand, you need to add extra lines of code. We will be creating a menu to let our users perform mathematical operations. For this purpose, we will utilize the case statements in the “select” structure. After the “PS3” variable, we have declared a list of strings with 5 different values in it. Each of the values from a list represents 1 mathematical operation.
You can see that the list also contains the option “quit” to quit the menu upon being selected by a user. The list will be used as a menu. The select structure is used here. This select structure uses the value, i.e., “PS3” value, to search the option from a list, i.e., “cal”.

After searching the option from a list, the case option will be matched with the index number listed options. Then, the particular option from the case statement will get executed, and the calculation will be performed. If the user enters 1, the “Sum” case will be executed. Within every case, two read statements have been used to perform calculations. After that, the echo statement will utilize both variables to perform the required operation on both variables and display. The sum case closes here, and other cases will be started.
If a user enters 2, the “Submit” case will be executed to calculate the subtraction of two integers entered by a user using the “-“ operator. The “Div” option will be executed when a user enters 3 as an option and divides both the integers using the “/” sign. The 4th option is called when the user adds 4 as an input, and the multiplication will be performed using the “*” operator.
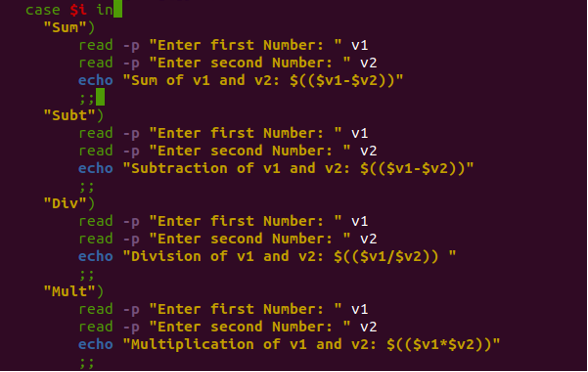
At last, the select statement will execute the “Quit” case when a user enters 5 as its input. Quit case will display the message that the menu has been existing and stop the execution of a code further with the help of a break keyword in it. If a user enters the wrong option number, i.e., other than 1 to 5, it will display the message that the user entered the invalid choice.

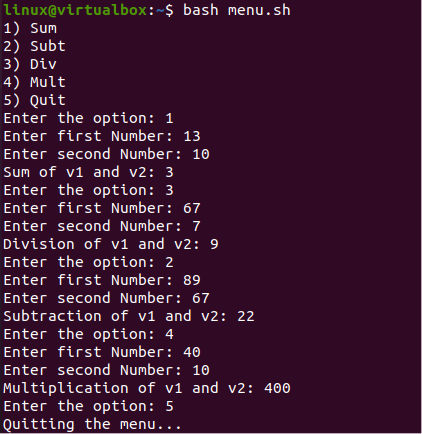
When you run the code, it will show 5 menu options. The user added 1 as its choice and got into the “Sum” case. Then, added two integers and got the sum of both calculated. So, all the other options have been performed. At last, the quit option has been called to exit the menu.
Conclusion
This article contains very simple and understandable illustrations to create a menu in the terminal with the help of a bash script. We have utilized the select structure, case statements, PS3 variable, and list to achieve the quality result.