This manual will explain the procedure for creating a Git branch. So, let’s begin!
How to Create a Git Branch?
Git allows users to create branches using multiple commands, such as “$ git branch” and “$ git checkout” commands. They also enable you to create branches using existing commit references or id and Git tags.
Let’s move ahead to create a new branch with the help of the discussed commands.
Method 1: Use git checkout Command to Create Branch
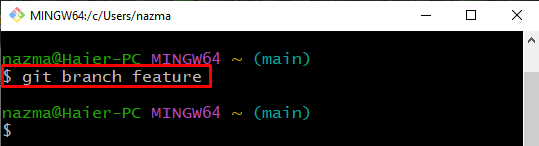
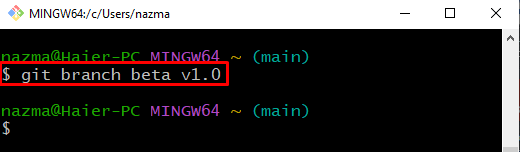
To create a new branch, execute the “git branch” command with the branch name:
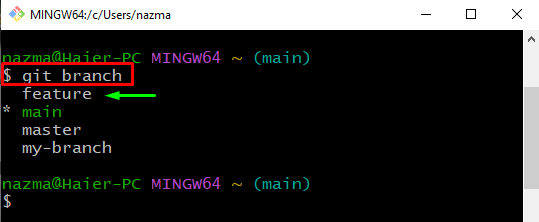
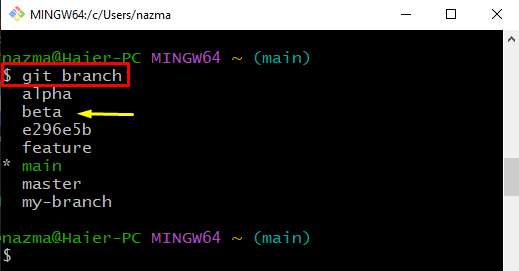
Next, run the below-provided command to view the list of branches:
It can be seen that we have successfully created the “feature” branch:
Now, let’s check out the second method!
Method 2: Create Branch Using git checkout Command
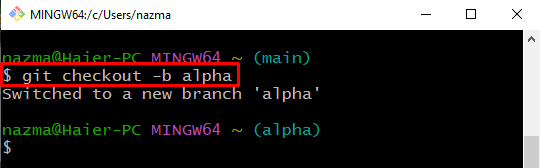
The “git checkout” command is another easiest way to create and switch a new branch simultaneously:
Here, adding the “-b” option will assist in creating a branch and switching to it immediately:
Method 3: Create Branch Using git tag Command
In order to create a new branch using the git tag, first, display the list of all existing tags. Then, choose one of them and execute the “$ git branch <branch-name> <git-tag>” command.
Let’s implement the above-mentioned scenario!
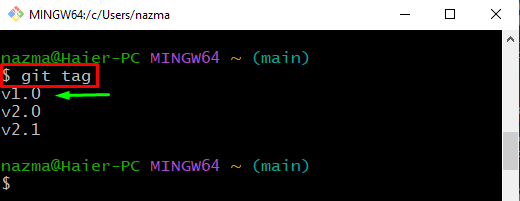
Execute the “git tag” command to view the list of existing Git tags:
Here you can see the list of tags is displayed:
Now, run the below-provided command to create a new branch using the selected Git tag:
Next, view the list of Git branches to ensure the presence newly created branch:
Below output shows that, the specified branch is created successfully:
How to Create Branch Using Commit Reference?
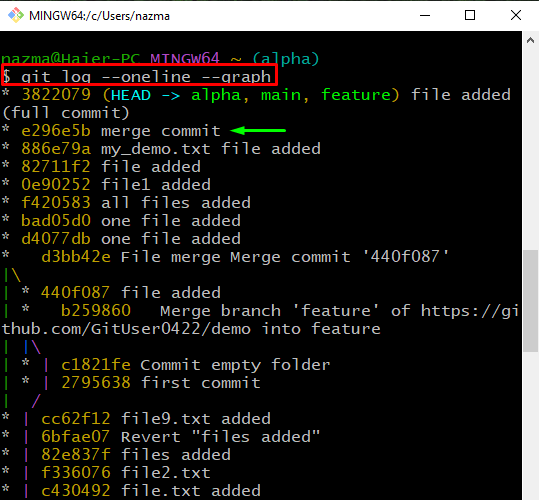
Another easy way to create a Git branch is by utilizing the commit reference. To do so, first, we will view the log history of the Git repository:
Then, select the required commit reference from the output and copy it. For instance, we have selected the “e296e5b” commit reference:
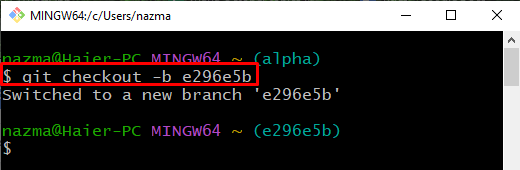
Now, execute the “git checkout” command to create a new branch with the selected commit reference:
It can be observed that we have successfully created the “e296e5b” successfully and switched to it:
That’s all! We have discussed the easiest ways of creating a Git branch.
Conclusion
You can create a new Git branch using the “$ git branch <branch-name>” command. Git also allows you to create a new branch using Git’s existing tags and commits reference or id. For this purpose, utilize the “$ git <branch-name> <git-tag>” command and the “$ git checkout” command with the “-b” option and “commit-ref”. This manual demonstrated the method of creating a Git branch.