How to Create an Ext4 File System with mkfs
Ext4 is the successor to ext3 in the Linux File system family. It is compatible with the majority of Linux distributions like RedHat, Ubuntu, Fedora, etc.
Ext4 has taken over as the default file system for many Linux distributions and is now the de facto standard for Linux kernels 2.6.28 and higher.
What Will We Cover?
In this article, we will see a basic overview of the Ext4 File system and how we can use it to create an Ext4 file system using mkfs?
Linux Ext4 File System
As opposed to the 32-bit ext3 file system, which merely added a few features to its predecessor ext2 file system and retains the same data structure as the ext2 file system, the ext4 file system has incorporated more significant improvements than ext3, for example:
- Better data structure and improved features.
- 64-bit file system.
- Supports file sizes of up to 16 TB.
- Concurrent allocation of multiple units.
- Quick fsck (file system check).
History of EXT Filesystem
Although the EXT filesystem was built for Linux, its origin goes back to the Minix OS and the Minix filesystem. Linus Torvalds used the Minix filesystem for his first-ever version of Linux. The EXT filesystem came to Linux in 1992 to compensate for some size limitations associated with the Minix File system. However, the EXT file system was soon overtaken by its successor EXT2 file system.
The EXT2 filesystem was a big hit. For many years, it was utilized in Linux systems. The EXT2 filesystem features the same metadata structures as the EXT filesystem but EXT2 is more advanced as it leaves more disc space between the metadata structures for future usage. One issue with the EXT2 filesystem was that recovering from a crash may take many hours since the fsck (file system check) tool needed a long way to find and rectify any irregularities in the filesystem.
The EXT3 filesystem was designed to address the large amounts of time required by the fsck tool to properly restore a disc structure broken by an erroneous shutdown during a file-update activity. It was brought to the mainline Linux kernel 2.4.15. The journal, which records changes to the filesystem in advance, was the single improvement to the EXT filesystem. The remaining disc structure remains unchanged from that of EXT2.
The EXT4 filesystem was introduced in 2006 and was adopted into mainline Linux kernel 2.6.28 in 2008. The Ext4 filesystem works in a similar way as that of Ext3. However, it adds support for the large filesystems, enhanced fragmentation resistance, superior performance, as well as better timestamps.
Creating an Ext4 File System with mkfs
After installing a Linux operating system, you may need to add a new ext4 file system. For example, if you add a new hard drive to the system, you might wish to partition it with the ext4 file system. This means we can divide our hard disks into logical chunks called partitions.
Partitions in Linux are mounted at certain points in the directory tree, making them accessible as subdirectories.
Let’s move and see how we can create an EXT4 file system using the GNU Parted tool:
Step 1. First, let us list the partition available on our system:
Or you can also use:

Step 2. Use the following command to modify the target disk(/dev/sdb in our case):
You will see a message similar to the one below:
Using /dev/sdb
Welcome to GNU Parted! Type 'help' to view a list of commands.
(parted)
On this new prompt, we can use different GNU parted commands like help, mklabel, mkfs, mkpart, etc.
IMPORTANT NOTE: GNU Parted immediately applies its modifications. With fdisk, you can revert back changes with the ‘q‘ command. This is very helpful in case you make a mistake during a partition operation. However, there is no way out with GNU Parted. As a result, you should use extreme caution when using GNU Parted.
Step 3. We will now use the ‘print’ command here to display the file system information for our target disk ‘sdb’:
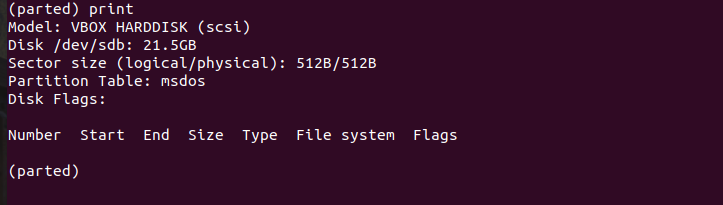
In this way, we can confirm we are working on the correct disk. You can use the ‘mklabel’ command to give a label to your disk.
Step 4. Now, we will issue the ‘mkpart’ command:
This will prompt us to different values:
Partition type? primary/logical? primary Enter primary here.
Partition name? []? Enter some name like LinuxHint.
File system type: Use ext4 here.
Start? Enter some value here like 100MB.
End? Enter some value here like 21GB.

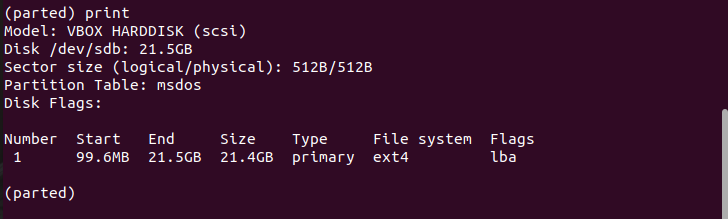
Here, we are using TB for the ‘terabyte’ unit. We can also use other units and formats like GB, GiB, kB, KiB, etc. Now, again run the ‘print’ command to see the details of the partition:
Step 5. Simply making partitions is not sufficient to make them functional. To utilize them, you need to first create a filesystem on the partition (this is a procedure known as “formatting” a partition). Now, exit the parted application.
We will format our partition with the mkfs utility. We can also use mke4fs for this purpose:
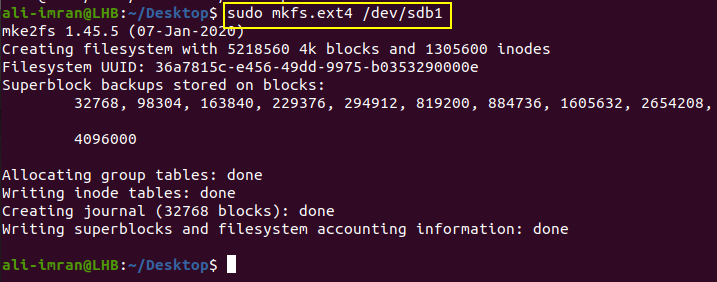
Here, /dev/sdb1 is the block device in our case.
In the above command, block_device is a partition that will hold the Ext4 file system to be created in the next steps.
Step 6. In this step, we will create a mount point for the file system to be mounted upon:
Now, mount the file system on the above mount point:

Verify the above steps with the ‘df’ command:

Step 7. Finally, modify the fstab file for persistent mounting of the new file system:
Enter the following content here in this file:
Conclusion
In this article, we have learned how we can create an EXT4 partition on Linux. It’s a good practice to plan how you’ll partition your hard drive before you install Linux on it. An imperfect initial partitioning design might become problematic when you’ll exhaust the space in one partition when another has plenty of available space.