Amazon Relational Database Service or RDS is a relational database that can be easily set up using AWS management console—AWS CLI and with RDS API. Beside these ways, we can also use the Terraform tool to create and manage an AWS RDS database.
Terraform can be used for deploying cloud infrastructure of many cloud service providers. It can be downloaded and installed on major operating systems such as Linux, macOS and Windows. It has its own syntactic language known as HCL (Hashicorp Configuration Language) for creating configuration files. We can specify the cloud service provider and other infrastructure details using the HCL syntax. Terraform first creates an execution plan that previews the changes planned for the infrastructure. It will only be deployed once you confirm this plan. There are three major Terraform commands that are prominently used: 1) terraform plan, 2) terraform apply, and 3) terraform destroy.
What Will We Cover?
This article presents you with the process of creating an AWS RDS snapshot using Terraform. We will first create an RDS database and then create its snapshot using Terraform.
What Will You Need?
- AWS account configured on your system.
- Access to the internet.
What Do We Expect From You?
Before we proceed further, make sure that you installed Terraform on your system (Ubuntu 20.04 in our case). We also assume that you already set up the AWS user credentials. These credentials are used in the Terraform provider block later when Terraform will be run.
See if Terraform is already installed in your system by running the following Terraform command:

As you can see, we installed the version 1.7 of Terraform. If you have not yet installed it, you can use the official binary package provided by Terraform. Or you can use the default package manager of distribution. More details about installation can be found on the Terraform website.
Creating AWS RDS Snapshot Using Terraform
Now that we already installed Terraform on our local machine, we can continue our task in working with AWS RDS.
The Terraform configuration for different components is stored in different files such as:
- variables.tf: Definition of various uses in the files.
- main.tf
As mentioned earlier, Terraform uses several configuration files to provision resources. Each of these files must reside in their respective working folder/directory. Let us create a directory for this purpose:
Step 1. Make a folder to contain your configuration files and change the directory to this folder.
Step 2. Let us create our first configuration file “variables.tf” that will contain the information about our AWS region, and the type of instance we want to use.
Now, put the following text inside it and save the file.
description = "The AWS region to work in."
default = "us-east-1"
}
Step 3. Make a “main.tf” file that will contain the definition for our infrastructure.
Now, put the following configuration inside it.
required_providers {
aws = {
source = "hashicorp/aws"
version = "~> 3.27"
}
}
required_version = ">= 0.14.9"
}
provider "aws" {
region = var.aws_region
shared_credentials_file = "/home/UserName/.aws/credentials"
profile = "profile1"
}
resource "aws_db_instance" "mydb" {
allocated_storage = 10
engine = "mysql"
engine_version = "8.0.28"
instance_class = "db.t2.micro"
name = "dbname"
password = "dbpassword"
username = "dbuser"
identifier = "linuxhint-terraform-db"
backup_retention_period = 0
parameter_group_name = "default.mysql8.0"
skip_final_snapshot = true
}
resource "aws_db_snapshot" "test" {
db_instance_identifier = aws_db_instance.mydb.id
db_snapshot_identifier = "testsnapshot"
}
In the previous file, replace the “UserName” with the value in your case. Let us see a bit about some of the parameters used above:
- shared_credentials_file: It is the path of the file containing the credentials of the AWS users.
- profile: It specifies the profile of the user to be used for working with the AWS.
- aws_db_instance: Resource for creating a new RDS instance.
- db_instance_identifier: It specifies the DB instance identifier from which the RDS snapshot will be generated.
- db_snapshot_identifier: Used as a snapshot’s identifier.
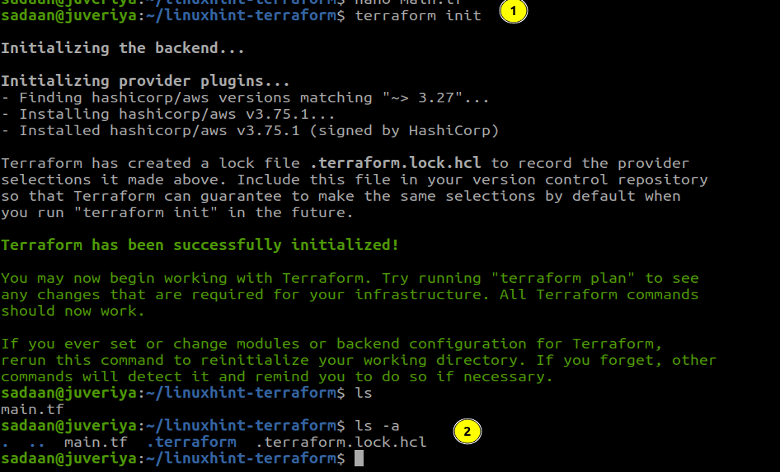
Initialize the Terraform Directory
To download and install the provider we defined in our configuration and other files, we need to initialize the directory containing this file.
Build the Infrastructure
To build the desired infrastructure, apply the changes using the following command:
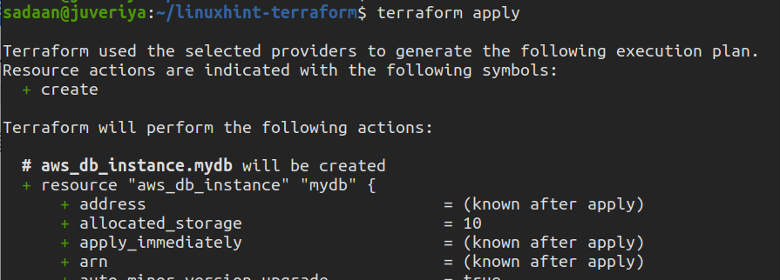
Enter ‘yes’ on the terminal when prompted.
Verify the Procedure
Now, let us check if the desired RDS instance bucket is created or not. Head to the RDS console and check for the available databases.
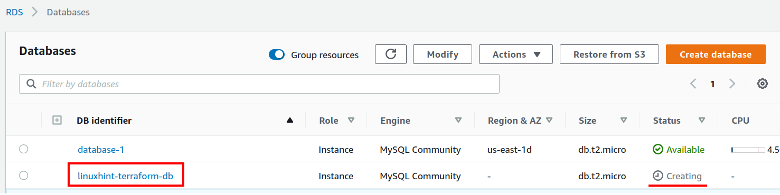
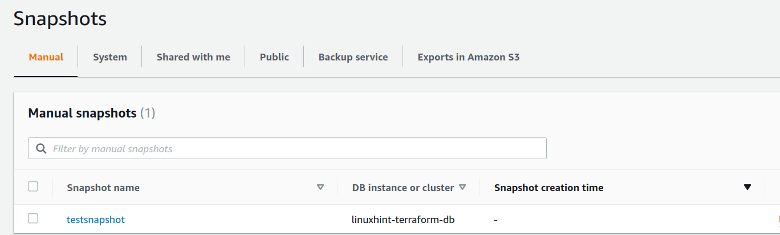
We can see that the “linuxhint-terraform-db” is created. Similarly, under the Snapshots sections, verify if the snapshot we specified in the configuration file is created or not.
Delete the Resources
When you have completed your task and do not need the AWS resources anymore, simply delete them by executing the following command:
Conclusion
In this guide, we learned and demonstrated about creating the S3 bucket on AWS using Terraform. You have probably noticed how simple it is to work with Terraform.