Example 01
We will be modifying a simple one-dimensional array in our very first illustration. Start the first example by creating a new file named “test.cc” in the shell by utilizing the touch query. This file is created in the Home folder of Ubuntu 20.04. The GNU Nano command comes in handy when a user tries to open it and edit it in the editor tool.
$ nano test.cc
As the file is opened in the editor, start adding some C code to modify arrays. Include some required headers at the start of a code file, i.e., input-output stream and standard C++ library. The standard namespace must be initialized in the code because without it, the code won’t work. We will be working within the main method to modify the array in C++. Within the main() function, we have initialized an array “A” of size 5, having five values in it. The “cout” clause is used here to display the original array. The “for” loop is declared and initialized to loop the array values and display them one after another with the help of a “cout” clause. The code is attached in the following image:
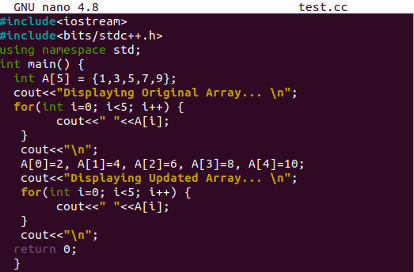
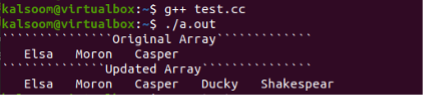
After displaying the original array values, we have assigned a new value to each index of array “A” with the help of its index number. Another “cout” clause is used here to tell the users that we have been displaying the modified array. After this, the “for” loop does its work and starts collecting array values one by one. It displays the values on the terminal with the assistance of a “cout” statement once again. The main() method ends here. After compilation, the code will be executed. The output displays the original array first and then the updated one:
$ ./a.out

Example 02
Let’s modify the string type array now. So, we have opened the same file and initialized a string array of size 5 with three values. A “for” loop is used here to display the initialized array on the terminal. After this, we have modified the array by assigning two new string values to its last two indexes. The array has been displayed once again after updating with the help of a “for” loop.
The code is attached in the following affixed image.

When we compiled the code and executed the file, it displayed the original array first and then, the updated array on the shell screen. The output is shown in the attached snapshot below:
$ ./a.out
Example 03
Until now, we have covered the examples of modifying one-dimensional arrays in C++. Currently, we will be illustrating the example of modifying the two-dimensional array in C++.
For this, we have opened the same file and added the headers that are required. After using the namespace for C++, we have initialized a two-dimensional array with 2 rows and 3 columns. We have also assigned it 3 column values. The clause “cout” shows that we will display the already declared two-dimensional array in the terminal. With the assistance of the “cout” clause within the “for” loop, the original array has been displayed. The first loop shows the rows, and the seconds show the columns for the array matrix “A”. We have assigned four new values to the array with the help of row and column numbers one by one.
The “cout” statement within the loops is working on displaying the updated 2D array in the terminal. While the “if” statement is used here to cut down the array into 2 dimensions with the help of “\n” here. The code is attached in the following image:

Lastly, compile the code to make it executable. When we had compiled and ran the code, it displayed the original 2D array and then, updated the 2D array on the terminal screen.
$ ./a.out

Conclusion
This guide has discussed several straightforward and easy-to-use methods to modify integer and string type arrays in C++. While modifying, we have used one-dimensional and two-dimensional arrays irrespective of their size. We believe that this article will assist you at its best while modifying one-dimensional and two-dimensional arrays in C++.